Table of Contents
Advertisement
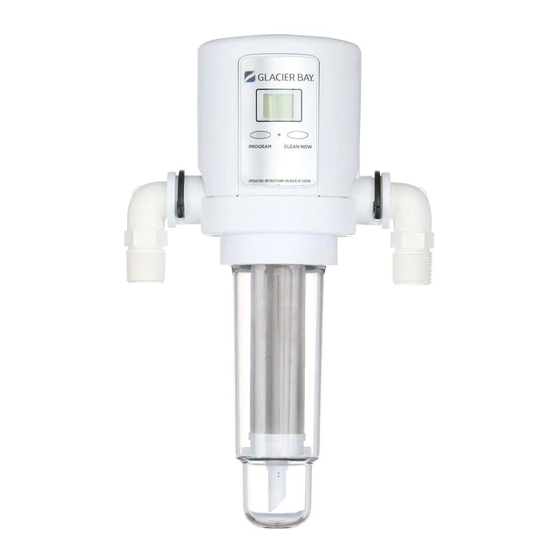
AUTOMATIC HOUSEHOLD WATER FILTRATION
Questions, problems, missing parts? Before returning to the store,
We appreciate the trust and confidence you have placed in Glacier Bay through the purchase of this filtration system.
We strive to continually create quality products designed to enhance your home. Visit us online to see our full line of
products available for your home improvement needs. Thank you for choosing Glacier Bay!
USE AND CARE GUIDE
HDGASS4 is tested and certified by NSF
International against NSF/ANSI Standards 42
for structural integrity and materials safety only.
Filter screen is tested and certified by NSF
International against NSF/ANSI Standards 42
for materials safety only.
call Glacier Bay Customer Service
7 a.m. - 6 p.m., CST, Monday - Friday
HOMEDEPOT.COM/GLACIER
HOMEDEPOT.COM
HOMEDEPOT.COM
HOMEDEPOT.COM
SYSTEM
1 1 1 1 - - - - 800
800- - - - 247
800
800
247
247- - - - 1087
247
1087
1087
1087
/GLACIERBAY
/GLACIER
/GLACIER
BAY
BAY
BAY
THANK YOU
THANK YOU
THANK YOU
THANK YOU
Item #1001 104 017
Model #HDGASS4
NSF
®
COMPONENT
NSF
®
COMPONENT
201-8401468 (REV 00)
Advertisement
Table of Contents

Subscribe to Our Youtube Channel
Related Manuals for Glacier bay HDGASS4


Summary of Contents for Glacier bay HDGASS4
- Page 1 THANK YOU We appreciate the trust and confidence you have placed in Glacier Bay through the purchase of this filtration system. We strive to continually create quality products designed to enhance your home. Visit us online to see our full line of...
-
Page 2: Table Of Contents
Table of Contents Safety Information .........2 Installation ..........9 Warranty ..........3 Programming the Electronic Controller11 Glacier Bay Water Filtration Systems - Powering Up ..........11 Warranty............. 3 Manually Starting a Sediment Flush ..11 Normal Operation ........11 Pre-Installation ........3 LCD Backlight ........... -
Page 3: Warranty
(1) year from date of purchase. If this system should ever develop a leak or drip Glacier Bay Water Filtration Systems will free of charge provide the parts necessary to put the system back in good working condition. -
Page 4: Installation Location
Pre-Installation (continued) IN IN IN INSTALLATION LOCATION STALLATION LOCATION STALLATION LOCATION STALLATION LOCATION To filter sediment from all household water, install the filter system on the household’s main incoming water pipe. Install upstream from the water softener (if any), the water heater, and all inside faucets. Untreated Water to City Water Supply Outside Faucets... -
Page 5: Filtration System Orientation
Pre-Installation (continued) FILTRATION SYSTEM ORIENTATION FILTRATION SYSTEM OR IENTATION FILTRATION SYSTEM OR FILTRATION SYSTEM OR IENTATION IENTATION To operate properly, the system must be installed with the sump pointed straight down. When possible, install the system on a horizontal section of the household’s main incoming water pipe. -
Page 6: Mounting Bracket
Pre-Installation (continued) MOUNTING BRACKET MOUNTING BRACKET MOUNTING BRACKET MOUNTING BRACKET A metal bracket (B) is included with the system to support the assembled system and plumbing when necessary. It may be mounted to a wall or wall framing member with two screws (included). -
Page 7: Tools Required
Pre-Installation (continued) TOOLS REQUIRED TOOLS REQUIRED TOOLS REQUIRED TOOLS REQUIRED Phillips Adjustable jaw Sealant Pliers screwdriver wrench tape PACKAGE CONTENTS PACKAGE CONTENTS PACKAGE CONTENTS PACKAGE CONTENTS Part Part Part Part Description Description Description Description Quantity Quantity Quantity Quantity Filtration System Mounting bracket with two screws Drain hose Adapters... -
Page 8: Installation Requirements
Installation Requirements PLUMBING CODES PLUMBING CODES PLUMBING CODES PLUMBING CODES All plumbing must be completed in accordance with national, state, and local plumbing codes. NOTICE: In the state of Massachusetts, the Commonwealth of Massachusetts plumbing code 248-CMR shall be adhered to. A licensed plumber shall be used for this installation. AIR GAP REQUIREMENTS AIR GA P REQUIREMENTS... -
Page 9: Grounding Information
Installation Requirements (continued) GROUNDING IN IN IN INFORMATION (FOR INSTA GROUNDING FORMATION (FOR INSTALLATIONS ON A METAL LLATIONS ON A METAL PIPE) PIPE) GROUNDING GROUNDING FORMATION (FOR INSTA FORMATION (FOR INSTA LLATIONS ON A METAL LLATIONS ON A METAL PIPE) PIPE) The house main incoming water pipe is often used to ground electrical outlets in the home. - Page 10 Installation (continued) Installing the drain hose Installing the drain hose Installing the drain hose Installing the drain hose Checking for leaks Checking for leaks Checking for leaks Checking for leaks Measure, cut to needed length, and connect the 3/8 With the installation steps completed, fully in.
-
Page 11: Programming The Electronic Controller11
Programming the Electronic Controller POWERING UP POWERING UP POWERING UP POWERING UP When the controller is powered up (by installing the battery or plugging in the optional AC adaptor), the display will briefly show the software version (example “1.0”), then the number of days until the next automatic sediment flush. MANUALLY STARTING A SEDIMENT FL MANUALLY ST ARTING A SEDIMENT FLUSH... -
Page 12: Sediment Flushes
Programming the Electronic Controller (continued) SETTING THE NUMBER OF D SETTING THE NUMBER O F DAYS BETWEEN AYS BETWEEN A A A A UTOMATIC SEDIMENT F UTOMATIC SEDIMENT FLUSHES LUSHES SETTING THE NUMBER O SETTING THE NUMBER O AYS BETWEEN AYS BETWEEN UTOMATIC SEDIMENT F UTOMATIC SEDIMENT F... -
Page 13: Maintenance
Maintenance CL CL CL CLEANING THE FILTER SC EANING THE FILTER SCREEN REEN EANING THE FILTER SC EANING THE FILTER SC REEN REEN It may be necessary to manually clean the filter screen from time to time. On water supplies that contain sticky sediment including mud, silt and clay, you may have to remove the sump and clean the screen frequently. -
Page 14: Troubleshooting
Troubleshooting Problem Problem Possible Cause Possible Cause Solution Solution Problem Problem Possible Cause Possible Cause Solution Solution Sediment flush does not The battery is dead. Replace the battery. initiate. There is a low or no water flow The filter is plugged. Manually clean filter screen. -
Page 15: Disassembling The Solenoid
Troubleshooting (continued) DISASSEMBLING THE SOLENOID DISASSEMBLING THE SO LENOID DISASSEMBLING THE SO DISASSEMBLING THE SO LENOID LENOID (See the Exploded View drawing in the Replacement Parts section on page 16.) If the Troubleshooting table indicates that the solenoid seat requires cleaning, use the following procedure: Before shutting off the water supply (as directed in Step 2), fill a bucket or sink full of water to use for cleaning. -
Page 16: Replacement Parts
Replacement Parts Part No. Part No. Description Description Part No. Part No. Description Description Part No. Part No. Description Description Part No. Part No. Description Description 7298442 Top Cover 1073-27-HA Head Assembly 7295177 Electronic Control Board (PWA) 7300312 O-Ring, Sump 7298434 Faceplate (order decal below) 7298395... - Page 17 Questions, problems, missing parts? Before returning to the store, call Glacier Bay Customer Service 7 a.m.-6 p.m., CST, Monday-Friday 1 1 1 1 - - - - 800 800- - - - 247 247- - - - 1087 1087 1087...
Need help?
Do you have a question about the HDGASS4 and is the answer not in the manual?
Questions and answers