Garland 36 E Series Installation And Operation Manual
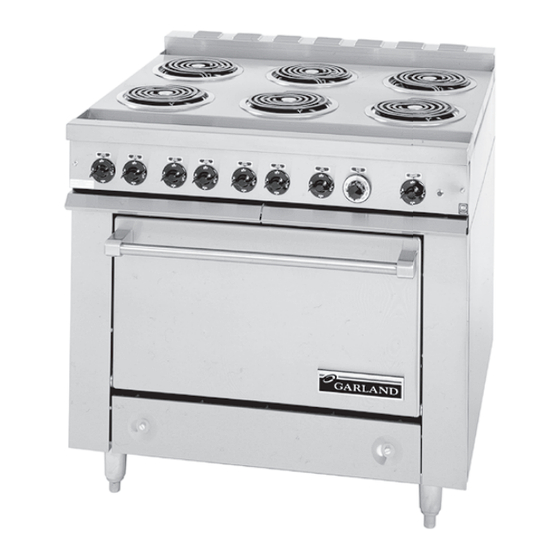
Heavy duty electric ranges and broilers
Hide thumbs
Also See for 36 E Series:
- Parts list (20 pages) ,
- Specifications (2 pages) ,
- Specifications (2 pages)
Table of Contents
Advertisement
Quick Links
INSTALLATION AND
OPERATION MANUAL
GARLAND 36 E SERIES
HEAVY DUTY ELECTRIC
RANGES AND BROILERS
FOR YOUR SAFETY:
DO NOT STORE OR USE GASOLINE
OR OTHER FLAMMABLE VAPORS OR
LIQUIDS IN THE VICINITY OF
THIS OR ANY OTHER
IMPROPER INSTALLATION, ADJUSTMENT,
ALTERATION, SERVICE OR MAINTENANCE
CAN CAUSE PROPERTY DAMAGE, INJURY,
OR DEATH. READ THE INSTALLATION,
OPERATING AND MAINTENANCE
INSTRUCTIONS THOROUGHLY
BEFORE INSTALLING OR
SERVICING THIS EQUIPMENT
Users are cautioned that maintenance and repairs must be performed by a Garland authorized service agent
using genuine Garland replacement parts. Garland will have no obligation with respect to any product that has been
improperly installed, adjusted, operated or not maintained in accordance with national and local codes or installation
instructions provided with the product, or any product that has its serial number defaced, obliterated or removed,
or which has been modified or repaired using unauthorized parts or by unauthorized service agents.
For a list of authorized service agents, please refer to the Garland web site at http://www.garland-group.com.
The information contained herein, (including design and parts specifications), may be superseded and is subject
to change without notice.
GARLAND COMMERCIAL INDUSTRIES
185 East South Street
Freeland, Pennsylvania 18224
Phone: (570) 636-1000
Fax: (570) 636-3903
Part # 1009067 Rev11 (01/24/08)
Part # 1009067 Rev11 (01/24/08)
APPLIANCE
WARNING:
GARLAND COMMERCIAL RANGES, LTD.
1177 Kamato Road, Mississauga, Ontario L4W 1X4
CANADA
Phone: 905-624-0260
Fax: 905-624-5669
PLEASE READ ALL SECTIONS OF THIS MANUAL
AND RETAIN FOR FUTURE REFERENCE.
THIS PRODUCT HAS BEEN CERTIFIED AS
COMMERCIAL COOKING EQUIPMENT AND
MUST BE INSTALLED BY PROFESSIONAL
PERSONNEL AS SPECIFIED.
INSTALLATION AND ELECTRICAL CONNECTION
MUST COMPLY WITH CURRENT CODES:
IN CANADA - THE CANADIAN ELECTRICAL
CODE PART 1 AND / OR LOCAL CODES.
IN USA – THE NATIONAL ELECTRICAL CODE
ANSI / NFPA – CURRENT EDITION.
ENSURE ELECTRICAL SUPPLY CONFORMS WITH
ELECTRICAL CHARACTERISTICS SHOWN ON
THE RATING PLATE.
Enodis UK LTD.
Swallowfi eld Way, Hayes, Middlesex UB3 1DQ ENGLAND
Telephone: 081-561-0433
Fax: 081-848-0041
© 2004 Garland Commercial Industries, Inc.
Page 1
Advertisement
Table of Contents

Related Manuals for Garland 36 E Series


Summary of Contents for Garland 36 E Series
- Page 1 Users are cautioned that maintenance and repairs must be performed by a Garland authorized service agent using genuine Garland replacement parts. Garland will have no obligation with respect to any product that has been improperly installed, adjusted, operated or not maintained in accordance with national and local codes or installation instructions provided with the product, or any product that has its serial number defaced, obliterated or removed, or which has been modified or repaired using unauthorized parts or by unauthorized service agents.
-
Page 2: Important Information
IMPORTANT INFORMATION WARNING: This product contains chemicals known to the state of california to cause cancer and/or birth defects or other reproductive harm. Installation and servicing of this product could expose you to airborne particles of glass wool/ceramic fibers. Inhalation of airborne particles of glass wool/ceramic fibers is known to the state of California to cause cancer. -
Page 3: Table Of Contents
TABLE OF CONTENTS IMPORTANT INFORMATION... . . 2 OPERATION......10 Ovens . -
Page 4: Series Ranges
DIMENSIONS AND SPECIFICATIONS, 36E SERIES RANGES 3-PHASE NOMINAL AMPERES PER LINE TOTAL kW PER PHASE THREE PHASE MODEL SINGLE PHASE ALL VOLTAGES 208V 240V 460V 208V 240V 460V 36ER32 / 36ER38 21.5 36ER32-3 20.7 36ER33-88 36ER33 19.1 36ER33-99 18.7 36ER35 / 36ER36 18.5 36ER39 18.5... -
Page 5: Er36 Broiler
DIMENSIONS AND SPECIFICATIONS, ER36 BROILER ELECTRICAL LOADING CHART: MODEL ER36 NOMINAL AMPERES PER LINE 3-PHASE kW PER PHASE VOLTAGE TOTAL kW THREE PHASE SINGLE PHASE 7.00 33.7 16.8 29.1 16.8 7.00 29.2 14.6 25.3 14.6 5.51 12.0 12.0 12.0 REAR 2-3/4"... -
Page 6: Attachments
36" 24" [914mm] [610mm] Garland products are not approved or authorized for home or residential use, but are intended for commercial applications only. Garland will not provide service, warranty, maintenance 6" or support of any kind other than in commercial applications. -
Page 7: General Information
Please contact your Equipment Dealer or Maintenance & Repair Center (list enclosed) to take advantage of this exception offer. Thank you for using Garland products. It is our pleasure to serve you. Part # 1009067 Rev11 (01/24/08) -
Page 8: Installation
Garland plate should be checked to ensure that the unit’s electrical characteristics and the supply electrical characteristics agree. The Garland 36E series complies with the standards CSA Terminal Bock C222 no. 109-latest edition, the UL197-latest edition and the Located behind NSF #4-latest edition. -
Page 9: Main Line Entrance
INSTALLATION continued Main Line Entrance 3. Securely fasten Salamander support brackets at the rear to burner box sides with 1/4 - 20 x 3/4 slot truss head Two (2) alternate entrance location are provided as follows: machine screws, hex nuts and lock washers. 1. -
Page 10: Installation Instructions For Mounting The Double Deck High Shelf 36E Series
INSTALLATION continued Installation Instructions for Mounting The Double Deck High Shelf 36E Series Bolt "A" 1. Back of range must be easily accessible. Upright 2. Remove the flat head bolt “A” from each side of high shelf only when place next to a high shelf, Salamander. Burner Box 3. -
Page 11: General
OPERATION continued During preheat period, keep oven door closed. With oven Preheat oven thoroughly before use. To reach 350°F takes operating on rated voltage, it will require approximately 18 approximately 20 minutes. For optimum results oven should to 20 minutes to reach 450°F from a cold start. be preheated for 30 minutes to allow for thorough heat saturation. -
Page 12: Problem / Solution
Rolls have uneven color Reduce number of size pans. Motor Care The motor on your Garland range base convection is Switch maintenance free since it is constructed with self-lubricating Panel sealed ball bearing. It is designed to provide durable service when treated with ordinary care. -
Page 13: Boiling Plates
OPERATION continued Boiling Plates All Purpose Plates Remove all factory applied protective material (gelled Remove all factory applied protective material (gelled mineral oil) by washing with a hot, mild detergent or soap mineral oil) by washing with a hot, mild detergent or soap solution, then dry thoroughly. -
Page 14: Griddle Plates
OPERATION Continued Griddle Plates • Heat the griddle slowly for 15 to 20 minutes. Then wipe away oil. Repeat the procedure 2 to 3 times until the All steel griddle plates are controlled by thermostats griddle has a slick, mirror like finish. Do this until you have permitting separate temperatures to be maintained at reached the desired cooking temperature. -
Page 15: Maintenance And Cleaning
We suggest maintenance and repairs to be performed by an Use only stainless steel, wood or plastic tools if necessary Garland Authorized Service Agent. The listing provided with to scrape off heavy deposits of grease and oil. Do not use your range is titled “Maintenance and Repair Centers”. -
Page 16: Cleaning And Care Of Top Surface Heating
MAINTENANCE AND CLEANING continued Cleaning and Care of C. Once A Week clean griddle surface thoroughly. If necessary, use a grill stone or grill pad over the griddle Top Surface Heating Burners surface. Rub with grain of the metal while still warm. A detergent may be use on the plate surface to help clean Surface units may be raised to permit removal of spillover it, but care must be taken to be sure it is thoroughly... -
Page 17: Wiring Diagrams
WIRING DIAGRAMS Part # 1009067 Rev11 (01/24/08) Page 17... - Page 18 WIRING DIAGRAMS continued Page 18 Part # 1009067 Rev11 (01/24/08)
- Page 19 WIRING DIAGRAMS continued Part # 1009067 Rev11 (01/24/08) Page 19...
- Page 20 WIRING DIAGRAMS continued Page 20 Part # 1009067 Rev11 (01/24/08)
- Page 21 WIRING DIAGRAMS continued Part # 1009067 Rev11 (01/24/08) Page 21...
- Page 22 WIRING DIAGRAMS continued Page 22 Part # 1009067 Rev11 (01/24/08)
- Page 23 WIRING DIAGRAMS continued Part # 1009067 Rev11 (01/24/08) Page 23...
- Page 24 WIRING DIAGRAMS continued Page 24 Part # 1009067 Rev11 (01/24/08)
- Page 25 WIRING DIAGRAMS continued Part # 1009067 Rev11 (01/24/08) Page 25...
- Page 26 WIRING DIAGRAMS continued Page 26 Part # 1009067 Rev11 (01/24/08)
- Page 27 WIRING DIAGRAMS continued Part # 1009067 Rev11 (01/24/08) Page 27...
- Page 28 WIRING DIAGRAMS continued Page 28 Part # 1009067 Rev11 (01/24/08)
- Page 29 WIRING DIAGRAMS continued Part # 1009067 Rev11 (01/24/08) Page 29...
- Page 30 WIRING DIAGRAMS continued Page 30 Part # 1009067 Rev11 (01/24/08)
- Page 31 WIRING DIAGRAMS continued Part # 1009067 Rev11 (01/24/08) Page 31...
- Page 32 WIRING DIAGRAMS continued Page 32 Part # 1009067 Rev11 (01/24/08)
- Page 33 WIRING DIAGRAMS continued Part # 1009067 Rev11 (01/24/08) Page 33...
- Page 34 WIRING DIAGRAMS continued Page 34 Part # 1009067 Rev11 (01/24/08)
- Page 35 WIRING DIAGRAMS continued Part # 1009067 Rev11 (01/24/08) Page 35...
- Page 36 WIRING DIAGRAMS continued Page 36 Part # 1009067 Rev11 (01/24/08)
- Page 37 WIRING DIAGRAMS continued Part # 1009067 Rev11 (01/24/08) Page 37...
- Page 38 WIRING DIAGRAMS continued Page 38 Part # 1009067 Rev11 (01/24/08)
- Page 39 WIRING DIAGRAMS continued Part # 1009067 Rev11 (01/24/08) Page 39...
- Page 40 WIRING DIAGRAMS continued Page 40 Part # 1009067 Rev11 (01/24/08)
- Page 41 WIRING DIAGRAMS continued Part # 1009067 Rev11 (01/24/08) Page 41...
Need help?
Do you have a question about the 36 E Series and is the answer not in the manual?
Questions and answers