Table of Contents
Advertisement
Quick Links
Advertisement
Table of Contents

Subscribe to Our Youtube Channel
Summary of Contents for Prolight DIGIMIX Waudio
- Page 1 Order Code: MIXE07 www.prolight.co.uk ENGLISH...
-
Page 2: Safety Instructions
WARNING FOR YOUR OWN SAFETY, PLEASE READ THIS USER MANUAL CAREFULLY BEFORE YOUR INITIAL START-UP! CAUTION! Keep this equipment away from rain, moisture and liquids. SAFETY INSTRUCTIONS Every person involved with the installation, operation & maintenance of this equipment should: Be competent Follow the instructions of this manual CAUTION! TAKE CARE USING THIS EQUIPMENT! -
Page 3: Operating Determinations
Leave the equipment switched off until it has reached room temperature. • If your product fails to function correctly, discontinue use immediately. Pack the unit securely (preferably in the original packing material), and return it to your Prolight dealer for service. - Page 4 General When using the built-in amplification it is important not to block the air intake vents on the front and side panels. These are essential for the dual speed fan to keep the unit cool during operation. Avoid exposing the unit to rain or excessive levels of humidity during operation. 1) IEC power input - use this standard IEC connector to connect the DIGIMIX to the mains.
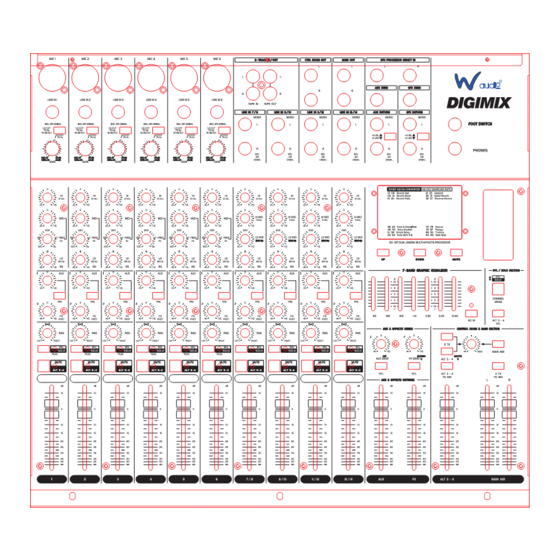
- Page 5 8) Lo Cut Switch (mic channels 1 to 6 only) - This button applies an 18dB per octave high pass filter that completely removes all frequencies below 75Hz. We highly recommend using this filter for hand held vocal microphones because it reduces handling noise. It is also worth while using it for any microphone or instrument that is not intended to produce bass because it also reduces the chances of low frequency feed back and can deliver an overall mix with greater clarity.
- Page 6 12) Pre Button - This button relates to the Aux control. When the button is ‘down’ the signal from this channel is sent to the Aux output connection before it reaches the channel level fader - so adjusting the channel level fader has no impact on the Aux Send Level. When the button is in the ‘UP’...
-
Page 7: Front Panel Inputs
The Aux & Effects Systems Using an Aux System The idea of an Auxiliary Send & return systems is that it enables you to send a signal out of the mixer, to an external processor (usually it is an effects unit), through the external processor, then back to the mixer.. -
Page 8: The Master Section
26) Programme LED - This large two digit LED display shows the currently selected programme. 27) Up & Down buttons - Use these increment buttons to select the Effect programme you wish to use from the list. Press either button once to move up or down through the list. When you have selected the desired programme you may then alter the timing of the delay/reverb by using the UP/DOWN buttons. - Page 9 32) XLR Level switch - Use this switch to determine whether the main XLR Output Connectors (30) operate at either the Professional Line Standard of +4dBu or the Domestic Line Level Standard of -10dBV. 33) Rear Panel Main Outputs - These line level 1/4” jack connectors carry the stereo main mix and can be used for a variety of purposes.
- Page 10 Control Room The DIGIMIX features a ‘Control Room’ system. In a recording studio this is often used for connection of the Mixing Console to the monitor system (speakers) used by the recording engineer. It’s main purpose is to provide a convenient routing and level control system for the engi- neer to use.
- Page 11 Alt 3&4 The Alt 3 & 4 System is a powerful ‘routing system’ that enables you to set up a second separate mix to the main mix that can be used for recording or setting up stage monitors or simply as a traditional ‘Sub Mix’.
- Page 12 56) Binding Post Speaker Output connectors - Use appropriate cables to connect these Binding Post speaker output connectors to the input connections of your speakers. Binding Posts are designed to accommodate bare wire ends of speaker cables; this is a speaker connection method which although safe and reasonably secure when handled correctly and capable of delivering good quality audio sound...
Need help?
Do you have a question about the DIGIMIX Waudio and is the answer not in the manual?
Questions and answers