Table of Contents
Advertisement
Advertisement
Table of Contents

Summary of Contents for Shenzhen MD-3010?
- Page 1 MD-3010Ⅱ INSTRUCTION MANUAL...
-
Page 2: Table Of Contents
CONTENT INTRODUCTION 1.1 FEATURES OF YOUR DETECTOR 2. PARTS AND NAMES 3. PREPARATION 3.1 ASSEMBLING THE DETECTOR 3.2 INSTALLING BATTERIES 3.3 BATTERY CONDITION INDICATION 3.4 USING A HEADPHONE 4. OPERATION 4.1 CONTROL PANEL 4.2 LCD DISPLAY 4.3 OPERATION INSTRCTION 4.4 SEARCH TESTING 4.5 OPERATION TIPS 4.6 METAL DETECTOR OPERATORS ETHICS 4.7 PLACES WHERE YOU CAN USE YOUR METAL DETECTOR... -
Page 3: Introduction
1. INTRODUCTION Thank you for purchasing our metal Detector. With this powerful and versatile device, you can hunt for coins, relics, jewelry, gold, and silver just about anywhere. To obtain maximum performance, The detector is versatile and easy to use with LCD. We urge you to take a few minutes to read this manual carefully and retain this manual for future reference. -
Page 4: Parts And Names
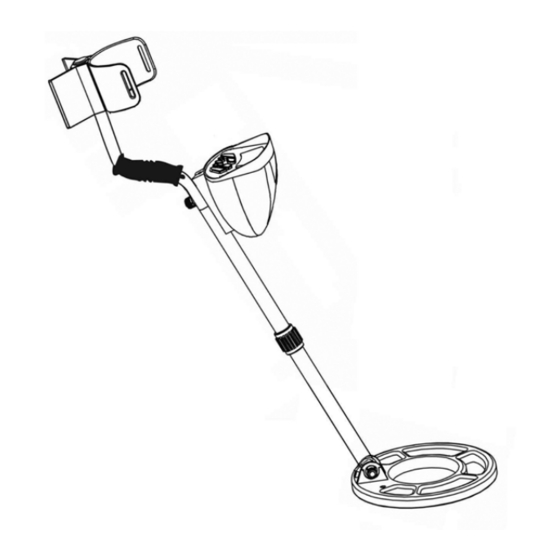
2. PARTS AND NAMES NOMENCLATURES:... -
Page 5: Preparation
3. PREPARATION 3.1 ASSEMBLING THE DETECTOR You don t need any special tools to assemble your metal detector. All you need is a small Philips-head screw driver. After unpack your detector, you may start the following assembling and adjustment: 3.1.1 Rotate the STEM LOCK NUT(11)Clockwise until loosens. 3.1.2Slide the UPPER STEM (12) towards the SEARCH COIL (14) as indicated by an arrow until you can see a micro-plug metal connector. -
Page 6: Installing Batteries
3.1.6 Adjust the LOWER STEM (12) so that when you stand upright with the detector in you hand, the SEARCH COIL (14) is level with and about 1/2 to 2 inches above the ground with your arm relaxed at your side. 3.1.7 Tighten the STEM LOCK NUT (8) in reverse direction (counterclockwise) to lock it in place. -
Page 7: Battery Condition Indication
3.2.4 Replace the battery cover. Cautions: ¡æUse only fresh batteries and always replace the old batteries by fresh batteries. ¡æDo not mix old and new batteries, different types of batteries (standard, alkaline, or rechargeable), or rechargeable batteries of different capacities. ¡æNever attempt to recharge the non-chargeable battery. -
Page 8: Operation
Note: The detector s internal speaker will be disconnected when you connect a headphone. 4. OPERATION 4.1 CONTROL PLANEL POWER: control power ON or OFF MODE: Selects to ignore a target (eliminates a target) or assigns a tone to a target SET: Selects a function LCD DISPLAY 4.2 LCD DISPLAY... - Page 9 4.2.1. Settable Icons 1. Sensitivity: 8 levels available for sensitivity adjustment. 2. Depth: 8 levels available for depth display. 3. Highlight a Target: A rectangular box encircling a target icon flashes when target is selected or being detected. 4. Target Eliminate Indicator: indicates the target that you don t want to detect. 5.
-
Page 10: Operation Instrction
4.3 OPERATION INSTRUCTION 4.3.1 Normal Operation State Turn on the detector by pressing on the POWER button once. The SENS and DEPTH icons (with other icons) should appear on the display. The detector enters in the Normal Operation State. Press the POWER again will turn off the power supply to the detector. 4.3.2 Batteries Condition Indicator Indicates the conditions of the batteries in the battery box. -
Page 11: Search Testing
et is restored. Repeat the above procedures for setting the other targets. Press the ENTER to confirm the setting and return to the Normal Operation State. 4.3.4 Tone Loudness Setting In the Normal Operating State, Press the SET button (3 times ) until the Tone Volume Icon flashing. -
Page 12: Operation Tips
Find an area on the ground outside where there are no metal objects. Bury few samples at a separation distance of 1-2 feet apart as targets for the testing. While holding the search coil level to the ground about 1-2 inches above the surface, slowly move the s earch coil over the area where you placed the samples, sweeping the search coil in a side-to-side motion. -
Page 13: Metal Detector Operators Ethics
Overlap you sweeps approximately 50%. Search in a methodical manner sweeping in a tight semicircle. Pay close attention to where you re going and where you ve been . 4.6 METAL DETECTOR OPERATORS ETHICS. Below are few basic rules you should follow while using your metal detector. Always get permission to hunt on private property Always leave a site cleaner than you found it. - Page 15 To all residents of the European Union Important environmental information about this product This symboi on this unit or the package indicates that disposal of this unit after its lifecycle could harm the environment. Do not dispose the unit (or batteries)as unsorted municipal waste: it should be brought to a specialized company for recycling.
Need help?
Do you have a question about the MD-3010? and is the answer not in the manual?
Questions and answers
How do you set the depth?
The Shenzhen MD-3010 does not have a manual setting for depth. The depth is indicated automatically on the LCD screen when a target is detected. As you slowly lift the probe, the depth icon on the screen rises, showing the estimated depth of the target.
This answer is automatically generated