Table of Contents
Advertisement
S
WARNING
S
Radio Alarm Clock
with iPod
1219820
OWNERS MANUAL
"Made for iPod" means that an electronic accessory has been designed to connect specifically
to iPod and has been certified by the developer to meet Apple performance standards.
Apple is not responsible for the operation of this device or its compliance with
safety and regulatory standards.
iPod is a trademark of Apple Inc., registered in the US and other countries.
WARNINGS
Docking
®
1
Note: iPod
not included
®
Advertisement
Table of Contents

Subscribe to Our Youtube Channel
Summary of Contents for Centrios 1219820
-
Page 1: Owners Manual
WARNINGS WARNING Radio Alarm Clock with iPod Docking ® 1219820 Note: iPod not included ® OWNERS MANUAL “Made for iPod” means that an electronic accessory has been designed to connect specifically to iPod and has been certified by the developer to meet Apple performance standards. -
Page 2: Table Of Contents
TABLE OF CONTENTS TABLE OF CONTENTS IMPORTANT SAFETY INSTRUCTIONS PRECAUTIONS FOR USE BASIC SYSTEM SET-UP 1. Extending the FM antenna 2. Connecting the main unit to power 3. Installing the battery into the remote 4. Installing batteries into the unit 5. -
Page 3: Important Safety Instructions
IMPORTANT SAFETY INSTRUCTIONS The lightning flash with an arrowhead symbol, within the CAUTION equilateral triangle, is intended to alert the user to the presence of uninsulated “dangerous voltage” within the product's enclosure that may be of sufficient magnitude to cause an electric shock. -
Page 4: Basic System Setup
BASIC SYSTEM SETUP Follow these 4 steps to complete the basic system set-up. 1. Extending the FM antenna FM Antenna 2. Connecting the main unit to power This system is designed to operate on DC 12V, 1,ooomA current. Connecting this system to any other power supply could result in damage to the unit which is not covered by your warranty. -
Page 5: Installing The Battery Into The Remote
BASIC SYSTEM SETUP 3. Installing the battery into the remote Insert one CR2025 battery into the remote control observing the correct (+) and (-) polarities as shown. 4. Installing batteries into the unit Insert 8 size C 1.5V batteries into the battery compartment at the back of the unit, observing the correct (+) and (-) polarities. -
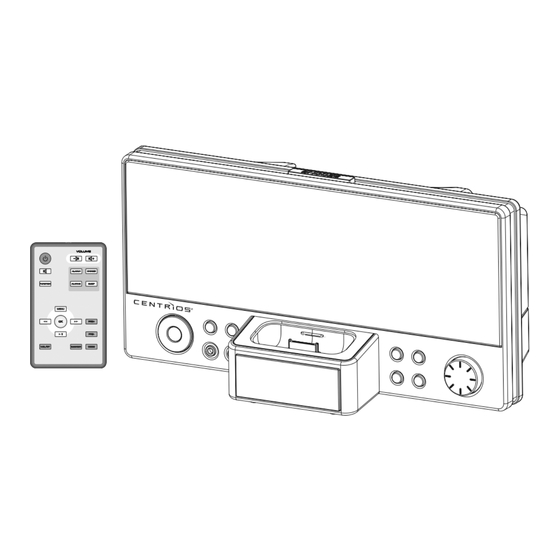
Page 6: Location Of Controls
LOCATION OF CONTROLS MENU BUTTON 11. AUX IN JACK STANDBY BUTTON 12. HEADPHONE JACK FUNCTION BUTTON 13. IR SENSOR SNOOZE BUTTON 14. iPod DOCK ® VOL - BUTTON 15. LCD DISPLAY VOL+ BUTTON 16. CLOCK SET BUTTON TUNING KNOB 17. SLEEP BUTTON PREVIOUS BUTTON 18. -
Page 7: Remote Control
REMOTE CONTROL REMOTE CONTROL STANDBY BUTTON 11. ALARM1 BUTTON MUTE BUTTON 12. SNOOZE BUTTON FUNCTION BUTTON 13. ALARM2 BUTTON MENU BUTTON 14. SLEEP BUTTON OK BUTTON 15. NEXT BUTTON PREVIOUS BUTTON 16. PREVIOUS+ BUTTON PLAY/PAUSE BUTTON 17. PREVIOUS- BUTTON MO./ST BUTTON 18. -
Page 8: Operating Instructions
OPERATING INSTRUCTIONS • Ensure that you have fully extended the FM antenna wire. • Ensure that the CR2025 battery has been installed in the remote control handset (included). • Plug the cable from the power adapter into the socket labelled 12V DC on the back of the unit. • CAUTION: Use only the power adapter supplied with the system. Connecting a power supply with a different rating will cause permanent damage to the system and may be hazardous. General controls Most of the main functions of this system can be operated by the controls on the front panel of the main unit, or by the buttons on the remote control handset. -
Page 9: Audio Controls
AUDIO CONTROLS 1. Volume controls TO INCREASE OR DECREASE THE SYSTEM VOLUME Press the buttons on the remote control or adjust using the volume control VOL-/VOL+ on the front panel. The Volume Level indicator will appear on the display when you adjust the volume level. -
Page 10: Ipod ® Operation
iPod OPERATION ® Using the iPod Dock, you can play music from the iPod through the unit’s ® speakers and operate with the remote control. The unit comes with eight removable dock adapters to ensure the proper fit for your iPod and to help ®... -
Page 11: Ipod ® Dock Adapter Table
iPod OPERATION ® 2. iPod Compatibility Table ® Universal Dock Adapter Number iPod ® Description Capacity iPod touch 8GB, 16GB ® iPod nano 4GB, 8GB ® (3rd generation) iPod nano 2GB, 4GB, 8GB ® (2nd generation) iPod classic 80GB, 120GB ® U2 iPod 30GB ®... -
Page 12: Radio Operation
RADIO OPERATION Press the FUNCTION button repeatedly until the main display shows “RADIO”. FM frequency will appear on the display. Tune to the desired station by adjusting the TUNING knob. FM STEREO SIGNAL IS INDICATED BY THE ((ST)) INDICATOR. If the FM Stereo signal is noisy or weak, press the MO./ST button on the remote control to select FM mono mode. -
Page 13: Other Functions
OTHER FUNCTIONS 1. Setting the clock When the AC power is connected, “0:00” will appear on the display. The clock can only be set while the unit is off. Press the CLOCK SET. button on unit or remote control and “24H” will be shown. Press the buttons to change the hour format in 12 or 24HR mode. -
Page 14: Alarm Function
OTHER FUNCTIONS 3. Alarm Function In STANDBY mode, press the ALARM1 button on the remote control for two seconds. “AL1” and “buzzer icon” will appear on the display. The hour digit will flash as shown. Press the PREVIOUS/NEXT button on the remote control to adjust the hours. -
Page 15: Stereo Headphone Jack
OTHER FUNCTIONS 7. Stereo headphone jack This system includes a HEADPHONE jack (12) on the front panel of the unit. You may connect a set of headphones (not included) to this jack for private listening without disturbing others. The main speakers are automatically turned off when the headphones are connected to the headphone jack. -
Page 16: Trouble Shooting
TROUBLE SHOOTING 1. GENERAL No Power AC connection is not complete. Check all cords and cables. System does not The built-in microprocessor may malfunction due to respond to key presses external electrical interference. Unable to operate the The path between the remote control and the remote system from the remote sensor on the system is blocked. -
Page 17: Warranty
WARRANTY THE SOURCE WARRANTY The Source warrants that this product will be free from defects in materials and workmanship for a period of ninety (90) days from the date of purchase. Within this period, simply take the product and your proof of purchase to any The Source store or dealer and the product will be repaired without charge for parts and labour.
Need help?
Do you have a question about the 1219820 and is the answer not in the manual?
Questions and answers