Table of Contents
Advertisement
Advertisement
Table of Contents

Summary of Contents for TC-Helicon VoiceTone Create
- Page 1 ENGLISH VERSION...
- Page 2 WARNING To reduce the risk of fire or electric shock, do not expose this appliance to rain or moisture. CAUTION This equipment has been tested and found to comply with the limits for a Class B digital device pursuant to Part 15 of FCC Rules. Operation is subject to the following two conditions: (1) This device may not cause harmful interference, and (2) this device must accept any interference received, including interference that may cause undesired operation.
-
Page 3: Table Of Contents
Table of Contents Introduction ............ page 4 Effect & Genre Descriptions .......page 24 Reverb ..................page 24 Delay & Tap Tempo ............page 25 Quick Start ............page 6 μMod ..................page 26 Transducer .................page 27 Using Two VoiceTone Pedals ......page 11 Genre Descriptions ............page 27 Patch List ............page 29 Front &... -
Page 4: Introduction
Reverb: halls, rooms, plates, spring, ambience portable pedal. The effects in VoiceTone Create are produced by the very same algorithms used in high-end o Delay: tap tempo, ping pong, slaps, taps studio hardware processors and software plug-ins. - Page 5 Canada, who spend every waking moment of their working lives listening, talking, singing, and interacting At TC-Helicon we truly believe that the voice is the with singers and those who have passion for the singing world's most beautiful instrument. We don't mean to voice.
-
Page 6: Quick Start
Quick Start Step 1: Step 2: Connect your microphone to a mic cable Connect the mic cable to the Mic Input on Create NOTE: Make sure Create is not powered. - Page 7 Quick Start Step 3: Step 4: Connect a mic cable to the Left (mono) Output of Connect the mic cable from Create to a mic input on Create. your sound system. NOTE: At this point it would be best to turn the gain and/or volume on your sound system's mic input to off.
- Page 8 Quick Start Step 5: Step 6: Set the Input Knob fully left, and the Mix Knob to 12 Connect Create's power adapter to main power and to o'clock. the Power Input on Create.
- Page 9 Quick Start Step 7: Step 8: While singing through your microphone, raise the Input Raise the gain and/or volume on your sound system mic Knob until the Input Light turns green, sometimes input channel and master volume until you hear a good orange on louder parts, but never red.
- Page 10 Quick Start Step 9: You're ready to add effects to your voice. a. Turn the effect on or off with the Right Footswitch. b. Listen to different patches by slowly turning the Patch Knob.
-
Page 11: Using Two Voicetone Pedals
Using Two VoiceTone Pedals Step 3: You can use two VoiceTone pedals in series. Generally, VoiceTone Create should be the last device in the chain Connect the 2nd VoiceTone pedal, in this case Create to before connecting to your PA. -
Page 12: Front & Back Panel Descriptions
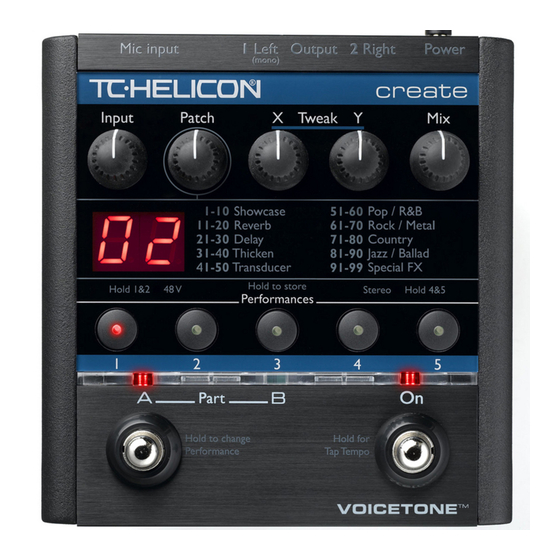
Front & Back Panel Descriptions Input Knob Controls the microphone pre-amplifier gain. Create can accept dynamic or condenser microphones. 2. Input Light Indicates the input level of the microphone. Flashing green, sometimes orange is good. Flashing red is clipping - not good! 3. - Page 13 Front & Back Panel Descriptions 6. Numeric Display 13. Left Output (mono) Indicates the current patch. When tweaking, temporarily Connects to a sound system (used for standard mono indicates the tweak value for the last edited Tweak Knob. setup) 7. Phantom Power Light 14.
-
Page 14: Setup Configurations
Setup Configurations Phantom Power Before using any setup configuration, determine the type of microphone you are using: Dynamic microphone: phantom power off. Condenser microphone: phantom power on. Enabling Phantom Power: 1. Confirm that your sound system master level is off. 2. -
Page 15: Standard Setup
Setup Configurations Standard Setup The standard setup for VoiceTone Create couldn't be easier - put Create between your microphone and your microphone input on your sound system. In this configuration the Right Output is not used. The Left Output is a mono mix of effects and dry, based on the setting of the Mix Knob. -
Page 16: Stereo Setup
Setup Configurations Stereo Setup simultaneously until the Stereo Light comes on. To turn stereo mode off, repeat this step. If you run your sound system in stereo, you can enable stereo mode. In this setup, effect patches have more spatial effect. In this configuration, the Left and Right Outputs are connected to two inputs on your sound system. -
Page 17: Sound Engineer Setup
Setup Configurations Sound Engineer Setup is on, press and hold Performance Buttons 4 and 5 simultaneously until the Stereo Light turns off. If you are in a situation where a live sound engineer mixes your vocal sound, you have the option of giving 5. -
Page 18: Patches, Performances, & Parts
Patches, Performances, & Parts Getting to Know the Basics VoiceTone Create has a simple yet sophisticated interface for selecting and VoiceTone Create performing from an extensive list of tweakable effects patches. Patch selection completely live interface. Any tweak you make in any and tweaks can be stored in performances. - Page 19 Patches, Performances, & Parts Patches value. After several seconds, the X or Y value display times out, and the selected patch number is again VoiceTone contains 99 effect patches. Each patch can indicated on the Numeric Display. have any combination of settings and effects including reverbs, delays, μMod, and Transducer.
- Page 20 Patches, Performances, & Parts NOTE: When a Performance Button is flashing it’s letting you know that the performance has been changed. The flashing also reminds you that the performance has not been stored. To store, read the section on Storing Performances and Parts below. Storing Performances and Parts 1.
-
Page 21: Performance Applications
Performance Applications Getting Comfortable Performing Performance options with VoiceTone Create are extensive for a floor based If you have selected a patch that contains a longer delay effect. Getting comfortable with the Left Footswitch and various options will sound, you may have the give you complete creative control over your effects. -
Page 22: A/B Effect Performances
Performance Applications A/B Effect Performances Now that you've mastered using a single performance, and you've heard a A great way to build energy during a song is to change an lot of different effects, it's time to make use of the Left Footswitch. effect from the verse to the chorus, or bridge to chorus. -
Page 23: Sequenced Performances
Performance Applications NOTE: 5. Select patch 90 by turning the Patch Knob. If you had part A selected when you enabled 6. Press the Left Footswitch to change between your sequencing through performances, you'll hear part A tweaked versions of patch 31 and patch 90. of each performance. -
Page 24: Effect & Genre Descriptions
Effect & Genre Descriptions Reverb Spaces: Halls The reverb effect is the most common vocal effect. Rooms Reverb can imitate the natural sound of spaces like churches, clubs and halls. However, not all reverb sounds Devices: imitate a real space. Many reverb effects are recreations Plates of electro-mechanical effects like Plates and Springs. -
Page 25: Delay & Tap Tempo
Effect & Genre Descriptions Delay 2. Browse through patches 21 through 30 by turning the Patch Knob. The delay effect is essentially a configurable echo. You can control how far apart the echoes occur (Delay 3. Use the Tweak Knobs to alter the delay effect. The Time), and whether the echoes fade out quickly, or build most common assignments for the Tweak Knobs are on themselves like you were trapped in house of... -
Page 26: Μmod
Effect & Genre Descriptions μMod 2. Select patch 21 - Mono Tap by turning the Patch μMod is short for micro-modulation ("μ" is the scientific Knob until 21 is indicated on the Numeric Display. symbol for micro). The μMod effect is capable of creating many different sounds that range from subtle 3. -
Page 27: Transducer
Effect & Genre Descriptions Transducer Selecting μMod Patches 1. Turn effects on by pressing the Right Footswitch. This is the block that helps create so many of the ear- candy effects in popular music, as well as replicating the 2. Select a μMod patch by turning the Patch Knob. vintage audio quality of older audio effects and (μMod effects are located from patch 31 to 40). - Page 28 The sound of distortion can be very different on low VoiceTone Create's Genre banks are unique and offer frequencies versus high frequencies. Lastly, distortion can instant inspiration. The categories are very broad. By increase the risk of feedback.Test, and reduce your levels...
-
Page 29: Patch List
Patch List Number - Patch Number Tweak X / Y Indicates what the Tweak Knobs control. Bank Tap Tempo Shows the type of effect, or genre of music for which the patch is intended. Showcase is a collection of patches Patches where tap tempo can be set. - Page 30 Patch List...
- Page 31 Patch List...
- Page 32 Patch List Verse/Cho...
- Page 33 Patch List...
- Page 34 Patch List...
-
Page 35: Faq & Troubleshooting
FAQ & Troubleshooting FAQ & Troubleshooting: once to engage it. Additionally, ensure the Mix Knob is not in the off position (fully left). 1. I'm not getting any sound out of Create a. Confirm the power adapter is properly connected b. - Page 36 FAQ & Troubleshooting to listen for. Some controls are subtle like Reverb is on. If it’s not, push the Right Footswitch to enable it. PreDelay, Hi and Lo Colour, and Reverb Decay. c. If you’ve confirmed it is a Tap Tempo patch, and the c.
-
Page 37: Super Edit Mode & Restore
Super Edit Mode Restoring to Factory State You might wonder how the developers and product If at any time you want to get VoiceTone Create back to managers at TC-Helicon authored patches for its original presets and settings, follow this procedure. -
Page 38: Specifications
Specifications Analog Inputs EMC & Safety Connectors Balanced XLR, Input Impedance 1kOhm Complies with EN 55103-1 and EN 55103-2 FCC part 15, Class B, CISPR 22, Mic Input Sensitivity @ 0dBFS -44dBu to +2dBu Class B Mic Input Sensitivity @ 12dB headroom -56dBu to -10dBu Certified to IEC 65, EN 60065, UL6500 EIN -128dBu @ max. -
Page 39: Tear-Out Section
Don’t worry, Create to a mic input on your sound system. VoiceTone Create has a quality mic pre with 109 dB SNR, and the patches are authored specifically for voice. - Page 40 Tear-Out | Patch Tweak List...
Need help?
Do you have a question about the VoiceTone Create and is the answer not in the manual?
Questions and answers