
Summary of Contents for mineralPRO RO
- Page 1 MineralPRO – RO Installation, Operation, & Maintenance Manual MineralPRO Mfg. MineralPRO Mfg. PO Box 1499, Parksville BC Canada V9P 2H4 T 250.586.6667 F 250.586.6670 www.mineralpro.com...
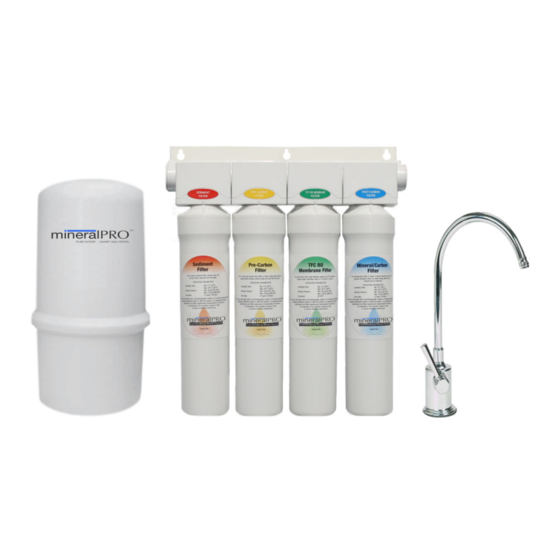
- Page 2 Stage 1 – Sediment filter, recommended change 6 months. The first stage of your RO system is a five micron sediment filter that traps sediment and other particulate matter like dirt, silt and rust which affect the taste and appearance of your water.
-
Page 3: Table Of Contents
Steps 9 through 12 (Tube Connections) ......................9 Quick Reference Tube Connections ....................... 9 How to Use the Quick Connect Fittings on the RO Module ................9 Step 9 – White 3/8” Tube Connection (Tank <---> M PRO) ..............10 INERAL Step 10 –... -
Page 4: Operational Parameters
1 1/4” Carbide tipped hole-cutter drill bit for stainless steel Hole punch or large nail Hammer Porcelain, Enamel, Ceramic on Metal or Cast Iron Sink Type (If drilling hole is required) 1 1/4” Bi-metal hole saw drill bit 5/16 Carbide drill bit Masking tape - 3 - www.mineralpro.com... -
Page 5: Step 1 - Determine Location For The Faucet
The faucet should be positioned so it empties into the sink and the spout swivels freely for convenience. If the sink has a hole that can accommodate the RO faucet, no drilling is required. Proceed with step 4 – Mounting the Faucet. -
Page 6: Step 3 - Drill A Hole For The Faucet In A Porcelain, Enamel, Ceramic On Metal Or Cast Iron
From above the sink, feed the faucet tubing and toggle bolt down through the 1¼” mounting hole in the sink. Ensure that the soft rubber gasket is uniformly positioned in between the base and the top of the sink. - 5 - www.mineralpro.com... - Page 7 Turn the handle up (away from you) to the “OFF” position. 4(d) - Completion of faucet installation (tubing connections) will be done later in this manual. Refer to Steps 9 through 12 of this manual. - 6 - www.mineralpro.com...
-
Page 8: Step 5 - Water Valve (Adapta-Valve) Installation
Attach Adapta-Valve as illustrated in the three photos above, choosing the configuration that fits your plumbing. (When attaching the Adapta-Valve to straight pipe threads, use Teflon tape on the threads). The white tube from inlet side of RO module will be cut to length and attached later in the installation. -
Page 9: Step 7 - Drain Saddle Installation
Attach black compression nut, but do not tighten at this time. The black tubing will be installed later. Caution: Do not over tighten the screws. It may crack the drain saddle. - 8 - www.mineralpro.com... -
Page 10: Step 8 - Tank Valve Installation
INERAL 1/4" Drain to M INERAL How to Use the Quick Connect Fittings on the RO Module Cut tube square with tube cutter. Do not use hacksaw or any other saw. O-ring must be free from burrs and sharp edges. -
Page 11: Step 9 - White 3/8" Tube Connection
12(c) - Insert the flow control into the end of the red tubing and insert the end of the tube into the port labeled “Drain” on the back of the M PRO unit. INERAL Flow Control - 10 - www.mineralpro.com... -
Page 12: Step 13 - Install Cartridges
INERAL 14(c) - Open the RO faucet and leave it open until water begins to trickle out (it will come out slowly). 14(d) - After water trickles out of the faucet, close the faucet so the tank will fill with water. The tank will take 4 to 8 hours to fill completely depending on the production capability of the membrane, local water temperature and pressure. -
Page 13: Maintenance Instructions
Maintenance Instructions Cartridge Replacement Instructions Cartridge replacement is made easy with the MineralPRO’s Quick Change system. The cartridge heads contain built in check valves and shutoff valves so that the cartridges can be changed without shutting off the water supply or the storage tank. The cartridge head is also hinged to allow easy access to the cartridges. -
Page 14: Cartridge Replacement Schedule
1 year Annual Maintenance Storage Tank Sanitization Storage tank sanitization should be done when the 4/5th stage of MineralPRO unit is replaced. However, it is important to sanitize the system prior to replacing the filter, as outlined in the instructions below: Step 1 Turn off the incoming water supply at the Adapta-Valve. -
Page 15: Tank Air Pressure
Remove and discard the sediment filter, pre-carbon filter, and post carbon filter cartridges. Step 4 Remove the RO membrane cartridge. Place it in a zip lock bag and store in rerigerator. Step 5 To begin using the unit again, follow the startup and tank sanitization procedures. -
Page 16: Troubleshooting
Air in System Air in the system is a normal occurrence with initial start up of the RO system. This milky look will disappear during normal use within 1-2 weeks. If condition reoccurs after filter change, drain tank 1 to 2 times. -
Page 17: Service Record
Serial No. ___________________ Date of Purchase: _______________ Date of Install: ________________ Installed by: _________________ 1st Stage 2nd Stage 3rd Stage 4th Stage Date Sediment Pre-Carbon RO Membrane Carbon/Mineral (6 months) (6 months) (2 years) (1 year) NOTES: - 16 - www.mineralpro.com... -
Page 18: Limited Warranty
OTHER CONDITIONS: If MineralPRO chooses to replace the equipment, it may be replaced with reconditioned equipment. Parts used in repairing or replacing the equipment will be warranted for 90 days from the date the equipment is returned to you or for the remainder of the original warranty period, whichever is longer.
Need help?
Do you have a question about the RO and is the answer not in the manual?
Questions and answers