
Summary of Contents for Pt Platinum PT-DPSFK
- Page 1 PRO STUDIO FLASH KIT PT-DPSFK USER GUIDE Before using your new product, please read these instructions to prevent any damage.
-
Page 2: Table Of Contents
Pro Studio Flash Kit Contents Important Safety Instructions..............3 Introduction . -
Page 3: Important Safety Instructions
PRO STUDIO FLASH KIT Important Safety Instructions To prevent damage to the flash or modeling lamp or injury to you or to others, read the following safety precautions in their entirety before using the flash. 1 Read and understand all instructions before using. 2 Keep these instructions. -
Page 4: Introduction
Introduction Congratulations on your purchase of a high-quality Platinum product. Your PT-DPSFK represents the state of the art in pro studio flash kit technology and is manufactured for reliable and trouble-free performance. Features • 300 Ws, two-light studio flash (strobe) kit with modeling light, stands, and remote trigger •... -
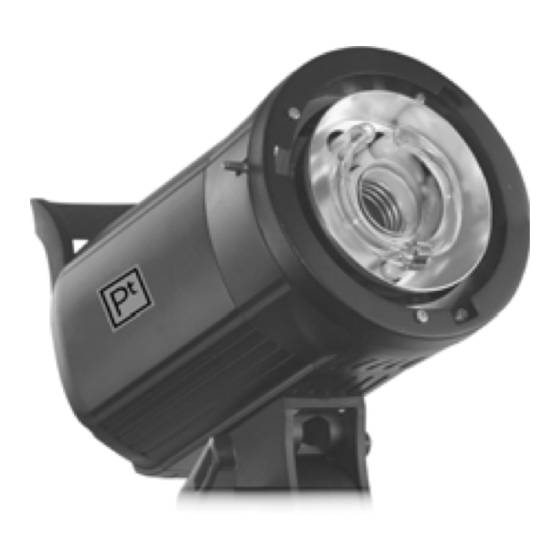
Page 5: Flash Head
PRO STUDIO FLASH KIT Flash head 5 10 5 11 Item Description Light sensor Senses the light from your camera’s flash and triggers your flash. If you have the remote control receiver installed on one of the flashes, this flash triggers the second flash. -
Page 6: Remote Trigger
Remote trigger Your studio flash kit comes with a remote trigger that lets you wirelessly fire your flash. For more information, see “Using the remote trigger” on page 16. Receiver Transmitter Item Description Channel code switches Use these switches to set the channel the receiver uses to receive signals. -
Page 7: Setting Up Your Studio Flash Kit
PRO STUDIO FLASH KIT Setting up your studio flash kit To set up your studio flash kit: 1 Loosen the slider locking knob, pull open the legs on a light stand, then slide the legs down until they are fully extended. - Page 8 4 Screw the modeling lamp into the flash head. Caution: Use insulating gloves when you handle the modeling lamp. Oil from your hands can damage the lamp. Modeling lamp 5 Slide the reflector release pin, slide the reflector over the flash head and modeling lamp, then turn the reflector clockwise to lock it in place.
- Page 9 PRO STUDIO FLASH KIT 7 Plug the power cord into the AC power socket on the flash head and into a power outlet. AC power socket 8 Press the ON/OFF switch to the ON position. The digital display lights. ON/OFF switch...
-
Page 10: Adjusting The Flash
Adjusting the flash Adjusting the flash head position You can adjust the vertical or horizontal position of the flash head. To adjust the flash head position: 1 To change the vertical position of the flash head, move the flash head angle adjustment lever up or down. Note: To set the lever to a better angle for making adjustments, pull the lever out, rotate the lever to the angle you want, then push it back in. -
Page 11: Attaching Accessories
PRO STUDIO FLASH KIT Attaching accessories Your studio flash kit includes two umbrellas and a softbox that let you adjust the light from the flash head. Attaching an umbrella Attach an umbrella to reflect and broaden the light from the flash. To attach an umbrella: •... - Page 12 3 Slide the metal rods (thick ends towards the center) through the loops on the inside of the softbox. Thick end of the rod 4 Slide the ends of the metal rods into the holes on the mounting bracket. Mounting holes Softbox rotation knob Note: Leave the softbox rotation knob loose so you can rotate the softbox after it is installed.
- Page 13 PRO STUDIO FLASH KIT 5 Slide the other ends of the metal rods into the corner pockets on the softbox. 6 Close the gaps on the back of the soft box near the bracket by overlapping the flaps and pressing against each other.
- Page 14 8 Slide the reflector release pin, place the softbox mounting bracket on the flash head, then turn the bracket clockwise to lock it in place. 9 Attach the inner light diffuser to the four elastic loops inside of the softbox.
-
Page 15: Using The Modeling Lamp
PRO STUDIO FLASH KIT 10 Press the edges of the outer diffuser to the outside edges of the softbox and inner diffuser. Using the modeling lamp The modeling lamp provides a low light level so that in a dark environment you have enough light to set up the camera and see the subject in the view finder. -
Page 16: Flash Triggering Methods
Flash triggering methods You can trigger your flash using the: • Remote trigger—See “Using the remote trigger” on page 16. • Light sensor—See “Using the built-in light sensor” on page 17. • PC sync cable—See “Using a PC sync cable to trigger your flash” on page 18. Note If OF appears on the display, the flash triggering feature is turned off. -
Page 17: Using The Built-In Light Sensor
PRO STUDIO FLASH KIT 4 Slide the wireless transmitter onto the camera hotshoe, then turn the locking ring clockwise to secure the transmitter to the hotshoe. 5 Take a picture. When the camera shutter opens, the remote transmitter sends a signal to the remote receiver that triggers the flash head. -
Page 18: Using A Pc Sync Cable To Trigger Your Flash
Using a PC sync cable to trigger your flash You can connect the PC sync cable to your flash and camera so your flash fires when the camera shutter opens. To use a PC sync cable to trigger your flash: 1 Plug the PC sync cable into the SYNC jack on your flash. -
Page 19: Maintenance
PRO STUDIO FLASH KIT Maintenance Replacing the modeling lamp Warnings To avoid damage to the lamp and bodily injury, always: • Wear insulated gloves to protect your hands and to avoid getting oil from yous hands on the modeling lamp. •... -
Page 20: Troubleshooting
Troubleshooting My flash head does not turn. • Make sure that the power cord is plugged into a working power outlet. • Make sure the power switch on the back of the flash head is turned on. • If you are using the remote trigger, make sure that the power cord is connected correctly and the power LED on the remote receiver is blue. -
Page 21: Specifications
PRO STUDIO FLASH KIT Specifications Specifications are subject to change without notice. Flash tube maximum power 300 Watt Seconds Guide number (m ISO 100) Operating voltage AC100~120V/60Hz Modeling lamp power 150 watts Color temperature 5600±200K Power output control OFF, 1.0~3.0 (1/8-1/1) Recycle time 0.3 to 1.5 seconds Triggering methods... -
Page 22: Legal Notices
Legal notices FCC Part 15 This device complies with Part 15 of the FCC Rules. Operation of this product is subject to the following two conditions: (1) this device may not cause harmful interference, and (2) this device must accept any interference received, including interference that may cause undesired operation. -
Page 23: One-Year Limited Warranty - Platinum
PRO STUDIO FLASH KIT One-year limited warranty - Platinum Definitions: The Distributor* of Platinum branded products warrants to you, the original purchaser of this new Platinum-branded product (“Product”), that the Product shall be free of defects in the original manufacturer of the material or workmanship for a period of one (1) year from the date of your purchase of the Product (“Warranty Period”). - Page 24 The Pt logo is a registered trademark of Best Buy. PLATINUM is a trademark of Best Buy and its aliated companies. Registered in some countries. Distributed by Best Buy Purchasing, LLC 7601 Penn Ave South, Richeld, MN 55423 U.S.A. ©2014 Best Buy. All rights reserved. Made in China V1 ENGLISH 14-0806...
Need help?
Do you have a question about the PT-DPSFK and is the answer not in the manual?
Questions and answers