Advertisement
Advertisement

Subscribe to Our Youtube Channel
Summary of Contents for Protect America Camera
- Page 1 Camera Installation Manual...
-
Page 2: Table Of Contents
Table of Contents Camera Anatomy ....... page 3 Package Contents ......page 4 Camera Assembly ......page 5 Account Login ........page 7 Adding a New Camera ....page 8 Wireless Configuration ....page 11 Camera Troubleshooting ....page 16... -
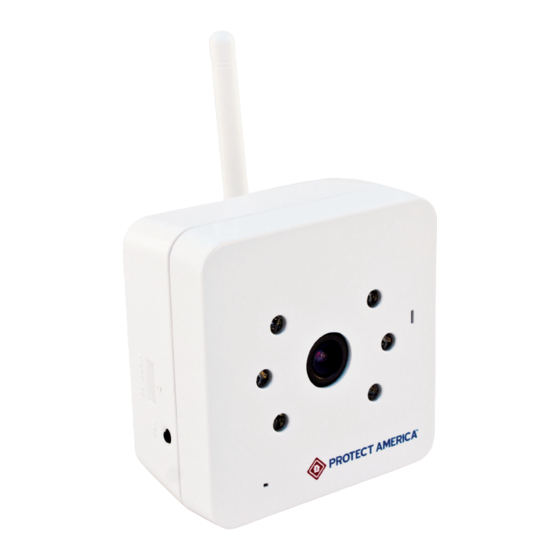
Page 3: Camera Anatomy
**The WPS feature allow for one touch paring of wireless devices. Your wireless router must be WPS enabled in order to pair devices, such as your camera. This feature will allow for easy configuration and saving of your wireless setting with your camera. -
Page 4: Package Contents
Package Contents 1 — In your box you should find. Security Camera(s) AC Power Adapter and Antenna (1 per camera) Ethernet Cord (1 per camera) Mounting Bracket Set Hardware (per camera) (1) Swivel Base Connection (3) 1-inch Mounting Screws (1) Connector... -
Page 5: Camera Assembly
1.OFF 2.RED 3.LIGHT GREEN 4.FLASHING DARK GREEN (If the camera's LED is blue press the WPS/ Privacy button for about 1 second). **WAIT FIVE MINUTES** Check to make sure the front LED light is FLASHING DARK GREEN. *If the camera's LED is not FLASHING DARK GREEN, STOP. - Page 6 Camera Assembly Mounting Bracket (Optional) Assemble mounting bracket components and mount bracket at desired position and height. Connect mounting bracket to the back of the camera.
-
Page 7: Account Login
Account Login The User Website: http://protectamericainteractive.com To log into protectamericainteractive.com: 1. Enter your Username 2. Enter your Password 3. Click Login Once logged in, you will see the Account Details screen. -
Page 8: Adding A New Camera
Adding a New Camera The Camera Settings screen is used to adjust the camera's options for each camera on your account. To add a new camera, click Camera Settings. To add a camera, click on Add Camera Enter the MAC Address of your camera . This will be... - Page 9 (low bandwidth setting). Mac User ACTIVE X If the camera is not connected to your Network, you will see: If this message is displayed or no video is showing on your computer screen, check internet connectivity, unplug and restore camera power.
- Page 10 Click ADD when done. Congratulations! You have successfully set up your camera with a wired internet connection. If you wish to set up your camera for Wi- Fi communication, DO NO DISCONNECT the Ethernet cable from your camera, and then continue to the next page.
-
Page 11: Wireless Configuration
WPS. This will allow you to pair and save wireless configuration data to your camera directly from your router. Refer to the WPS Enabled Routers section on page 13 of this manual and the owner's manual of your wireless router for further instructions. - Page 12 Wireless Configuration **NOTE: Hardwired Camera Installation must be completed before proceeding to the wireless configuration.** Now that your camera is added, you can configure it for wireless communication. Navigate to the Camera Settings tab to view available cameras. Click the EDIT icon or the camera NAME/LOCATION.
- Page 13 Click SELECT next to your network name. The list will auto fill with the correct information. Fill in your wireless NETWORK KEY. Remember it is case sensitive. Once you are done click SAVE. You will see a status bar while your camera is updating. DO NOT DISCONNECT YOUR CAMERA.
- Page 14 Now it's time to test your wireless network settings. Disconnect the power and Ethernet cable from your camera. Wait about 15 seconds for the camera to power down fully. Do not plug the Ethernet cable back into the camera. Restore POWER to the camera. If your wireless settings were saved correctly your camera will start up as normal and connect to your wireless network.
- Page 15 If your router is WPS Enabled follow the directions for pairing WPS Enabled Devices. This step will save the wireless information to the camera but will not add it to your Protect America Interactive account. Refer to your router's owner's manual for direction on how to place in discovery mode.
-
Page 16: Camera Troubleshooting
Camera Troubleshooting The first step of troubleshooting a camera is to see if the camera is plugged in and has power and then to check the LED on the front of the camera and follow the chart below: Description Troubleshooting... -
Page 17: Customer Care
Central Monitoring Station 1-877-274-0604 Protect America, Inc, 3800 Quick Hill Road, Building 1-100, Austin, TX 78728. 1-800-951-5111. Licenses: AL: 027; AR: E 2001-0538; AZ: ROC114856 (L-67), ROC114855 (C-12); CA: ACO 4115; DE: 06-204; FL: EG13000437; GA: LVA205875; IA: AC-0081; IL: 127-001092; LA: F492; MD: 107-1657; MI: 8714 MS: 15005347 Huckleberry Lane, Lansing MI.
Need help?
Do you have a question about the Camera and is the answer not in the manual?
Questions and answers