Table of Contents
Advertisement
Advertisement
Table of Contents

Summary of Contents for Medeli DR2
-
Page 2: Fcc Information
FCC Information GUIDELINES LAID DOWN BY FCC RULES FOR USE OF THE UNIT IN THE U.S.A. (not applicable to other areas) NOTICE This equipment has been tested and found to comply with the limits for a Class B digital device, pursuant to Part 15 of the FCC Rules. -
Page 3: Important Notes
IMPORTANT NOTES Thank you very much for purchasing t his product . You are recommended to study this manual carefully before using the unit. This unit could be operated either by a 3V battery or by a 3V center minus DC adaptor. Before connection, please ensure the power supply has been properly installed and all power devi- ces such as amplifiers must first be turned off, in order to avoid any malfunction. - Page 4 When to use DR2 ? This product is suitable in the following situation Sound sampling in an external or internal environment Live recording Conference recording Course recording for students Home Studio Journalist and other situation need interview recording to record...
-
Page 5: Main Features
MAIN FEATURES Stereo 4 mics recording,360 degree mode. Support mp3 and wav format. 16bit/24bit,44.1K and 48K sample rate. Support SD/SDHC card up to 16G. 128*64 OLED display. Bass compensate, 3D effect, Reverb Chorus Pitch and Delay effect. MP3 voice cancelling. Tuner function inside for guitar and bass player. -
Page 6: Table Of Contents
CONTENTS SIDE PANEL FRONT PANEL 9-10 BATTERY REPLACEMENT DIAGRAM MENU TREE BASIC OPERATION 13-26 RECORDING SETUP 13-15 RECORDING 16-19 SETUP PLAYBACK 20-22 PLAYBACK 23-26 EFFECTS 27-30 FILE MANAGEMENT 31-34 UTILITY 35-38 SD CARD 39-40 SPEAKER PHONES CURRENT STATE PROTECT SPECIFICATIONS... -
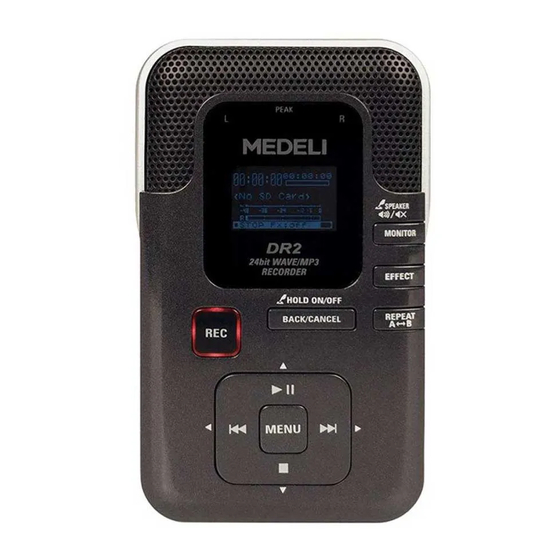
Page 7: Side Panel
SIDE PANEL 1.POWER supply jack:(DC in 3V center minus) Connect an AC adaptor to this jack. 2.[POWER ON/OFF] button: Turn the power on/off. 3.[VOLUME] button: Adjust volume. 4. [MIC GAIN H..L ] button: Choose high level mic input or low level input. -
Page 8: Side Panel
SIDE PANEL 6.LINE IN jack: Connect to any other audio device such as mp3 and CD player. 7. EXT MIC jack: Connect the external microphone. 8. [INPUT LEVEL+/-] button: You can also adjust the recording level by [INPUT LEVEL +] or [INPUT LEVEL-] button. 9. -
Page 9: Front Panel
FRONT PANEL 10.[MENU] button : Press [MENU] button to choose the menu. 11. [BACK/CANCEL] button: Press [BACK/CANEL] goes back to the home screen. Long press[BACK/CANCEL]button to hold on / off . 24bit WAVE/MP3 24bit WAVE/MP3 RECORDER RECORDER 12. [REPEAT A B] button: A-B repeat function allows you to specify point A and point B and automatically play the section between these two points repeatedly. - Page 10 FRONT PANEL 14. [MONITOR] : Headphone monitor output on/off. Long press to turn on/off speaker while playing. 15. [REC] : Record button 16. [Display] A variety of information about the unit appears here. 24bit WAVE/MP3 24bit WAVE/MP3 RECORDER RECORDER 17. [ ]/[ ]: [PLAY/PAUSE] button / [Up] button .
-
Page 11: Battery Replacement Diagram
Size AA, Sum-3,R6 battery. -
Page 12: Menu Tree
MENU TREE... -
Page 13: Basic Operation
BASIC OPERATION M E N U 00:02:22 00:00:00 RECORDING SETUP 1 . R E C O R D S E T U P D R 2 - 0 0 0 1 . m p 3 2 . P L A Y S E T U P At the main screen, press [MENU] button, 3 . - Page 14 BASIC OPERATION SAMPLE RATE R E C O R D S E T U P R E C O R D S E T U P SAMPLE RATE is sample rate parameter . S A M P L E R A T E S A M P L E R A T E 4 8 k H Z 4 4 .
- Page 15 BASIC OPERATION INPUT SELECT R E C O R D S E T U P R E C O R D S E T U P is parameter for number of INPUT SELECT S A M P L E R A TE S A M P L E R A T E microphone to be choosed .
-
Page 16: Recording
We can see two highlight record levels are P U A S F X : o f f scanning. This product detects the level of the currently selected input source. The current file name displays under the record level (eg:DR2-xxxx.mp3 or DR2-xxxx.wav). - Page 17 BASIC OPERATION 04:36:22 00:00:00 Adjust the record level by pressing M I C G A I N : D R 2 - 0 0 0 1 . m p 3 [INPUT LEVEL+] [INPUT LEVEL-] button so that the highlight record level P U A S F X : o f f reaches thehighest level without the peak indicator shown in red turning on .
- Page 18 BASIC OPERATION At the standby condition, Press [PLAY/ PAUSE] or [REC] button to start recording 00:00:01 04:36:21 The [REC] button lightens . D R 2 - 0 0 0 1 . m p 3 the time level begin to increase as recording starts.
- Page 19 BASIC OPERATION 04:36:21 00:02:11 Adjust the output volume by pressing V O L U M E : D R 2 - 0 0 0 1 . m p 3 [VOLUME+] or [VOLUME-] at the left side. R E C F X : o f f 00:11:49 04:25:37 Press [PLAY/PAUSE] button to pause the...
-
Page 20: Setup Playback
BASIC OPERATION M E N U 00:00:00 00:02:22 SETUP PLAYBACK 1 . R E C O R D S E T D R 2 - 0 0 0 1 . m p 3 2 . P L A Y S E T U P 3 . - Page 21 BASIC OPERATION P L A Y S E T U P TRACK SELECT T R A C K S E L E C T S T E R E O TRACK SELECT controls selection of S P E C I A L O F F playback channel .
- Page 22 BASIC OPERATION VOLUME VOLUME controls playback volume. You P L A Y S E T U P V O L U M E [ ] or [ ] button to adjust the playback volume from 0 to 32. Default parameter is 20.
-
Page 23: Playback
BASIC OPERATION PLAYBACK 00:00:00 00:02:22 D R 2 - 0 0 0 1 . m p 3 This product supports playback files of MP3 and WAV . 00:01:18 00:02:22 At the home screen, you can use [PLAY/PAUSE] S T O P F X : o f f D R 2 - 0 0 0 1 . - Page 24 BASIC OPERATION Choose the OPEN at the files edit 00:01:18 00:02:22 F I L E L I S T menu and press the [MENU] button to 1 . O P E N D R 2 - 0 0 0 1 . m p 3 start playing the selected file.
- Page 25 BASIC OPERATION The A-B repeat function allows you to specify point A and point B and automatically play the section between these two points repeatedly. While playing, press the [REPEAT A-B] 00:0:20 00:03:20 00:0:22 00:03:20 button for the first time to locate the start D R 2 - 0 0 0 2 .
- Page 26 BASIC OPERATION The volume of playback can be controlled 00:03:20 00:1:45 by the volume of PLAY SET . The V O L U M E D R 2 - 0 0 0 2 . m p 3 [VOLUME+] [VOLUME -] button on the left side panel can also adjust the P L A Y F X : o f f volume of the recorder.
-
Page 27: Effects
BASIC OPERATION EFFECT M E N U In home screen ,press [MENU] button to go 1 . R E C O R D SE T 2 . P L A Y S E T U P into the main menu, use [ ] or [ ] button 3 . - Page 28 BASIC OPERATION OFF: E F F E C T E D I T E F F E C T T YP E O F F ROOM: E F F E C T E D I T E F F E C T T Y P E Room provides warm musical ambience R O O M...
- Page 29 BASIC OPERATION CHORUS : E F F E C T E D I T The Chorus effect combines delay time and E F F E C T T Y P E amplitude modulation to effectively thicken C H O R U S R A T E and add warmth to the sound .
- Page 30 BASIC OPERATION 00:0:20 00:03:20 In home screen ,You can also press [EFFECT] D R 2 - 0 0 0 2 . m p 3 button to select Room, Hall ,Chorus ,Pitch Shift, or Delay . S T O P F X : o f f 00:0:20 00:03:20 D R 2 - 0 0 0 2 .
-
Page 31: File Management
BASIC OPERATION FILE MANAGEMENT M E N U 1 . R E C O R D S E T In home screen , press the [MENU] 2 . P L A Y S E T U P 3 . E F F E C T button to ENTER the main menu. - Page 32 BASIC OPERATION OPEN 00:00:01 00:03:20 F I L E L I S T choose the OPEN press [MENU] 1 . O P E N D R 2 - 0 0 0 2 . m p 3 2 . D E L E T E button to play the file, the screen will go .
- Page 33 BASIC OPERATION RENAME F I L E L I S T R E N A M E choose RENAME to rename the file, D R 2 - 0 0 0 1 . O P E N 2 . D E L E T E then press the [MENU] button,the 3 .
- Page 34 BASIC OPERATION if a file with the same name already exists in R E N A M E the folder, a message appears and the name D R 2 - 0 0 0 change cannot be executed . Press [MENU] to edit the name. DUPLICATE NAME S A M E F I L E N A M E E X I S T S...
-
Page 35: Utility
BASIC OPERATION UTILITY M E N U 1 . R E C O R D S E T 2 . P L A Y S E T U P At the home screen, press [MENU] to go to 3 . E F F E C T 4 . - Page 36 BASIC OPERATION Choose INFORMATION , then press S D C A R D SD INFORMATION the [MENU] ,the screen displays button C A P A C I T Y 1 . I N F O R M A T I O N the information of SD card such as 9 5 2 M B 2 .
- Page 37 BASIC OPERATION Press [MENU] to confirm,the screen will display Processing....,then begin to format , After finishing the operation the display will go to the SD menu DISPLAY U T I L I T Y D I S P L A Y choose DISPLAY ,press [MENU] button .
-
Page 38: Utility
BASIC OPERATION PRESET U T I L I T Y P R E S E T L O A D F A C T O R Y 1 . S D C A R D choose PRESET , press [MENU] button . P R E S E T ! 2 . - Page 39 BASIC OPERATION SD CARDS: This product supports SD card to exchange data between recorder and PC or other peripheral equipments . Format the card before using it .Most preferable to use the recorder's format function to ensure the compatibility of the card. This product supports SD and SDHC card up to 16G .
- Page 40 BASIC OPERATION Note: In order to avoid any error, please shut down the recorder when inserting a SD card...
-
Page 41: Mic
BASIC OPERATION 00:00:00 04:36:22 MIC: M o n i t o r o f f D R 2 - 0 0 0 1 . m p 3 This product has 4 high-powered stereo MICs inside and can be used as a high quality S T O P F X : o f f microphone . -
Page 42: Current State Protect
BASIC OPERATION CURRENT STATE PROTECT : 04:36:22 00:00:00 Hold [BACK/CANCEL] to start the hold H O L D K EY O N function Display show HOLD KEY ON D R 2 - 0 0 0 1 . m p 3 It will lock all the keys on the panel, S T O P F X : o f f except the USB connection and power off. -
Page 43: Specifications
SPECIFICATIONS Power Requirements: AC adaptor DC3V center minus type or SIZE AA,SUM-3,R6 battery Dimensions: 108(L) x 67.5(W) x 28.5(H) mm Weight: 97g without battery... - Page 44 Version:G13...
Need help?
Do you have a question about the DR2 and is the answer not in the manual?
Questions and answers