Advertisement
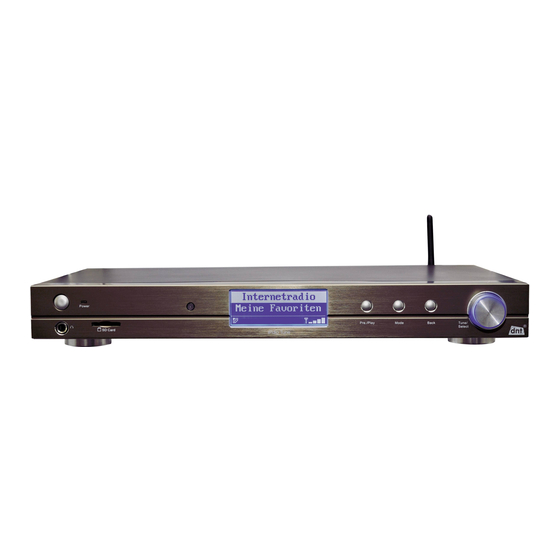
Location of Controls
1.
Power button
2.
Power LED indicator
3.
Remote control lens
4.
LCD display
5.
Previous / Play button
6.
Mode changing button
7.
Back button
8.
Tuning / Select button
9.
6.35 mm earphone jack
10. SD card slot
11. External Wifi antenna
12. Ethernet jack
13. Coaxial Digital output
14. Toslink Digital output
15-16. RCA analog line out
17. FM antenna socket
18. USB host
19. DC IN – power input
20. Main on/off switch
Advertisement
Table of Contents

Subscribe to Our Youtube Channel
Summary of Contents for DNT IPdio
- Page 1 Location of Controls Power button Power LED indicator Remote control lens LCD display Previous / Play button Mode changing button Back button Tuning / Select button 6.35 mm earphone jack 10. SD card slot 11. External Wifi antenna 12. Ethernet jack 13.
-
Page 2: Step 1- Switching On The Radio
Caution: Use only the mains adapter supplied with the radio. Connecting a power supply with a different rating will cause permanent damage to the radio and may be hazardous. The display on the front of the radio will light up and say: Welcome to IPdio Radio Then show Reciva Enabled ARM Powered After a few seconds, it will show the Starting…... -
Page 3: Alarm Clock
After 3 seconds the display goes into the code entry screen. If the display does not automatically go into the code entry mode, press the TUNE/SELECT button. To enter the code, use the TUNE/SELECT to select each character of the code, push down the TUNE/ SELECT button to confirm each character. - Page 4 You can select Auto, Wired only or Wireless only. If you select Auto, it will detect automatically for either wired connection or wireless connection. If you select Wired Only, it will only connect through Wired connection. If you select Wireless Only, it will only connect through Wireless Wi-Fi connection. Configuring the radio to only use a wired Ethernet connection Selecting ‘Wired Only’...
- Page 5 <Language> You can select your desired language from the menu <Factory Reset> You can select this option to clear all the settings you have made and it will resume to the factory’s default settings. If you confirm to do this, all the Presets, Language, selected ESSID, network configuration etc will be resumed to default setting. <Register>...
- Page 6 Choose a Continent and country from the list. A list of radio stations will be displayed: Caribbean Europe Ukraine 2. Select the station by <Genre>: Choose the stations by category or by the type of music, such as the music from 90s, Classical, Dance or Rock music.
-
Page 7: Media Player
.mp3 Windows Media .wma Real itunes .aac Ogg Vorbis .ogg (These are the letters that appear after the file name. e.g. MUSIC.mp3) Select “Media Player’ on the menu: My Stuff Media Player Playback music from SD card or USB drive 1. - Page 8 Playback music via ‘Windows Shares’: In order to play the music files you have stored on your PC via the Media player you must ensure the following: Your PC has the type of music files as listed in the table below The music files on your PC are not 'protected' The music files are stored in the correct location on your PC The music files on your PC are “shared”...
- Page 9 Press the SELECT button.’ [Add to Queue]’ will be displayed. Turn the knob until the required track is displayed. Press the SELECT button. The track will begin playing. Listening to a complete shared album Turn the knob until ‘By Artist’ is displayed. Press the SELECT button.
- Page 10 Playing tracks in the queue repeatedly Select the individual tracks as described previously. Navigate to top-level menu item ‘Media Player’ using the SELECT and BACK buttons. Press the SELECT button. Turn the knob until ‘Playback Mode’ is displayed. Press the SELECT button. Turn the knob until ‘Repeat’...
- Page 11 From the ‘Media Sharing’ windows, the radio will be listed as an unknown device. Click on the unknown device listed, then click the ‘Allow’ button and then click ‘OK’ Allowing the Radio to Connect: Once the UPnP server is configure to share media files with the internet radio, you can play the files by doing the following on the radio.
-
Page 12: Step 5- Listening To Fm Stations
e.g. ‘Music’, ‘Playlists’ etc. Turn the knob to select which category you wish to browse, press SELECT and turn the knob to highlight a sub category and press SELECT again. For example, you could select ‘Music’ and then ‘Album’. 12. Select the music files that you wish to play. 13. -
Page 13: Step 7- How To Set The Alarm
Step 7- How to set the Alarm 1. On the main menu, select <Alarm/Clock> to set the Alarm clock: Set Alarm Sleep timer 2. You can select “Disable all” to disable all the alarm settings, or you can set to enable the 5 alarms. 3. -
Page 14: Audio Output
using remote control. Requesting a station that is currently unavailable on-line If you want to listen to a particular radio station which is currently not available on line, you can visit the Reciva website at http://www.reciva.com/ and put in a request to add the station to the list. Switch the radio OFF and ON To switch off, press POWER once and the clock will be displayed. -
Page 15: Troubleshooting
TROUBLESHOOTING If you have trouble connecting the radio to your wireless network, these steps may help to resolve the problem: Confirm that a Wi-Fi or Ethernet Wired connected PC can access the internet (i.e. can browse the web) using the same network. - Page 16 this should not be a problem. Y ou have a third party firewall in your network, which is preventing file sharing. If you have a third party firewall (Like Norton, or Zone Alarm) that will have its own control panel and you will need to consult the manual for your firewall.
- Page 17 the file type is .m3u. (Existing play lists can be opened and re-saved in this format) When the Internet Radio detects you have playlists, it will enable a new menu option allowing the playlist to be selected and added to the queue. If you re-connect to another PC of folder, which does not have any Playlists in the .m3u.
-
Page 18: Internet Service
INTERNET SERVICE Configuring ‘My Stuff’ Registering an account on Reciva’s website Open the website, http://www.reciva.com, from your internet browser. Click on the ‘My Account’ link and follw the on-screen instructions to register an account. Please note, during the registration process, a validation code will be sent to you via email. Please enter this code when prompted to do so. After logging into your account, you will be able to edit your information for ‘My Stations’,’My streams’, ’My Detail’... - Page 19 : <Press to start playback at the next track> 17. MODE: <Press to switch Flat/Bass/Classical/Jazz/Pop/Rock equalizations. The default for this EQ is Flat style as default.>...
Need help?
Do you have a question about the IPdio and is the answer not in the manual?
Questions and answers