
Summary of Contents for Mobile CyberNetor ED-35-SRD
- Page 1 3.5” SATA Dual Bay LANDisk User Guide Include ☆ Hardware Overview ☆ Hardware Installation ☆ Web ☆ Raid Mode Selection ☆ Hard Drive Formatting Guide ☆ Software Installation Guide...
-
Page 2: Table Of Contents
Dual Bay LANDisk User Guide Contents Hardware ..........................2 Power / 1.2 Ports / 1.3 Buttons / 1.4 Leds ............... 2 Front / Back View......................3 Installation......................…..………..…4 2.1 Requirements…………………………………………………………………………………….4 2.2 HW Installation………………………………………………………………………...…………4 Web ............................6 Home ..........................6 Administration ........................6 3.2.1 LAN Settings ..................... -
Page 3: Hardware
Dual Bay LANDisk User Guide 1. Hardware Overview Power Receptor for the provided Power Adapter (12V DC, Maximum 4Amps, 100-240V AC, 50-60Hz) 1.2 Ports LAN connection. (Connect the port with RJ-45 cable to your switch or IP LAN Port sharing router.) Connect your USB device to NAS. -
Page 4: Front / Back View
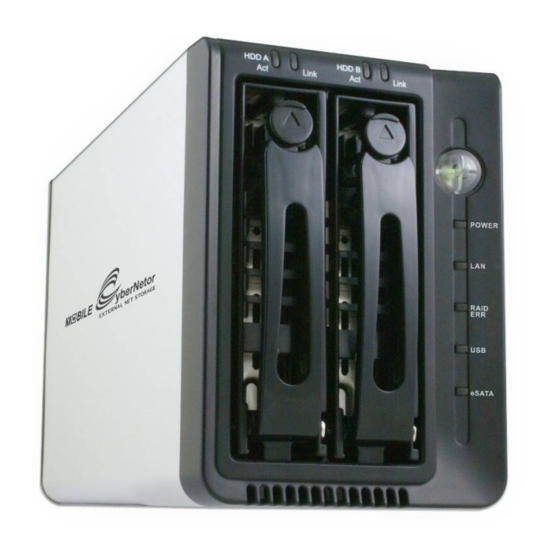
Dual Bay LANDisk User Guide About the 3.5” SATA Dual Bay LanDisk 1.5. Front / Back View HDD B Act / Link LEDs HDD A Act / Link LEDs POWER Button POWER LEDs LAN LEDs Raid ERR LEDs USB LEDs e SATA LEDs Power DC Jack System Reset SW... -
Page 5: Installation
Dual Bay LANDisk User Guide 2. Installation 2.1 Requirements The following are required when using the NAS. TCP/IP Protocol must be installed in your PC. • Connect NAS to a switch/hub port to connect your network. • 2.2 HW Installation Hard Drives Installation Guide STEP1: Push the button and Pull out the tray. - Page 6 Dual Bay LANDisk User Guide STEP3: Push the tray to the end until the HDD is connected with SATA connector. STEP4: Push tray into Aluminum housing and secure them together. : Note Select operation mode first.
-
Page 7: Web
Dual Bay LANDisk User Guide 3.Web Just simply type in the NAS IP (default IP:192.168.16.1) in the browser to enter the NAS web. 3.1 Home The basic information of the NAS will be shown at here. 3.2 Administration The username and password will be required when entering this section. The default username is "admin"... -
Page 8: Lan Settings
Dual Bay LANDisk User Guide 3.2.1 LAN Settings This section contains all LAN settings to configure the NAS to the network. Depending on how the network is set up, changes to this page may or may not be necessary. We can choose between DHCP and Static IP from the “Protocol”... - Page 9 Dual Bay LANDisk User Guide 3.2.2 System The basic settings of NAS can be set at here. Including “Device Name”, “Description”, “Date”, “Time Zone”, “Http Port” and the NTP, FTP server can be enabling or disable in here too. After the NTP option is enabled, you’ll need to enter a valid NTP server to make it work correctly. It will get the time from the server.
- Page 10 Dual Bay LANDisk User Guide 3.2.4 The installed USB hard disk will show in here. NOTE: The printer is various in style, therefore the printer function does not guarantee to support all printers. 3.2.5 Users A NAS hard disk MUST be installed for this function to work in properly. Change Password: We can change the user’s password from here (only works if there’s a user exist).
- Page 11 Dual Bay LANDisk User Guide the time of NAS hard disk is created). Remove user’s share folder completely This will remove all files and folder of user’s completely without any backup. Add a new user: Type in the username, password we want. There are 3 properties can be choose: No accessible to other users:Only the user himself can access to the folder.
- Page 12 Dual Bay LANDisk User Guide 3.2.6 Share Select the share folder list to change it after a user has been added. There are three operations types to choose: Not accessible to other users: No accessing. No user is allowed to get access to this folder. Read-only to other users: Users are allowed to read in this folder.
-
Page 13: Itunes
Dual Bay LANDisk User Guide 3.2.8 iTunes iTunes Server First time to start the iTunes Server function; install the software to hard disk. Start this function, choose “setup module “, Insert the installation CD into the CD ROM device, choose “itunes.bin“ to install. -
Page 14: Bittorrent
Dual Bay LANDisk User Guide 3.2.9 BitTorrent A NAS hard disk is required to use this function. Global settings From here we can choose which folder (public or user’s folder) we want to place the torrent files. The max download and upload rate can be limited to the rate we want. Seed options:... - Page 15 Dual Bay LANDisk User Guide There are four operations we can do: Detail: Show the detail information of the job. Start : If you want to running the job clicks this button. Stop : If you want to stop the job click this button. Delete:Stop and delete the job then you can add other jobs.
-
Page 16: Tools
Dual Bay LANDisk User Guide 3.2.10 Tools 3.2.10.1 Scheduling A schedule for the NAS to restart can be set in here. 3.2.10.2 Restart Restart the NAS immediately. 3.210.3 Hard disk utility Two functions can be found in this option. Format:Format a hard disk into a NAS hard disk from here (User management ONLY works on a NAS hard disk). - Page 17 Dual Bay LANDisk User Guide 3.2.10.4 Firmware Upgrade Whenever a new firmware released, we can upgrade the NAS firmware from here. This will takes about 1~2 min for the upgrade to complete. 3.2.10.5 Save Config Here allows us to backup the setting we’ve set for future use. (Including the settings in LAN, System and Scheduling) Download:The configuration file will be downloading.
-
Page 18: Factory Default / 3.2.10.7 Login Setting / 3.2.10.8 System Log
Dual Bay LANDisk User Guide 3.2.10.6 Factory Default Only use this function whenever you want the device back to the Factory Default. NAS will be reboot for the new setting to be effective. 3.2.10.7 Login Settings The username and password to login the NAS can be change from here. 3.2.10.8 System Log We can view the log from here. -
Page 19: Raid Mode Selection
Dual Bay LANDisk User Guide 4.RAID Mode Selection 4.1 GUI SteelVine Manager Operation ☆ GUI SteelVine Manager is available only under GUI Mode. STEP1: Install SteelVine Manager . STEP2: Start the SteelVine Manager . STEP3: Click on “Configure Box” icon. STEP4: Select “Storage Policy”... -
Page 20: Jumper Selection & Storage Policy Definitions
Dual Bay LANDisk User Guide 4.2 Jumper Selection & Storage Policy Definitions 4.2.1 GUI MODE (factory default):This mode allows you to use the SteelVine Manager GUI to configure the storage policy and other settings as well as monitor the status of the appliance (i.e., storage capacity, and RAID mode of the desired hard drive). - Page 21 Dual Bay LANDisk User Guide 4.2.2 JBOD MODE:It enables each hard drive to be seen separately as single drives. When using a SATA host controller, JBOD should only be used if the SATA host controller provides Port Multiplier (PM) support. If a host is not PM-aware, only a single drive is presented (drive A). No such limitation if using a USB host connection.
- Page 22 Dual Bay LANDisk User Guide 4.2.3 BIG MODE:It concatenates a series of physical hard drives as a single large volume; Hard drive A and B are combined into a storage capacity that is equal to the sum of each of the physical hard drives A and B.
- Page 23 Dual Bay LANDisk User Guide 4.2.4 RAID 0 (Fast):It’s a combination of two physical partitions, where the data is striped between them. It presents the best data speed but no data redundancy. Two equal hard drives:The capacity is double of the smaller hard drives. Two unequal hard drives:The capacity is equal to the sum of both hard dr ives.
- Page 24 Dual Bay LANDisk User Guide 4.2.5 RAID 1 (Safe):It allows the device automatically to copy data to both hard drives. It stores all data in duplicate on separate drives to protect against data loss due to drive failure. It provides the highest level of data protection for critical data that you cannot afford to lose if a hard drive fails The capacity is equal to the smaller of the two hard drives.
- Page 25 Dual Bay LANDisk User Guide 4.2.6 RAID / SAFE33 :It creates two virtual volumes; one SAFE volume and one BIG volume, and should be used when you need the high reliability for some of your data but you don’t need high reliability for the remainder of your data.
- Page 26 Dual Bay LANDisk User Guide 4.2.7 RAID / SAFE50:It creates two virtual volumes; one SAFE volume and one BIG volume, and should be used when you need the high reliability for some of your data but you don’t need high reliability for the remainder of your data.
-
Page 27: Jbod Mode
Dual Bay LANDisk User Guide 5.Hard Drive Formatting Guide STEP1: Right-click on “My Computer” icon and select the” Manage” column. ”. STEP2: Select “Disk Management” and you will see your hard drives show “Unallocated : Sample 750GB & 250GB hard drives. JBOD MODE... -
Page 28: Big Mode
Dual Bay LANDisk User Guide BIG MODE RAID 0 (FAST) MODE... -
Page 29: Raid 1 (Safe)
Dual Bay LANDisk User Guide RAID 1 (SAFE) MODE RAID/SAFE 33 MODE... -
Page 30: Raid / Safe50
Dual Bay LANDisk User Guide RAID/SAFE 50 MODE STEP3: Right-click the red-squared block and selects “Initialize Disk”. Take JBOD MODE for example. (one 750GB HDD & one 250GB hard drives) STEP4: Press “OK” button to initialize hard drive. - Page 31 Dual Bay LANDisk User Guide STEP5: The hard drive will show “Online”. Right-click the “Unallocated” block and selects “New Partition”. STEP6: The “New Partition Wizard” will appear. Please follow the instruction of the wizard to complete the partition.
- Page 32 Dual Bay LANDisk User Guide STEP7: When new partition is completed, the hard drive will be recognized as a “New Volume”. STEP8: Format the other hard drive in the same way.
-
Page 33: Software Installation Guide
Dual Bay LANDisk User Guide 6.Software Installation Guide STEP1: Insert driver CD to the CD-ROM drive. STEP2: Select “Install GUI” icon to install the driver. STEP3: Please follow the wizard to complete. - Page 34 Dual Bay LANDisk User Guide Starting the SteelVine Manager Before you begin, be sure that the SteelVine Manager software has been installed according to the instructions in the Software Installation Guide for your host computer type. MS Windows Click Start → Program Files → Silicon Image 57XX SteelVine → SteelVineManager. Once started, the SteelVine Manager Application icon can be found in the Notification Tray located at the bottom right hand corner of the screen.
- Page 35 Dual Bay LANDisk User Guide Introducing the SteelVine Manager The SteelVine Manager starts with the Status window visible so you can monitor the device. The Status-only mode is entered when the switching jumper is in the JBOD, BIG, RAID 0, RAID 1, SAFE33, or SAFE50 mode.
- Page 36 Dual Bay LANDisk User Guide JBOD MODE: RAID 1 (Safe):...
- Page 37 Dual Bay LANDisk User Guide BIG MODE: RAID / SAFE33:...
- Page 38 Dual Bay LANDisk User Guide RAID / SAFE50: RAID 0 (Fast):...
- Page 39 Dual Bay LANDisk User Guide Item Description System Status Section The field displays “N/A” because there’s no temperature sensor Temperature installed in this device. The field displays “N/A” because there’s no fan speed sensor Fan Speed installed in this device. Drive Status Section Box Status Shows the unique serial number assigned by the disk manufacturer.
- Page 40 Dual Bay LANDisk User Guide Show Event Log View the Event Log. View the current version or download an updated version Specify Firmware of the SteelVine Storage Processor firmware. Backup Button Useless on this device.
Need help?
Do you have a question about the ED-35-SRD and is the answer not in the manual?
Questions and answers