Table of Contents
Advertisement
Quick Links
Advertisement
Table of Contents

Summary of Contents for Smart Cat PDA
- Page 1 Users Manual V 1.0 Distributed Exclusively by William Frick & Company...
-
Page 2: Table Of Contents
TABLE OF CONTENTS System Requirements & Reader Specs ..........3 Reader Specs ..................4 SmartCAT Kit ..................5 ™ Kit Accessories ................... 6 Reader Components ................7 Icons ....................8 SmartCAT Setup ................9-11 SmartCAT Configuration ..............12 SmartCAT Folder and File Overview ..........13 Customizing the Configuration File .......... -
Page 3: System Requirements & Reader Specs
SYSTEM REQUIREMENTS & READER SPECS SmartCAT ™ can only be used with a computer You must have Windows ActiveSync 3.7 or higher, utilizing Microsoft Windows. if you are using Windows XP or earlier. Download ActiveSync 4.5 at: Windows Mobile Device Center will automatically http://www.microsoft.com/en-us/download/details.aspx?id=15 launch for users using Windows Vista and 7. -
Page 4: Reader Specs
READER SPECS CONT. Physical and Environmental Communication RS-232 serial port; USB Characteristics Port Dimensions with- 6.25” (L) x 3.1” (W) x Expansion Slot 1 Micro SD slot, 1 SIM out gun handle 4.6” (H) slot Keypad 29 Key 15.9cm (L) x 7.9cm (W) x 11.7cm (H) Notifications Vibrator, Speaker, LED’s... -
Page 5: Smartcat ™ Kit
SmartCAT ™ Case Included in Kit: 1. Reader pistol grip, hand strap and stylus come assembled 2. Reader Leather Sleeve 3. Cradle (docking station) for USB connection and charging reader battery 4. Extra Battery and USB Sync Cable 5. 12 Volt Car Charger, AC Charger, Adapter and AC Cable 6. -
Page 6: Kit Accessories
KIT ACCESSORIES Reader Hand Strap Pistol Grip Stylus Reader Cover Case Cradle Battery (2) 12 Volt Car Charger Adaptor and AC Cable USB Sync Cable User Manual V1... -
Page 7: Reader Components
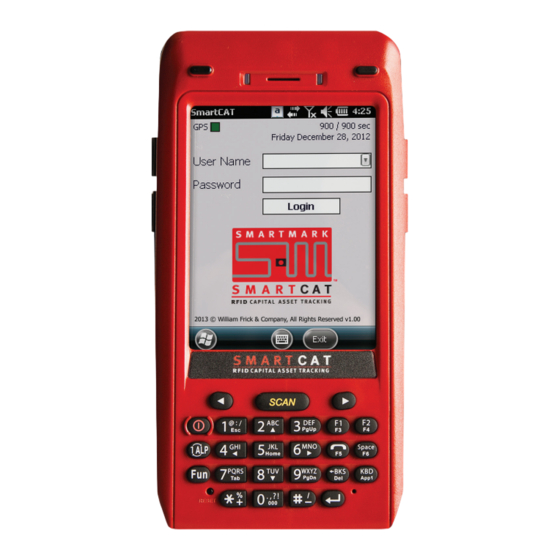
READER COMPONENTS Camera RFID Reader Barcode Scanner Speaker Function WLAN LED Battery Buttons Phone Speaker Charge Status Volume Touch Screen Left/Right Arrows Power Button Keypad Reset Button Battery Latch DC Power Jack Hand strap Hole Cradle Connector Earphone Jack USB Sync Connector Trigger Button Pistol Grip smartcatrfid.com... -
Page 8: Icons
ICONS APP ICONS Windows Start Menu Warning/Missing data/App not running GPS signal NOT Acquired GPS signal Acquired Touch Screen Keyboard Warning message to inform the user Required Field User Manual V1... -
Page 9: Smartcat Setup
SmartCAT SETUP ™ the power button and checking the remain- Introduction ing battery on screen. Connect AC charger to the charger if the upper left hand light is red, ™ SmartCAT is an all-in-one RFID-based capital the READER is charging, if it is green, the asset tracking system. - Page 10 For Windows XP and Older - ActiveSync 4.5 Users 3. Once the USB cable is connected, the follow- ing screen (Sychronization Setup Wizard) will display on your computer. Click “Cancel”. NOTE: Do not disconnect the USB while loading. Load time will depend on the speed of your computer.
- Page 11 SmartCAT SETUP ™ CONT. 6. Open the SmartCAT ™ folder. 11. Open the Master Config folder, in the SmartCAT folder. 7. Select a drive on your computer where you 12. Cut and paste the Config folder from the would like to store your SmartCAT files. device drive to this folder on your computer.
-
Page 12: Smartcat Configuration
SmartCAT CONFIGURATION ™ NOTE: The spreadsheets that you will be Overview - Before Configuration customizing will have example data filled in (first time use). Delete this data, unless otherwise ™ SmartCAT is configured by using spreadsheets stated, before customizing your information. ™... -
Page 13: Smartcat Folder And File Overview
SmartCAT FOLDER AND FILE OVERVIEW ™ mended to save a time and dated copy of the Customizing the Configuration current configuration files in the Config Ar- chives folder. This section is a brief overview of the configura- After a change has been made to the current tion files and folders that the administrator will configuration files within the Config folder, the customize and upload to the READER. -
Page 14: Customizing The Configuration File
CUSTOMIZING THE CONFIGURATION FILES tion will not show up on the reader. NOTE: There is no restriction on length or the Customizing the “Users” Spreadsheet use of special characters (#$%^&). It is, however, 1. On your PC, open: advisable to keep the password and user name SmartCAT ™... - Page 15 CUSTOMIZING THE CONFIGURATION FILES CONT. track in column A. Customizing the AssetTypes Spreadsheet 3. Type the asset type file names next to the corresponding asset type in column B. The 1. On your PC, open: SmartCAT ™ >Master asset name should be the asset type “.csv” Config>Config>AssetTypes.csv Refer to example spreadsheet image below.
- Page 16 CUSTOMIZING THE CONFIGURATION FILES CONT. Column *Header/Description Customizing the “Survey Questions” REQUIRED FIELD Spreadsheet Do you want this to be a required These will be the survey questions that appear on field? Type TRUE if you would like it the READER while the user is tracking the asset. to be a required field, leave blank if 1.
- Page 17 CUSTOMIZING THE CONFIGURATION FILES CONT. Example - Survey Questions Spreadsheet smartcatrfid.com...
- Page 18 CUSTOMIZING THE CONFIGURATION FILES CONT. Customizing the “System” Spreadsheet 5. Row 4, column B, select if you would like the GPS to be on or off. Type ON or OFF in this 1. Open SmartCAT ™ >Master Config> cell. Config folder>System.csv 6.
- Page 19 CUSTOMIZING THE CONFIGURATION FILES CONT. Customizing the “SafetyMessage” text file see and accept every time they log into the SmartCAT app. If you would not like a safety 1. Open SmartCAT ™ >MasterConfig>Config> message to appear, then delete the SafetyMessage.txt SafetyMessage folder on your computer.
-
Page 20: Customizing The Configuration File
CUSTOMIZING THE CONFIGURATION FILES CONT. 1. Copy the Config folder on your PC drive. Sync Files to Reader For Windows Vista and Newer - Windows Mobile Device Center Users Transfer folders from PC drive to READER 2. Paste the folder in the READER device drive: drive ™... -
Page 21: Smartcat User Guide
SmartCAT USER GUIDE ™ 3. The Home screen will display. Select the Using the SmartCAT Application ™ SmartCAT icon. on the READER Use the stylus pen to select information on the touch screen. NOTE: The screen will black out after being idle for a certain amount of time. - Page 22 SmartCAT USER GUIDE ™ CONT. 6. Select the Login button. Example Survey 7. Read the safety message (skip this step if a safety message does not appear). 8. Select the Accept box. 9. Select OK. 10. Once logged in, select the Asset Type that you will be surveying in the Asset Type drop down.
- Page 23 SmartCAT USER GUIDE ™ CONT. RFID: 4. If selecting multiple tags, select the desired tag(s) on the display screen. When RFID is selected, the following screen will 5. Select OK on the display screen and move on display: to the remaining questions. Barcode: When Barcode is selected, the following screen will display:...
- Page 24 SmartCAT USER GUIDE ™ CONT. Camera: b. Select “Flash” from the list of options When Camera is selected, the following screen c. Select “On” will display: 2. ResolutionChange Example a. Within the Camera mode, select the “Menu” option on the windows bar at the bottom of the screen.
- Page 25 SmartCAT USER GUIDE ™ CONT. 1. Mount the READER to the cradle. For Windows XP and Older - ActiveSync 4.5 Users 2. Connect the USB cable from the cradle to your computer USB port. 3. Once the USB cable is connected, the follow- ing screen (Sychronization Setup Wizard) will For Windows Vista and Newer - Windows display on your computer.
- Page 26 SmartCAT USER GUIDE ™ CONT. 7. Open SmartCAT folder. 13. Open the Data folder on your computer ™ drive (Computer>SmartCAT>Data). Confirm 8. Cut the Data folder (right click on folder and that the newest log file is in the Data folder. select “cut”).
- Page 27 SmartCAT USER GUIDE ™ CONT. Convert Log Files to CSV 1. Open MS Excel. 7. Name log file so that it is easy for you to identify, organize and recover in the future. 2. Open the log file that you would like to con- vert (Computer>SmartCAT ™...
-
Page 28: Troubleshooting
TROUBLESHOOTING Before Calling for Service Review the following troubleshooting guide and FAQ section before calling for service. Customer Service: 1-855-SMRTCAT (767-8228). SmartCAT ™ Problem Cause Solution Time and date on the READER This is normal operation. Always keep your READER charged to changes every time the battery avoid this issue. -
Page 29: Faqs
FAQS Does SmartCAT also work as Are there any limitations to the ™ asset management software? number of data capture options able to be used in a survey? No. SmartCAT ™ is an asset tracking and data collecting application. Data exports in ‘.csv’ or ‘.xml’... - Page 30 FAQS My reader wont connect to my I can’t copy my configuration computer with Windows 7 OS. file to the reader. I keep What should I do? getting the error message “Cannot copy ‘File’. The device Please make sure you have “Windows Mobile Device Center”...
Need help?
Do you have a question about the PDA and is the answer not in the manual?
Questions and answers