Table of Contents
Advertisement
Quick Links
- 1 Commissioning
- 2 How to Synchronize a Second Device with an Installation Already Done with the Original Device
- 3 How to Reset the Nexho Application Downloaded in My Device
- 4 How to Control Your Nexho Installation from Outside Your House through Internet
- 5 How to Reset the Internet Module Nexho-Nt
- 6 How to Install Radiators in Your Automation Network
- 7 Troubleshooting
- 8 Impossible to Connect with the Internet Module
- Download this manual
NEXHO-NT – Internet Module
Fitting and Operating Instructions
NOTICE
Please read these instructions carefully and keep them for future consultation.
NEXHO range equipment must be installed by an accredited, qualified electrician
and must observe Low Voltage Regulations. The installation as a whole should
meet the provisions of aforesaid regulation. Any claim presented will be deemed
invalid if the prevailing regulations have not been met.
Advertisement
Table of Contents

Summary of Contents for Farho NEXHO-NT
- Page 1 NEXHO-NT – Internet Module Fitting and Operating Instructions NOTICE Please read these instructions carefully and keep them for future consultation. NEXHO range equipment must be installed by an accredited, qualified electrician and must observe Low Voltage Regulations. The installation as a whole should meet the provisions of aforesaid regulation.
-
Page 2: Table Of Contents
How to deactivate the password request in NEXHO application? ..12 How to control your nexho installation from outside your house through internet? ..................12 How to reset the internet module NEXHO-NT? ........16 WORKING WITH HEATERS ..............18 How to install radiators in your automation network? ......18 How to change the name of one heating zone? ........ - Page 3 WORKING WITH FIRE DETECTORS ............30 How to install a fire detector in the automation network? ....30 WORKING WITH NUMERIC MODULES ..........31 How to install a numeric module in the automation network ....31 WORKING WITH POWER CONTROL MODULES ........32 How to install power control modules in the automation network ..
- Page 4 How to activate/deactivate the security mode against flooding? ... 48 How to configure the actions that your system has to take when receiving a potential fire alert? ..............48 How to activate/deactivate the security mode against fires?....49 WORKING WITH SCENES ..............50 What is an scene? ................
-
Page 5: Instructions For Use
Once the application is downloaded and configured together with the Internet Module NEXHO-NT you will be able to surf through the different existing menus and control, in an intuitive and user-friendly manner,... -
Page 6: Commissioning
, a feeder plug and a 230V/125V adaptor. In order to use the Internet Module NEXHO-NT it is necessary to have a router with Wi-Fi connectivity and at least one controlling device such as a smart phone, TABLET or PC with internet connection that are not included in this package. - Page 7 Configure your Smartphone or any other device to connect to the Wi-Fi network generated by the router that has been connected to the Internet Module NEXHO-NT. This step is vital in this process. Do not forget to connect yourself to the Wi-Fi network generated by the router when you are doing the initial installation.
- Page 8 The NEXHO system needs an start up installation in order to link the application in the device with the Internet Module NEXHO-NT. Moreover, the NEXHO application protects, with a password all the menus related with security and configuration Nevertheless it is important to protect the wifi access to your router with a password if you haven’t done it...
-
Page 9: Positioning
(Android Market, Apple Store, etc.) in your device as you have done in the first installation. Configure your Smartphone or any other device to connect to the Wi-Fi network generated by the router that has been connected to the Internet Module NEXHO-NT. This step is vital in this process. Do not forget to... - Page 10 Using a small screw driver or any other alternative tool, push the “push button switch” in the back of the Internet Module NEXHO-NT. After doing so, a message will show in your device screen indicating the status of the synchronization of your mobile device with the Internet Module NEXHO-NT.
-
Page 11: How To Reset The Nexho Application Downloaded In My Device
• In both devices, select the configuration menu in the opening screen of NEXHOs application. In some versions of this application this menu will appear as an icon in the shape of a tool at the top left part of the screen. If this icon does not appear, press the “Menu”... -
Page 12: How To Set The Time
How to set the time? Please go to the main menu and press the “Communications” button, once inside the communications menu press the “Send time” button. Please keep in mind that the configuration password by default is “nexho”. You can change this password or deactivate it. To do any of this please go to configuration menu, then go into “Password”... -
Page 13: How To Deactivate The Password Request In Nexho Application
How to deactivate the password request in NEXHO application? In order to access to some of the menus within NEXHOs application it is necessary to introduce a password. The password for configuration will be by default, “nexho”. If you want to deactivate the password request of this application, enter the configuration of the opening screen of NEXHOs application. - Page 14 Moreover you will need to configure your router so the NEXHO application is allowed to receive data from outside your local network. To make this possible you will need to configure a “Port forwarding” in your installation router. From a computer connected with a cable to the router, access your routers configuration menu.
- Page 16 The configuration of the router is now finished.
-
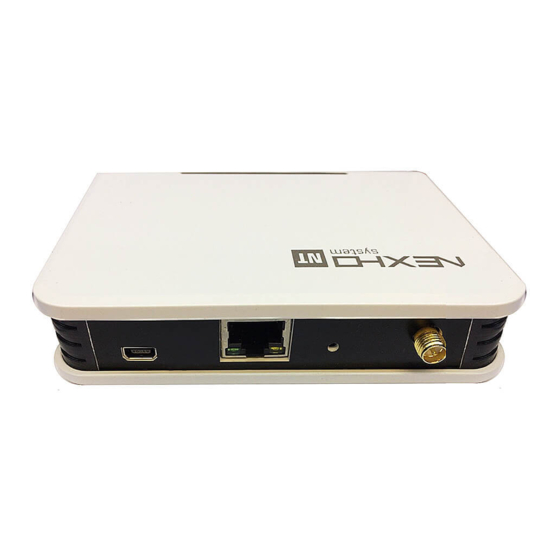
Page 17: How To Reset The Internet Module Nexho-Nt
After this, you should re-install all NEXHO products in your house and synchronize again, the applications of all associated devices. In order to reset the Internet Module NEXHO-NT, take the following steps: Disconnect the network cable RJ45 that connects your installation routers to Internet module... - Page 18 Disconnect the power cable from your Internet Module. Connect the data cable RJ45 to the Internet Module NEXHO-NT and to your router. Insert the feeder plug into the corresponding connector at the back of the Internet Module NEXHO-NT and connect the feeder to the house mains.
-
Page 19: Working With Heaters
WORKING WITH HEATERS How to install radiators in your automation network? This operation will only be necessary when you are installing the radiators. This configuration will remain saved even with electric cut outs. It is necessary to go through this process in order to be able to control your heating system from your nexho application. -
Page 20: How To Change The Name Of One Heating Zone
If you want to install another radiator in an existing zone: • Select “Edit Zone”. Select the zone that you have previously created where you want to install a second radiator • Select the option “Add Modules” • When the screen shows the message “Waiting for the module” select the following options from your XANA PLUS radiator: •... -
Page 21: How To Activate The Programs In The Xp Heaters
screen where it gives you several options: “One Zone”, “Various Zones” and/or “All Zones”. Use the +/- buttons to select the temperature you want and then press the “Modify” button. How to activate the programs in the XP heaters In the NEXHO application click on the “Heating” button and click the option “Programs”. -
Page 22: How To Personalize Or Modify The Programs Of Your Xp Heaters
How to personalize or modify the programs of your XP heaters? In the NEXHO application click on the “Heating” button and press the “Programs” option. Select the zones/rooms where you want to personalize the programs. Please keep in mind that you can select more than one room/zone in the upper part of the screen where it gives you several options: “One Zone”, “Various Zones”... - Page 23 With the new NEXHO system, you will be able to control the radiators that are out of the Internets module range. Using the built in repeater you will find in our XP radiators, you will be able to send instructions to all the radiators, even those far away from the Module.
- Page 24 (Note: If when getting to this step the indicator “►” is positioned in front of the “Activate” word, this would mean that the repeater mode has already been deactivated. Only activate this function when necessary, and on the smallest number of radiators possible.
-
Page 25: Working With Thermostats
WORKING WITH THERMOSTATS How to install a thermostat module in the automation This operation will only be necessary when you are installing thermostat modules. This configuration will remain saved even with electric cut outs. It is necessary to go through this process in order to be able to control your thermostat modules from your NEXHO application. -
Page 26: How To Change A Name Of A Thermostat Zone
Select the option “Add Modules” When the screen shows the message “Waiting for the module” press the installation button from your Thermostat Module NEXHO-CL If all this has been done correctly, in your applications screen you can see that the number of modules installed has increased in one unit. -
Page 27: How To Activate The Programs In The Thermostat Modules Nexho-Cl
How to activate the programs in the thermostat modules NEXHO-CL? In the NEXHO application click on the “Heating” button and click the option “Programs”. Select the zone/room where you want to activate the programs. Please keep in mind that you can select more than one room/zone in the upper part where it gives you several options: “One Zone”, “Various Zones”... - Page 28 Now select the option “Edit Programs”. Select the days you want to personalize the programs. Remember you can pick more than one day in the options “Various days” or “All” in the menu you will find in the upper part of the screen. Insert the time that you want the program to begin, the time when you want the program to stop and the temperature in the first timeframe of the programming menu.
-
Page 29: Working With Presence Detectors
WORKING WITH PRESENCE DETECTORS How to install a presence detector in the automation network? This operation will only be necessary when you are installing presence detectors. This configuration will remain saved even with electric cut outs. It is necessary to go through this process in order to be able to control your presence detectors from your internet module. -
Page 30: Working With Flooding Detectors
WORKING WITH FLOODING DETECTORS How to install a flooding detector in the automation network? This operation will only be necessary when you are installing flooding detectors. This configuration will remain saved even with electric cut outs.elettrica. It is necessary to go through this process in order to be able to control your flooding detectors from your internet module. -
Page 31: Working With Fire Detectors
WORKING WITH FIRE DETECTORS How to install a fire detector in the automation network? This operation will only be necessary when you are installing fire detectors. This configuration will remain saved even with electric cut outs.elettrica. It is necessary to go through this process in order to be able to control your fire detectors from your internet module. -
Page 32: Working With Numeric Modules
WORKING WITH NUMERIC MODULES How to install a numeric module in the automation network This operation will only be necessary when you are installing numeric modules. This configuration will remain saved even with electric cut outs. It is necessary to go through this process in order to be able to control your numeric modules from your internet module. -
Page 33: Working With Power Control Modules
WORKING WITH POWER CONTROL MODULES How to install power control modules in the automation network This operation will only be necessary when you are installing power control modules. This configuration will remain saved even with electric cut outs. It is necessary to go through this process in order to be able to control your power control modules from your nexho application. -
Page 34: How To Change A Name Of A Power Control Module
If you want to install another power control module in an existing zone: Select “Edit Zone”. Select the zone that you have previously created where you want to install a new thermostat Select the option “Add Modules” When the screen shows the message “Waiting for the module”... -
Page 35: How To Activate/Deactivate A Power Control Module From Your Application?34
How to activate/deactivate a power control module from your application? In the NEXHO application click on the “Other Equipment” button. Select the zone where you want to modify the working condition. Remember that you can select more than one zone with the options “Various Zones”, “All” in the upper part of the menu. -
Page 36: How To Personalize Or Modify The Programs Of Your Power Control Modules
How to personalize or modify the programs of your power control modules? In the NEXHO application click on the “Other Equipment” button and press the “Programs” option. Select the zones/rooms where you want to personalize the programs. Please keep in mind you can select more than one room/zone in the upper part where it gives you several options: “One Zone”, “Various Zones”... -
Page 37: Working With Light Modules
WORKING WITH LIGHT MODULES How to install a light module in the automation network? This operation will only be necessary when you are installing light modules. This configuration will remain saved even with electric cut outs. It is necessary to go through this process in order to be able to control your light modules from your nexho application. -
Page 38: How To Delete A Light Module From The List
If you want to install another light module in an existing zone: Select “Edit Zone”. Select the zone that you have previously created where you want to install a new light module Select the option “Add Modules” When the screen shows the message “Waiting for the module”... -
Page 39: How To Activate The Programs In A Light Module
Press the “100%” or “OFF” button to turn on or off the lights in the selected zone. You can also press “+” or “-“ followed by “Modify” to select an intermediate percentage of lighting. How to activate the programs in a light module? In the NEXHO application click on the “Lights”... -
Page 40: How To Personalize The Programs Of Your Light Modules
How to personalize the programs of your light modules? In the NEXHO application click on the “Light” button and press the “Programs” option. Select the zones/rooms where you want to personalize the programs. Please keep in mind that you can select more than one room/zone in the upper part where it gives you several options: “One Zone”, “Various Zones”... -
Page 41: Working With Blind Modules
WORKING WITH BLIND MODULES How to install a blind module in the automation network? This operation will only be necessary when you are installing blind modules. This configuration will remain saved even with electric cut outs. It is necessary to go through this process in order to be able to control your blind modules from your nexho application. -
Page 42: How To Delete A Blind Module From The List
The blind module is now ready to be controlled from your NEXHO application. If you want to install another blind module in an existing zone: Please totally close the blinds with the ends of the reel cord correctly configured. ... -
Page 43: How To Open And Close A Blind
How to open and close a blind? In the NEXHO application select the menu “Blinds”. Select the zone/room where you want to modify the position of any given blind. Remember you can select more than one room/zone in the upper part where it gives you several options: “One Zone”, “Various Zones”... -
Page 44: How To Personalize The Programs Of Your Blind Modules
Please keep in mind that you can select more than one room/zone in the upper part where it gives you several options: “One Zone”, “Various Zones” and/or “All Zones”. Now select the option “Deactivate Programs”. How to personalize the programs of your blind modules? In the NEXHO application click on the “Blind”... -
Page 45: Configure The Security Mode
The security password has been modified. How to receive security alarms in your mobile? Thanks to the Internet Module NEXHO-NT you can receive security messages in your mobile phone free of charge through “PUSH” notifications To receive these notifications you must fulfill the following criteria: ... -
Page 46: How To Configure The Actions That Your System Has To Take When Receiving A Potential Security Breach
How to configure the actions that your system has to take when receiving a potential security breach? The Internet Module NEXHO-NT allows you to select other elements within the NEXHO system so they can actuate independently, when receiving a notification with a potential security breach. -
Page 47: How To Activate/Deactivate Your Security Mode Against Intrusions
Select the option “Configure New Scenes” and in the new menu select “Presence”. ”.If your password request is not deactivated the configuration password, by default, is “0000”. Select the modules “Lights”, “Blinds” and “Other Equipment” if you want them to activate when an intrusion alarm occurs. Example: You could select “Other Equipment”, an “Alarm”... -
Page 48: How To Activate/Deactivate Your Security Mode Against Intrusions From The Numeric Module
How to configure the actions that your system has to take when receiving a potential flooding alert? The Internet Module NEXHO-NT allows you to select other elements within the NEXHO system so they can actuate independently, when receiving a notification with a potential flooding alert. -
Page 49: How To Activate/Deactivate The Security Mode Against Flooding
How to configure the actions that your system has to take when receiving a potential fire alert? The Internet Module NEXHO-NT allows you to select other elements within the NEXHO system so they can actuate independently, when receiving a notification with a potential fire alert. -
Page 50: How To Activate/Deactivate The Security Mode Against Fires
You can configure your fire detection scene with as many devices as you wish and have installed. Once you have finished, press the button “Save”. How to activate/deactivate the security mode against fires? In the NEXHO application go to the “Security Systems” menu. Select the zone with Fire or smoke detectors where you want to activate/deactivate the security mode. -
Page 51: Working With Scenes
WORKING WITH SCENES What is an scene? An scene is a group of orders to the system all under one name that allow to, when activated, create a determined situation when mixing several NEXHO modules installed in your house. Example: Lets imagine we create an scene called “MOVIE”. -
Page 52: How To Activate One Scene
“Living Room” and select “0%”. Finally go to “Other Equipment” in the menu, select “Home Cinema” and make sure its “On”. You can configure your scene with as many modules you want and have installed. Once you have finished press the “Save” button. How to activate one scene? Select the “Scenes”... -
Page 53: How To Delete A General Or A Security Scene
How to delete a general or a security scene? In the NEXHO application, select the menu “Scenes” and press the “Configuration” button. If your request for password is not deactivated, the configuration password, by default, is “nexho”. Press the “Delete Configured Scenes” button. In the next menu select the scene you want to delete con confirm its elimination. -
Page 54: Working With Associations
WORKING WITH ASSOCIATIONS Why associate? The Internet Module NEXHO-NT allows you to associate different elements within your system, making some devices operate independently after receiving orders from other devices. For example we can associate the lights from an area in your house which would go on when the presence detector in that area is working and detects movement. -
Page 55: How To Make Work During Certain Hours A Day, An Association Of Light Modules
Multifunction Remote (Nexho-MT). We will then be able to associate actions to any of the four available buttons Numeric Module NEXHO-NM. We will then be able to associate actions to the existing buttons numbered from 1 to 9 ... - Page 56 Remember that, if you program it for the times of the associations, you won´t be able to maintain any other program previously saved in the Lights Module and vice versa. In the NEXHO application, select the menu “Lights” and press the option “Programs”.
-
Page 57: Troubleshooting
TROUBLESHOOTING It has been impossible to connect with X of the X modules installed in X If, on sending an order by means of the NEXHO application a message comes up on screen that reads “It has not been possible to communicate with X of the X installed equipments”... -
Page 58: Impossible To Connect With The Internet Module
Impossible to connect with the internet module When starting up, the application does not connect with the Internet module. Possible causes are: • The Internet module is disconnected. Check that only the green light of the Internet module is on. •... -
Page 59: Technical Details
40 mA Max operating consumption Care and maintenance The NEXHO-NT does not need any special maintenance care. Only a few small instructions need to be followed as regards is preservation: Clean the Remote’s casing with a slightly damp cloth. -
Page 60: Guarantee Conditions
FARHO may, at its own discretion, require the customer to ship the unit back to the factory for diagnosis before making a determination as to whether it is covered by this warranty. - Page 61 Any other expense or related costs such as (labor, transport, food/hotel allowance, product assembly, disassembly, etc) will be payed by the buyer. It will be FARHO´s responsibility the cost of parts replaced and the time required for the replacement. This clause is not intended to limit the liability of the manufacturer in a manner contrary to the provisions of the applicable national law nor to exclude its liability for matters that, under those rules may not be excluded.
- Page 62 ANY PROBLEM WITH YOUR NEXHO PRODUCT WILL ONLY BE ATTENDED BY THE DISTRIBUTOR IN YOUR COUNTRY (ALTERNATIVELY YOU CAN CONTACT OUR FACTORY IN SPAIN ventas@farho.com)
- Page 64 FARHO S.L.U. Polígono Industrial Tabaza II, Parcelas 9 a 13 Telephones: (+34) 985 514 082 – (+34) 985 514 605 Fax: (+34) 985 514 164 33438 Tabaza (Asturias) www.FARHO.com NEXHO SYSTEM FOR HOME COMFORT NEXHO-NT Distributed by:……………………………………………………………....Purchase date:……… of …………….…………… 20…..……...
Need help?
Do you have a question about the NEXHO-NT and is the answer not in the manual?
Questions and answers