Table of Contents
Advertisement
Quick Links
Advertisement
Table of Contents

Related Manuals for Avox Indio petite

Summary of Contents for Avox Indio petite
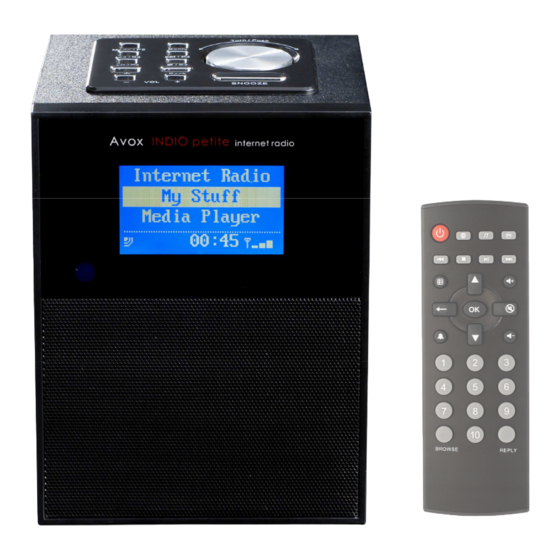
- Page 1 INDIO petite internet radio User’s Guide Bedienungsanleitung Guide d’utilisation...
-
Page 2: Copyright And Trademarks
COPYRIGHT AND TRADEMARKS COPYRIGHT AND TRADEMARKS COPYRIGHT AND TRADEMARKS COPYRIGHT AND TRADEMARKS INDIO is a registered trademark of Avox Technology GmbH IMPORTANT SAFETY INSTRUCTIONS IMPORTANT SAFETY INSTRUCTIONS IMPORTANT SAFETY INSTRUCTIONS IMPORTANT SAFETY INSTRUCTIONS WARNING: WARNING: WARNING: WARNING: • To reduce the risk of fire or electrical shock, do not expose the product to rain or moisture. - Page 3 Contents Contents Contents Contents INDIO, power adapter, remote control, User’s Guide Inhalt Inhalt Inhalt Inhalt INDIO, Netzteil, Fernbedienung, Bedienungsanleitung Contenu Contenu Contenu Contenu INDIO, adaptateur secteur, télécommande, Guide d’utilisation • What you need before you can use INDIO What you need before you can use INDIO What you need before you can use What you need before you can use...
- Page 4 Functions & Functions & Controls Controls Functions & Functions & Controls Controls Standby / ON UP / DOWN To select or change BACK To Previous Menu Quick-key to Main Menu Quick-key to Station Location Quick-key to Station Genre Quick-key to Live365 Mute - VOL+ Volume - / +...
-
Page 5: Display Icons
* * * * Use the Use the Use the Use the Quick Quick Quick Quick- - - - key key to go to the to go to the to go to the to go to the desired desired desired menu or desired menu or menu or press... - Page 6 CAUTION CAUTION: Use only the power adapter supplied with INDIO. Connecting a CAUTION CAUTION power supply with a different rating will cause permanent damage to INDIO and may be hazardous. The screen will light up and display: Reciva Radio ARM Powered then: INDIO and then:...
- Page 7 It is possible, and in some locations highly likely, that your radio will find more than one wireless access point, in which case you can choose which one you want to connect to. Turn the knob on INDIO to see the ESS-ID for each access point INDIO has found.
- Page 8 <END ◄ ► A BCDEF> █ To enter the password, use the knob or the UP/DOWN UP/DOWN buttons to select UP/DOWN UP/DOWN each letter/number/symbol of the password in turn, pressing OK OK after each letter. Note that WEP and WPA passwords are sensitive to upper and lower case characters so you must enter them exactly.
-
Page 9: Internet Radio
Internet Radio Internet Radio Internet Radio Internet Radio Tuning to the radio station Tuning to the radio station Tuning to the radio station Tuning to the radio station Select ‘Internet Radio Internet Radio Internet Radio Internet Radio’ and press OK Location Genre Search... - Page 10 All Stations By Genre 3. Select the station and press OK 4. Wait until INDIO connects to that station. 2. 2. 2. 2. Genre Genre Genre Genre Adults ..1. Select the type of content and press OK 2. Choose to find the desired station from all stations available in the genre or by the country: All Stations By Country...
- Page 11 1. Use the knob on the panel or the UP/DOWN UP/DOWN UP/DOWN UP/DOWN buttons to select the index letters or word for searching the station(s) or location(s) or type of the station(s) you want to find. Select END END and press OK OK after entering the index.
- Page 12 • Changing the station Changing the station Changing the station Changing the station A. Press UP UP/ / / / DOWN DOWN DOWN to browse other radio stations while playing. Press OK DOWN OK to change. B. Press BACK BACK BACK BACK to reach the station list and to change.
- Page 13 • Stations which enable you to choose what you listen to Stations whi ch enable you to choose what you listen to Stations whi Stations whi ch enable you to choose what you listen to ch enable you to choose what you listen to Some radio stations can provide a number of options associated with their station;...
-
Page 14: Listening To Podcasts
Podcasts Podcasts Podcasts Podcasts Listening to Podcasts Listening to Podcasts Listening to Podcasts Listening to Podcasts Select ‘Podcasts Podcasts Podcasts Podcasts’ and press OK BBC Podcasts BlogTalkRadio By Category Use the knob or the UP/DOWN UP/DOWN UP/DOWN buttons to choose your preferred podcast and UP/DOWN press OK My Stuff... -
Page 15: Setting The Clock
• Setting the clock Setting the clock Setting the clock Setting the clock 1. Select ‘Setting Setting Setting’ from the main menu and press OK Setting OK..2. Select ‘Clock Clock Clock Setup Clock Setup Setup’ and press OK Setup Set Time/Date Clock Format... -
Page 16: Setting The Alarm
The screen stays about 3 sec. then changes to the Set Time/Date screens for another couple sec., and then returns to the original screen or the playing screen, depends. • Setting the alarm Setting the alarm Setting the alarm Setting the alarm 1. -
Page 17: Setting The Sleep Timer
Once Everyday Weekly 6. Choose to activate the alarm ‘Once Once Once’, ‘Every Once Every Every Every D D D D ay ay ay ay’, ‘Weekly Weekly Weekly Weekly’, ‘Weekdays Weekdays Weekdays Weekdays’ and ‘Weekends Weekends’. If you choose ‘Once Once’... -
Page 18: Network Config
Setting Setting Setting Setting Setting Setting Setting Setting menu menu menu menu Select ‘Setting Setting Setting’ and press OK Setting Network Config Version Upgrade Firmware Language Factory Reset Register Clock Setup Backlight Contrast WiFi Strength Choose the feature shown on the display and press OK 1. -
Page 19: Upgrade Firmware
4. INDIO will now prompt you to enter the required network mask for the network. You will be able to enter this in the same way as before for entering the IP address. 5. You will now need to enter the default gateway’s IP address used by INDIO on the network. - Page 20 6. 6. 6. 6. Register Register Register Register This will display a key that can be used to register INDIO on the Reciva http://www.reciva.com https://devices.reciva.com Customer portal: 7. 7. 7. 7. Clock Clock Clock Setup Clock Setup Setup Setup Set the time, set an alarm and to view the current alarm setting, see “Listening services to other See “Managing ‘My Stuff’”...
- Page 21 Setting the clock ”, “Setting the alarm”. 8. 8. 8. 8. B B B B acklight acklight acklight acklight Adjust the brightness the display’s three menu modes: • Inactive -- when there is no user activity for 30 seconds. • Active -- when there is user activity.
- Page 22 Managing Managing ‘My Stuff’ ‘My Stuff’ Managing Managing ‘My Stuff’ ‘My Stuff’ 1. 1. 1. 1. Registering an account on Reciva’s website Registering an account on Reciva’s website Registering an account on Reciva’s website Registering an account on Reciva’s website Open the website http://www.reciva.com https://devices.reciva.com...
-
Page 23: Media Player
Media Player Media Player Media Player Media Player The Media Player allows you to play audio files (AAC, AAC+, AIFF, AU, FLAC, MP3, OGG, RealAudio, WAV, and WMA) and playlists (ASX, M3U, PLS, RAM, RPM) stored on a networked PC. It has been verified to work on Windows 2000, Windows XP and Windows Vista. - Page 24 4. Open ‘Windows Explorer’ by right clicking on the Start menu and selecting ‘Explore’. Create a new directory in the ‘Public’ directory and move your media files into this new directory. 5. Right click on the directory just created and select ‘Share …’. Ensure that the directory is listed as being shared, if not, click on the ‘Share’...
- Page 25 it is ‘Read/Write’ enabled. Double-click on ‘Directory Access’ and enable the following: AppleTalk LDAPv3 SMB/CIFS Also, for ‘SMB/CIFS’, click ‘Configure’ and select an appropriate workgroup. Copy and paste the mp3 media files to ‘Documents’ in the ‘Finder’ window. Turn on ‘AirPort’ (or wireless sharing). Wait for a few minutes for the changes to take place.
- Page 26 Note that the first time the file scan is done a file called ‘.reciva_media_cache’ is written to the folder where the audio files are stored. This is in order to speed up subsequent file scans. 2. 2. 2. 2. Listening to a single shared track Listening to a single shared track Listening to a single shared track Listening to a single shared track...
- Page 27 3. If you want to jump to a particular place in the queue then press OK OK when the required track is displayed. 6. 6. 6. 6. Removing tracks from the queue Removing tracks from the queue Removing tracks from the queue Removing tracks from the queue 1.
- Page 28 B. B. B. B. Set up a Windows PC to allow Set up a Windows PC to allow INDIO INDIO to access your audio files to access your audio files Set up a Windows PC to allow Set up a Windows PC to allow INDIO INDIO to access your audio files...
- Page 29 Selecting ‘ ‘ ‘ ‘ Media Sharing… Selecting Media Sharing…’ ’ ’ ’ for Windows Media Player 11: for Windows Media Player 11: Selecting Selecting Media Sharing… Media Sharing… for Windows Media Player 11: for Windows Media Player 11: 5. From the ‘Media Sharing’ window, INDIO will be listed as an unknown device.
-
Page 30: Browsing The List Of Tracks Currently Queued Up For Playback
1. 1. 1. 1. Locating and playing media files using Locating and playing media files using Locating and playing media files using INDIO Locating and playing media files using INDIO INDIO INDIO and UPnP and UPnP and UPnP and UPnP Once the UPnP server is configured to share media files with INDIO, you can play the files by doing the following on INDIO: Press MENU... -
Page 31: Playing Tracks In Random Order
To remove all tracks from the queue, press MENU MENU MENU MENU to go to the ‘Media Player Media Player Media Player’ menu, press OK Media Player and then turn the knob to select ‘Clear Queue Clear Queue Clear Queue Clear Queue’... -
Page 32: Troubleshooting
Troubleshooting Troubleshooting Troubleshooting Troubleshooting If you experience any trouble with your wireless INDIO, then you may find it useful to visit the help http://www.reciva.com section on our webpage: If you have trouble connecting INDIO to your wireless network, these steps may help to resolve the problem: 1. -
Page 33: Spécifications
Bewahren SIe diese Anleitung für spätere Fragen auf. * Specifications subject to change without notice. * Les spécifications sont sujets à modifications ainsi que la notice. * Spezifikationen können ohne Notiz geändert werden. ©2009 Avox Technology GmbH...
Need help?
Do you have a question about the Indio petite and is the answer not in the manual?
Questions and answers