
Related Manuals for SSS Siedle Siedle S 851-0

Summary of Contents for SSS Siedle Siedle S 851-0
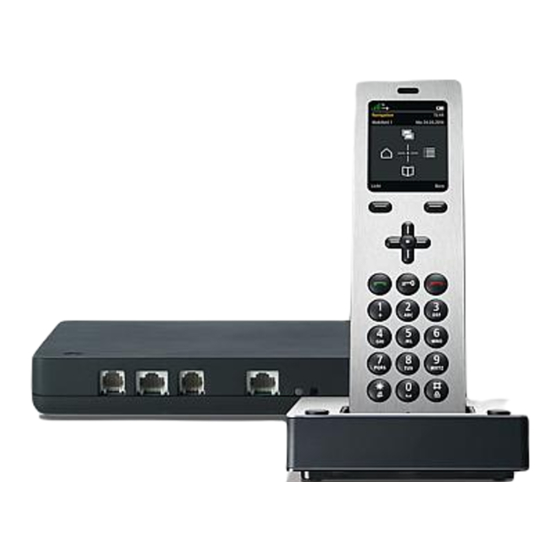
- Page 1 Operating Instructions Siedle Scope Scope cordless handset Smart Gateway Mini S 851-0 SZM 851-0 SGM 650-0...
-
Page 2: Table Of Contents
Contents Overview Log in via the browser-based Adjusting the ring tone volume user interface of the base Quick overview Notifications: Signal tone, station button tones, battery warning Scope handset Deregister handset tone Display navigation Setting the language Handset name Confirm/navigation buttons: Setting the date and time Registering the cordless Functions during a call... - Page 3 Menu – Intercom Updating cordless handsets General Siedle app for Smart Gateway Mini Calling indoor devices General Calling a door Safety remarks Switch Functions Enabling the Doormatic function Response in case of restricted connectivity Enabling door call forwarding Registering app users Triggering the door release Automatic video memory Switching off the door loud-...
-
Page 4: Overview Quick Overview
Overview Quick overview Telephony 30, 32 Triggering the door release 30, 31, 91 Actuate speed dial Calling indoor devices Call door call stations Actuating switching functions Switching Doormatic on and off Activating/deactivating door call forwarding... -
Page 5: Scope Handset
Scope handset 1 Loudspeaker for audio privacy. The loudspeaker for handsfree calls is located at the back. 2 Display symbols: Status displays of different func- tions (indicated display symbols are 12:30 dependent on the settings.) Handset 1 Mon. 27/04/2015 3 Display with start screen in operational status 4 Menu-dependent functions/... -
Page 6: Display Navigation
Overview Display navigation Door call images Main menu Phone directory Intercom Access to saved door call Access to Access to saved telephone Access to building commu- images. • the calls lists numbers. nication functions: • the phonebook • Call indoor devices/door •... -
Page 7: Confirm/Navigation Buttons: Functions During A Call
Confirm/navigation buttons: Functions during a call Softkey: Functions during a call To access functions during a call During an active call, the navigation buttons assume Main menu 12:30 different functions: Handset 1 Mon. 27/04/2015 • Top navigation button: Microphone on/off •... -
Page 8: Display Symbols
Overview Display symbols General information display area. If a function is active, • Signal quality to the base station The display symbols show the status its display symbol is shown. The (top left) of the different device functions and following display symbols are perma- •... -
Page 9: Menu Structure In The Cordless Handset
Menu structure in the cordless handset Menu level 1 Menu level 2 Menu level 3 Menu level 4 Door call images Main menu Call lists All calls Missed door calls Missed calls Accepted calls Dialled numbers Phone directory Settings Language Date / time Tones / signals Call... -
Page 10: System Overview
Overview System overview Simplified layout showing arrange- ment of the Siedle Scope, Siedle app for Smart Gateway Mini and the installed Siedle intercom in the overall system. Internet Mobile phone with installed Siedle app Router WLAN BVPC 850-... Siedle app for Smart Gateway Mini BTSV 850-... -
Page 11: Siedle Scope - One For All
Siedle Scope – One for all New freedom The cordless landline telephone Administration by means of Siedle Scope unites the worlds of Used as a landline telephone, Scope software audiovisual door communication offers: No laborious operation at the tele- and landline telephony, providing a •... - Page 12 Overview Siedle Scope – One for all In contrast to apps, Scope estab- lishes a cordless connection using the DECT standard for telephony. Siedle has expanded DECT to transmit video. The result is a mobile video call station whose combination of audio quality, availability, standby time and reliability beats every wire- less LANbased app by some consid-...
-
Page 13: Safety Remarks
Safety remarks Note Battery safety Medical devices/facilities Read and observe the safety instruc- tions and content of the following supplied documents before using Siedle Scope for the first time: • Please note the following remarks, • If you use personal medical devices •... -
Page 14: General Information
Safety remarks Important installation instruc- General information Protect your property! tions Use only the original Siedle recharge- Lock front doors or apartment doors This product and its components are able battery in the cordless handset. during the daytime if there is nobody not suitable for use in wet rooms, home. -
Page 15: Legal Notice
Legal notice Care instructions Contact with liquids Photographs of individuals taken The correct care and maintenance In case of intensive contact with or without their knowledge may not be of Siedle Scope depends on the contamination by liquids (such as published or stored in publicly acces- selected device surface finish. -
Page 16: Getting Started
Getting started Checking the scope of supply Procedure: Check the scope of supply for completeness. Take the following components from the scope of supply: • Product information S 851-0 • Commissioning instructions S 851-0 • Siedle Scope cordless handset with battery (Li-Ion 3.7 V) •... - Page 17 Scope of supply S 851-0 Scope of supply SGM 650-0 Scope of supply SZM 851-0 In-Home In-Home Prog. Prog. Line Line Power Power • Siedle Scope cordless handset with • Base station with power supply unit • Siedle Scope cordless handset battery (Li-Ion 3.7 V) •...
-
Page 18: Charging The Cordless Handset
Getting started Charging the cordless handset Remarks: The cordless handset is delivered with a storage battery already inserted. Siedle recommends first charging the cordless handset for around 3 hours. The battery is pre-charged in the as-delivered status. The battery may become discharged during storage and transport. -
Page 19: Charging And Operating Times
Charging and operating times Use only the original Siedle recharge- able battery in the cordless handset. The charging and operating times depend on the degree of usage of Siedle Scope and on the capacity and age of the battery. Charging times: •... -
Page 20: Commissioning The Base Station/Smart Gateway Mini
Getting started Commissioning the base station/ Take the following components from Smart Gateway Mini the scope of supply: • Base station with power supply In-Home Prog. unit Line • Connecting cable TAE/RJ11 Power • Network cable RJ45 (In-Home) • Network cable RJ45 shielded (LAN) •... -
Page 21: Switching On The Cordless Handset
Switching on the cordless To switch on the cordless handset, handset press the end call button (red receiver symbol) for around 1 second. If it remains in the idle status for longer than 2 minutes, the cordless handset will activate the power saving mode automatically. -
Page 22: Display Navigation
Getting started Display navigation From the start screen, you can open the individual submenus using the navigation keys. 12:30 • Open the Door call images menu Handset 1 Mon. 27/04/2015 using the top navigation button. • Open the Main menu using the right-hand navigation button. -
Page 23: Registering The Cordless Handset At The Base Station
Registering the cordless handset Procedure: at the base station 1 Briefly disconnect the base ..station from the power mains and (Possibility 1) reconnect. 2 As soon as the status LED flashes green at the base station, you have 2 minutes to register the Scope cord- Start screen less handset. - Page 24 Getting started Log in with an already registered Procedure: cordless handset 1 Have both cordless handsets (Possibility 2) ready for operation. System 12:30 2 In order to activate the registration Handset 2 Mon. 27/04/2015 mode with a cordless handset, use an already registered handset.
-
Page 25: Log In Via The Browser-Based
Log in via the browser-based Procedure: user interface of the base station 1 Log in at the base station again as Administrator (admin/admin). (Possibility 3) 2 Click on DECT > base station. 3 Assign a new 4-digit PIN number and make a note of it. 4 All future log-in processes take place using the new PIN number. -
Page 26: Deregister Handset
Getting started Deregister handset All cordless handsets which are registered at the base station must be deregistered via the brows- er-based user interface of the base station so that they are no longer displayed as internal users. If a registered cordless handset is switched off, defective or has been removed out of the range of the base station/DECT repeater, it is still... -
Page 27: Setting The Date And Time
Setting the date and time The date and time are required in order to show incoming and outgoing calls in the call log and System 12:30 images in the video memory Handset 1 Mon. 27/04/2015 Start screen with the correct time. •... - Page 28 Getting started Setting the date and time Using the navigation buttons (top/bottom), scroll between the lines. Date / time 12:30 Using the left-hand softkey Handset 1 Mon. 27/04/2015 (back), it is possible to interrupt the input and change to the previous view Date.
-
Page 29: Basic Functions
Basic functions Switching the cordless handset Procedure: on and off In order to switch the cordless handset on or off, press the end call button (red receiver button) for around 3 seconds. If it remains in the idle status for longer than 2 minutes, the cordless handset will activate the power saving mode automatically. -
Page 30: Triggering The Door Release
Basic functions Picking up calls The call number is visible in the display, provided the caller has not withheld their number. If you have stored the call number with a name in the Scope phonebook, the name of the caller can be read in the display. -
Page 31: Triggering The Door Release With
Triggering the door release with Remarks: GAP terminals You can also register the DECT handset of another make at the Siedle Scope base station, provided it is compatible with the GAP standard (GAP-capable terminal). However, only basic functions at the Siedle Scope (such as telephone calls, accepting audio door calls etc.) are possible, not the full functional capability of Siedle Scope (e.g. -
Page 32: Ending A Call
Basic functions Ending a call Procedure: Press the end call button (red receiver symbol) in order to termi- nate the call. If you are talking in the handsfree mode with the cordless handset in the charging cradle: End the call using the Speech button on the charging cradle. -
Page 33: Entering And Editing Texts
Entering and editing texts When generating a text (e.g. entering a name), the following rules apply: • Every button between 0 and 9 is assigned several letters and symbols – depending on the set language. • Using the left-hand softkey (<-X) already entered characters can be deleted. -
Page 34: Switching Handsfree On And Off
Basic functions Switching handsfree on and off In the handsfree mode, you do not hold the cordless handset to your ear, but put it down, for example on the table. This allows other people to also take part in the call. Procedure: 1 Accept a call using the left-hand softkey (mouth symbol). -
Page 35: Confirm/Navigation Buttons: Functions During A Call
Confirm/navigation buttons: During an active call, the navigation Functions during a call buttons assume different functions: • Top navigation button: 12:30 Microphone on/off Handset 1 Mon. 27/04/2015 • Left/right-hand navigation button: Receiver/handsfree volume • Bottom navigation button: Flash button (only during telephone calls) Procedure: 1 Press the confirm button during an existing external telephone/internal... -
Page 36: Activating And Deactivating Microphone Silencing
Basic functions Activating and deactivating Using the microphone silencing microphone silencing function, you can mute the cord- less handset in the middle of a call should you wish to speak privately to a person in the room. Your call partner at the other end of the line cannot hear your conversation. -
Page 37: Setting The Volume
Setting the volume Use the navigation buttons (left/ right) to reduce or increase the volume of the current call – depending on the call mode, this applies either to the receiver or the handsfree volume. The call volume can be set in five steps. -
Page 38: Flash Function
Basic functions Flash function During a call, it is also possible to use the bottom navigation button to initiate a so-called “flash“ function. The flash is a time-defined line interruption to enable a certain telephony function to be initiated. Which telephony function can be initiated depends on the available control codes of the telephone system/network provider to which... - Page 39 Procedure: 1 Press the confirm button during an existing call. The functions of the navigation buttons are indicated for around 1 second in the display. 2 Press the bottom navigation button down to activate the flash. 3 Tap in the required control code of your telephone system/your net- work provider in order to initiate the required telephone system/network...
-
Page 40: Brokering
Basic functions Brokering Brokering is used to describe the process of switching backwards and forwards between a door call and a public network call. When brokering, the active call moves backwards and forwards in and out of the waiting loop. It is naturally also possible to reject a second incoming call. -
Page 41: Call Forwarding
Call forwarding You can forward incoming calls, both public network and door calls, Options at other Scope cordless handsets. Forwarding is not possible if Holding a call there is no active call (blind transfer). Options Procedure: 1 Accept the door call or public Call 12:30 network call with the pick up button... -
Page 42: Video Image
Basic functions Video image When a door call comes in from a camera door station, the Scope cordless handset rings and shows the camera image. After accepting the door call, the speech connection is established. If another door call is received from a different door station, the existing call is ended and the process begins again. -
Page 43: Displaying The Door Call Images
Displaying the door call images If you have opened a picture, you can display this in the full screen mode. Using the confirm button, toggle Start screen between the default display mode and the full screen mode. Using the left-hand softkey (back) Door call images you can quit the picture preview mode. -
Page 44: Main Menu
Main menu General The main menu offers quick access • Call lists 12:30 • Phone directory Handset 1 Mon. 27/04/2015 Start screen • Settings The call logs are reached by Main menu pressing the pick up button (green receiver symbol) when in the standby status. - Page 45 Call lists The call logs record incoming and outgoing calls with call number, date and time. In the Call logs menu, there are Start screen more logs available: • All calls • Missed door calls Main menu • Missed calls •...
-
Page 46: Tones / Signals
Main menu Settings In the Settings menu, you can • Carry out the basic set-up, • Obtain information about your cordless handset and Start screen • Carry out general inputs required for running operation. Main menu The following menu points are available: •... - Page 47 Settings Tones / signals In the Tones/signals menu • Set the call volume you require to be used as standard; Main menu 12:30 • Assign different ringtones to the Handset 1 Mon. 27/04/2015 Start screen various call types; • Specify whether, for example, a Call lists low battery charge should be acous- Main menu...
-
Page 48: Setting The Call Volume
Settings Setting the call volume The receiver and handsfree volume are set using the Call menu. Tones / signals 12:30 Procedure: Handset 1 Mon. 27/04/2015 Start screen 1 If this is not already displayed, change to the start screen. Call 2 Using the right navigation Main menu Telephone call... -
Page 49: Adjusting The Settings For Dif
Adjusting the settings for dif- In the Telephone call, Door call, ferent call types Storey call and Intercom menus, set the ring tone and the ring tone Tones / signals 12:30 volume for the different call types. Handset 1 Mon. 27/04/2015 Start screen For door calls, you can also set the number of call signals. -
Page 50: Define The Number Of Call Signals
Settings Define the number of call signals Procedure: 1 In the Tones/Signals menu, select Door call. Tones / signals 12:30 2 Select the entry Number of call Handset 1 Mon. 27/04/2015 Tones / signals signals. 3 Press the right-hand navigation Number of call signals button or confirm with the right- Door call... -
Page 51: Notifications: Signal Tone
Notifications: Signal tone, button In the Notification tones menu, tones, battery warning tone activate or deactivate the different notification tone types. Tones / signals 12:30 Handset 1 Mon. 27/04/2015 Start screen The notification tones include: • Signal tone • Key tones Telephone Main menu •... -
Page 52: Handset Name
Settings Handset name In the Settings > Cordless handset > Name of cordless handset menu, enter the name of your Scope 12:30 cordless handset as you wish it to Handset 1 Mon. 27/04/2015 Start screen appear in the display and in the system. - Page 53 Registering the cordless handset Procedure: at the base station 1 Briefly disconnect the base station from the power mains and (Smart Gateway Mini) Settings 12:30 reconnect. Handset 2 Mon. 27/04/2015 Start screen 2 As soon as the status LED flashes green at the base station, you have 2 minutes to register the Scope cord- Language...
-
Page 54: Display - Brightness
Settings Display – Brightness In the Settings > Display menu, set the brightness of the display. Settings 12:30 Procedure: Handset 2 Mon. 27/04/2015 Start screen 1 If this is not already displayed, change to the start screen. 2 Using the right navigation Language Main menu button, select the main menu. -
Page 55: Speed Dial 1
Speed dial For fast access to a particular number from the phonebook, an intercom user or an intercom func- tion, it is possible to assign a speed dialling number from 0 - 9. Using the relevant numerical button you can then activate the speed dial function (hold down the button for 3 seconds). - Page 56 Settings Adding a new speed dial If the selected button is already assigned to a speed dial function, you can replace this using the right- Settings 12:30 hand softkey (Options); see also Handset 2 Mon. 27/04/2015 Start screen Editing or replacing speed dial. Procedure: Tones / signals Main menu...
-
Page 57: Adding A New Speed Dial
Adding a new speed dial If you have selected Phonebook, Number from the phonebook this is then opened. Speed dial 12:30 Condition: Handset 2 Mon. 27/04/2015 Speed dial At least one contact is stored in the phonebook. If you have not yet Abdullah, Rayan stored a contact in the phonebook, Alpers, Heinrich... - Page 58 Settings Adding a new speed dial If you have selected Switching, the Entry from the Switching menu Switching menu is opened. 12:30 Condition: Handset 2 Mon. 27/04/2015 Speed dial • Programming using BPS software Light Procedure: 1 Select a switching function. Garage door 2 Confirm with the right-hand softkey (Continue).
-
Page 59: Actuate Speed Dial
Actuate speed dial The speed dial is actuated by holding down the relevant numer- ical button for appr. 3 seconds. Start screen Selection using speed dial buttons is only possible in the standby mode (start screen). 3 sec. button 0 - 9, I, II Procedure: Editing/replacing the speed dial 1 If this is not already displayed,... -
Page 60: Delete Speed Dial
Settings Delete speed dial Procedure: 1 If this is not already displayed, change to the start screen. Speed dial 12:30 2 Using the right navigation Handset 2 Mon. 27/04/2015 Start screen button, select the main menu. 3 Select the Settings menu. Speed dial 1 4 Select Speed dial in the Settings Main menu... -
Page 61: System
System General Carry out general settings for your Scope handset in the System menu. Main menu 12:30 These include: Handset 1 Mon. 27/04/2015 Start screen • Switching the Eco mode on and off (reduced transmission output) Call lists • Switching the door call on and off Main menu •... -
Page 62: On And Off
System Switching the eco mode In the Eco mode, the cordless on and off handset adjusts the transmission power to the distance from the System 12:30 base station. The transmission Handset 2 Mon. 27/04/2015 Start screen power is gradually reduced or increased again in 3 stages. -
Page 63: Switching On The Registration Mode
Switching on the registration The function is switched off as mode standard. System 12:30 Procedure: Handset 2 Mon. 27/04/2015 Start screen 1 If this is not already displayed, change to the start screen. Eco mode on 2 Using the right navigation Main menu Registration mode on button, select the main menu. -
Page 64: Enabling The Repeater Mode
System Enabling the repeater mode Note: In the current as-delivered status of Siedle Scope, the repeater mode cannot yet be activated. To allow the repeater mode to be activated, a system update is required. The system update will be provided by Siedle together with delivery of the Siedle DECT repeater. - Page 65 Note: Start screen In the current as-delivered status of Siedle Scope, the repeater System 12:30 mode cannot yet be activated. Main menu Handset 2 Mon. 27/04/2015 To allow the repeater mode to be activated, a system update is Eco mode on required.
-
Page 66: Setting The Dialling Pause
System Setting the dialling pause If you are operating the Siedle Scope at a telephone system, you may require an external line digit. It System 12:30 may be necessary to leave a short Handset 2 Mon. 27/04/2015 Start screen dialling pause. The required pause is determined by the customer's own Eco mode on telephone system. -
Page 67: Prefix
Prefix – Dialling code (interna- The prefix for the international tional) dialling code replaces an entered plus sign (e.g. +49) by the first 2 System 12:30 digits of an international dialling Handset 2 Mon. 27/04/2015 Start screen code (e.g. 0049). This permits shorter notation for international Eco mode on telephone numbers in the phone-... -
Page 68: Prefix
System Prefix – Defining the external Depending on the telephone line digit system, Siedle Scope may have to automatically dial the external line System 12:30 digit before the call number. Handset 2 Mon. 27/04/2015 Start screen Procedure: Eco mode on 1 If this is not already displayed, Main menu Door call on... -
Page 69: Setting The Flash Time
Setting the flash time If the “Flash“ function is initiated during a call, the call is interrupted for a certain period to allow a System 12:30 switching function (such as call for- Handset 2 Mon. 27/04/2015 warding) to be initiated. The length of time the interruption Eco mode on has to last depends on the tele-... -
Page 70: Change Pin
System Change PIN Important system settings are pro- tected against unauthorized access by a 4-digit Personal Identification System 12:30 Number (PIN), as protection against Handset 2 Mon. 27/04/2015 for instance registration and dereg- istration of the cordless handset Eco mode on or protection of the Door release Registration mode on button on the public network tele-... -
Page 71: Factory Setting - Handset
Factory setting – Handset Procedure: 1 Select System in the Settings menu. System 12:30 2 Confirm with the right-hand Handset 2 Mon. 27/04/2015 softkey (Select). 3 The System menu is displayed. Eco mode on 4 Select the entry Default setting. Registration mode on 5 Confirm with the right-hand Repeater mode... -
Page 72: Factory Setting - Base Station
System Factory setting – Base station The base station must remain ener- gized during the reset, otherwise a correct reset cannot be performed. When resetting the Smart Gateway Mini (base station) this returns to the as-delivered status: • The PIN is reset to 0000; •... - Page 73 The base station must remain ener- gized during the reset, otherwise a correct reset cannot be performed. Procedure: In-Home Prog. 1 Unplug the patch cable for the Line In-Home bus at the base station. Power 2 Press the Prog. button at the base station (e.g.
-
Page 74: Settings
Settings Accessing system information The Status menu provides informa- tion about the Siedle Scope model, the used software version of the Settings 12:30 cordless handset and the base sta- Handset 2 Mon. 27/04/2015 tion, the IPEI number of the cordless handset and the IP address of the base station. -
Page 75: Phone Directory
Phone directory General In the Phonebook menu, enter your preferred contacts. The phonebook can be edited either using the cordless handset or the browser-based user inter- face at the base station. Contacts you add at one cordless handset can be copied to other cord- less handsets if they are registered to the same base station. - Page 76 Phone directory General Procedure: • From the start screen: Use the bottom navigation button to open the phonebook. • Or open the Phonebook using the Main menu: 1 Using the right navigation button, select the main menu. 2 The Main menu is displayed. 3 In the main menu, select the Phonebook using the bottom navi- gation button.
-
Page 77: Calling A Contact
Calling a contact Procedure: 1 Select the entry in the Phonebook. Phone directory 12:30 Handset 2 Mon. 27/04/2015 Tip: If your phonebook is very extensive, Abdullah, Rayan press on the various letters to jump Alpers, Heinrich directly to the names starting with Smith, Jennifer the relevant letter. -
Page 78: Phonebook Options
Phone directory Phonebook options The following options are available in the Phonebook: Options • Create new contact • Delete contact • Copy contact • Delete directory • Copy directory • Edit contact Using the functions Copy contact and Copy phonebook, you can transfer an individual contact entry or the whole phonebook to a diffe- rent Scope cordless handset. - Page 79 Create new contact • Using the navigation buttons (top/ bottom), scroll between the lines. • The customary special symbols Phone directory 12:30 for the set language can be found Handset 2 Mon. 27/04/2015 by multiple pressing of a nume- rical button: For example, the “Ä“ appears after pressing the A button four times.
- Page 80 Phone directory Delete contact • Using the navigation buttons (top/ bottom), scroll between the lines. Phone directory 12:30 Tip: Handset 2 Mon. 27/04/2015 If your phonebook is very extensive, press on the various letters to jump Abdullah, Rayan directly to the names starting with Alpers, Heinrich the relevant letter.
- Page 81 Copy contact • Using the navigation buttons (top/ bottom), scroll between the lines. • Copying a contact/phonebook Phone directory 12:30 only works between registered Handset 2 Mon. 27/04/2015 Siedle Scope cordless handsets and not with cordless handsets of other Abdullah, Rayan manufacturers, as the GAP standard Alpers, Heinrich does not offer sufficient compatibi-...
- Page 82 Phone directory Delete directory • Using the navigation buttons (top/ bottom), scroll between the lines. • The phonebook is deleted locally Phone directory 12:30 from the Siedle Scope cordless Handset 2 Mon. 27/04/2015 handset. The central phonebook of the base station remains unchanged. Procedure: Create new contact 1 In the drop-up menu Options...
- Page 83 Copy directory • Using the navigation buttons (top/ bottom), scroll between the lines. • Copying a contact/phonebook Phone directory 12:30 only works between registered Handset 2 Mon. 27/04/2015 Siedle Scope cordless handsets and not with cordless handsets of other manufacturers, as the GAP standard does not offer sufficient compatibi- Create new contact lity for this.
- Page 84 Phone directory Edit contact • Using the navigation buttons (top/ bottom), scroll between the lines. • The customary special symbols Phone directory 12:30 for the set language can be found Handset 2 Mon. 27/04/2015 by multiple pressing of a nume- rical button: For example, the “Ä“...
-
Page 85: General
Menu – Intercom General Using the Intercom menu, it is possible to execute functions in the building communication mode, for 12:30 example: Handset 2 Mon. 27/04/2015 • Switching lights on and off • Calling in-house telephones • Calling other Scope cordless handsets •... -
Page 86: Calling Indoor Devices
Menu – Intercom Calling indoor devices Procedure: 1 Select Intercom contacts in the Intercom menu. Intercom 12:30 2 Confirm with the right-hand Handset 2 Mon. 27/04/2015 softkey (Select). 3 The Indoor devices menu is dis- Indoor devices played. 4 Select the contact you wish to Doors call. -
Page 87: Calling A Door
Calling a door In special cases, it may be necessary to actively call a visitor at the door using the door loudspeaker. Intercom 12:30 Handset 2 Mon. 27/04/2015 Procedure: 1 Select Doors in the Intercom Indoor devices menu. 2 Confirm with the right-hand Doors softkey (Select). -
Page 88: Switch
Menu – Intercom Switch The control and switching functions must be programmed by the elec- trical installer. Intercom 12:30 Handset 2 Mon. 27/04/2015 Procedure: 1 Select Switching in the Intercom Indoor devices menu. 2 The Switching menu is displayed. Doors 3 Select the switching function you wish to execute (e.g. -
Page 89: Enabling The Doormatic Function
Enabling the Doormatic function The door release is activated auto- matically at the door after actuating the call button – the Doormatic can Intercom 12:30 be activated for a certain door or for Handset 2 Mon. 27/04/2015 all doors. Indoor devices Any pre-set Doormatic function is automatically deactivated when Doors... -
Page 90: Enabling Door Call Forwarding
Menu – Intercom Enabling door call forwarding Incoming door calls are forwarded to a previously defined call number. Door call options 12:30 Any pre-set Doormatic function is Handset 2 Mon. 27/04/2015 automatically deactivated when enabling the door call forwarding Door call forwarding function. - Page 91 Triggering the door release In the Door call forwarding menu, Safety remarks the door call is automatically • Only forward door calls to trusted forwarded to the public network telephone numbers/contacts and telephone. This function exists known landline/mobile telephones. exclusively for door calls; a door call •...
-
Page 92: Ending A Call
Menu – Intercom Switching off the door loud- With door calls forwarded using speaker the door call forwarding function to Ending a call an external landline/mobile phone, after ending the call (replacing the receiver) an engaged tone is audible from the telephone network. To pre- vent this, the door loudspeaker can be silenced once remotely before you end the call. -
Page 93: General
Base station/Smart Gateway Mini General Safety remarks The Smart Gateway Mini SGM 650-0 1 Change the default password corresponds to the base station (admin/user) of the administrator/ S 851-0. For operation of the user access, irrespective of whether SGM 650-0, the Siedle App for the base station is connected to a Smart Gateway Mini is required. -
Page 94: Menu Structure User Interface
Base station/Smart Gateway Mini Menu structure User interface Menu level 1 Menu level 2 System status Change the password Network Date / time In-Home bus DECT Base station Handsets Telephony Siedle app Contacts Manage Create Update Servicing Highlighted menu items contain sub-menu items. -
Page 95: Log In As Administrator
Log in as administrator Procedure: 5 Enter the relevant password 1 Connect the PC using the net- (standard: admin). 6 If applicable, select a different work cable at the LAN socket of the base station. language. 2 Open the Firefox web browser 7 Click on Log in. - Page 96 Base station/Smart Gateway Mini Log in as administrator As an administrator, the following If you use a different web browser functions are available to you on to the Mozilla Firefox, display errors the user interface: can occur. • System status •...
- Page 97 Log out Procedure: If you use a different web browser 1 Click on Log out. 2 You have been logged out of the to the Mozilla Firefox, display errors can occur. base station and are now on the Log in page.
-
Page 98: Logging In As User
Base station/Smart Gateway Mini Logging in as user Procedure: 6 If applicable, select a different If you use a different web browser 1 Connect your PC using the net- language. to the Mozilla Firefox, display errors work cable at the LAN socket of the 7 Click on Log in. - Page 99 If you use a different web browser Before the next system configura- to the Mozilla Firefox, display errors tion steps, you must have logged in can occur. again as administrator: 1 Log in at the base station again As a user, the following functions as Administrator.
-
Page 100: System Status
Base station/Smart Gateway Mini System status Procedure: If you use a different web browser 1 Click on System status. 2 The system status is displayed. to the Mozilla Firefox, display errors can occur. The system status provides a com- pact overview of the statuses of all communication interfaces: •... -
Page 101: Change The Password
Change the password Procedure: You can only change the password 1 Click on Change adapter set- tings. for the user interface which you have logged into: Log in as admin- 2 The Change password menu istrator (admin) -> Administrator appears. password (Standard: admin) Log 3 Enter the old password. -
Page 102: Change The Network Settings
Base station/Smart Gateway Mini Change the network settings Procedure: In the as-delivered status, DHCP 1 Click on Network. 2 The network settings are dis- is activated. In the DHCP mode, the base station is assigned all the played. network settings from the router/ 3 Click on the square button managed switch. -
Page 103: Setting The Date And Time
Setting the date and time Procedure: The base station can automatically 1 Click on Date/time. synchronize the date and time via 2 The Date/time menu is displayed. the network router if a network con- 3 Click on the square button nection exists. -
Page 104: Change Pin
Base station/Smart Gateway Mini Change PIN Procedure: 1 Click on DECT > Base station. 2 The Base station menu is dis- played. 3 Enter a new 4-digit PIN. 4 Click on Apply. 5 It is only possible to register a cordless handset with the new PIN. - Page 105 Switching on the registration Procedure: mode – Register handset 1 Click on DECT > base station. 2 The Base station menu is dis- If you use a different web browser to the Mozilla Firefox, display errors played. can occur. 3 Click on the square button next to Registration mode.
- Page 106 Base station/Smart Gateway Mini Managing cordless handsets – Procedure: Changing the name of the cord- 1 Click on DECT > Cordless hand- less handset sets. If you use a different web browser 2 The Cordless handsets menu is to the Mozilla Firefox, display errors displayed.
-
Page 107: Deregister Handset
Deregister handset All cordless handsets which are registered at the base station must be deregistered via the brows- er-based user interface of the base station so that they are no longer displayed as internal users. If a registered cordless handset is switched off, defective or has been removed out of the range of the base station/DECT repeater, it is still... -
Page 108: Create App Users
Base station/Smart Gateway Mini Create app users Procedure: 8 Click on Apply. 1 Click on the Siedle app. 9 Register the app on the mobile 2 The Siedle app menu appears. phone by entering the user data. 3 Click on a user (User 1 – User 4). 10 If you wish to register several 4 Enter the surname of the user. -
Page 109: Deleting App Users
Deleting app users Procedure: If you are no longer using an 1 Click on the Siedle app. iPhone/iPad with the Siedle 2 The Siedle App menu is dis- app for Smart Gateway Mini played. installed, either temporarily or 3 Click on a user (user 1 – user 4). over longer periods (repair, sale, 4 Click on Delete user. - Page 110 Base station/Smart Gateway Mini Copying contacts between cord- Procedure: less handsets 1 Click on Contacts > Manage > Copy. Copying a contact/phonebook only works between registered Siedle 2 The menu Manage – Copy is Scope cordless handsets and not displayed. with cordless handsets of other 3 Click on the square button next to cordless handset (1–8) in order...
- Page 111 Deleting contacts from the cord- Procedure: 7 If you wish to delete additional less handset 1 Click on Contacts > Manage > contacts, repeat the process. Delete. 8 You have deleted the contact in Deleting a contact/phonebook only works at registered Siedle Scope 2 The menu Manage –...
-
Page 112: Add Contact
Base station/Smart Gateway Mini Add contact Procedure: 7 If you wish to create additional Copying a contact/phonebook only 1 Click on Contacts > Create. contacts, repeat the process. 2 The Create menu is displayed. works between registered Siedle 8 You have created the contact in Scope cordless handsets and not 3 Click on New. -
Page 113: Finding And Editing Contacts
Finding and editing contacts Procedure: 6 Edit the contact data as required. If you use a different web browser 1 Click on Contacts > Create. 7 Click on Apply. 2 The menu Contacts – Create is 8 If you wish to edit additional con- to the Mozilla Firefox, display errors can occur. -
Page 114: Finding And Deleting Contacts
Base station/Smart Gateway Mini Finding and deleting contacts Procedure: 7 If you wish to delete additional A contact can only be completely 1 Click on Contacts > Manage > contacts, repeat the process. Delete. deleted from all cordless handsets. 8 You have deleted the contact in If you use a different web browser 2 The menu Manage –... -
Page 115: Update The System
Update the system Procedure: 6 If a higher version number is The system update is only possible 1 Click on Update. available, select the more recent 2 The Update menu is displayed. if you have connected the base software version and save this to station/Smart Gateway Mini to a 3 Click on Download. - Page 116 Configuring the base station/Smart Gateway Mini 8 Click on Select. 14 Click on the Update button in Wenn das System erfolgreich 9 The page Upload file appears in order to start the system update. aktualisiert wurde, erscheint eine 15 A confirmation message appears the web browser.
-
Page 117: Updating Cordless Handsets
Updating cordless handsets Updating cordless handsets If the system update also contains an update for the Siedle Scope cordless handset, this is shown 12:30 using the Missed call display Handset 1 Mon. 27/04/2015 symbol. The update of the cordless handset is started by means of the entry (e.g. - Page 118 Updating cordless handsets 10 Place the cordless handset in the charging cradle and follow the instructions shown. Service Call 12:30 11 Transmission of the data to Handset 2 Mon. 27/04/2015 the cordless handset only starts when the cordless handset is in the charging cradle.
-
Page 119: General
Siedle app for Smart Gateway Mini General Temporary unavailability of the app Functions: The new Scope base station simul- in the wifi is possible. In this case, it - Audio and video door communi- taneously forms an IP gateway. A no longer receives door calls. -
Page 120: Connectivity
Siedle app for Smart Gateway Mini Response in case of restricted Registering app users Procedure: connectivity Before you can register the Siedle 1 Install the Siedle app for Smart Due to the restricted connectivity app for Smart Gateway Mini at the Gateway Mini on the device of the WiFi connection, compro- base station, you must have installed... -
Page 121: Automatic Video Memory Storage
Automatic video memory storage Explanation of symbols Picking up calls A WiFi connection with adequate transmission speed to the base sta- Ending a call tion is required. A picture of each person who makes a door call (rings) at the video intercom is automatically stored. - Page 122 Siedle app for Smart Gateway Mini Cancelling and deleting app Procedure: If you are no longer using an iPhone/ users 1 Open the Siedle app for Smart iPad with the Siedle app for Smart Gateway Mini. Gateway Mini installed, either 2 Open the menu Settings >...
-
Page 123: Hotel Mode
Hotel mode General Enabling the hotel mode Disabling the hotel mode Procedure: In the hotel mode, the functions of Procedure: the Scope cordless handset can be 1 Carry out all the settings necessary 1 If this is not already displayed, set to the special requirements of for the hotel guests. -
Page 124: Demo Mode
Demo mode General End demo mode In the demo mode, the video image End the demo mode by entering a transmission performance of Siedle button sequence during the running Scope is demonstrated by showing video clips. you sample video clips. No other functions can be accessed when Procedure: 1 Press the hash button twice. -
Page 125: Disposal
Disposal Simplified EC Declaration of Conformity Disposal Simplified EC Declaration of Remarks Conformity All electrical and electronic devices This device is produced in different must be disposed of separately from country variants/country variant the general house waste at the Manufacturer: S. Siedle & Söhne combinations. -
Page 126: Index
Index Accessing system information Copying contacts between Hotel mode cordless handsets Activating and deactivating Important installation microphone silencing Copying the phonebook instructions Activating door call forwarding Creating a new contact Information Activating Doormatic Creating app users Legal notices 15, 121 Activating the repeater mode Default setting –... - Page 127 Scope of supply Updating cordless handsets Setting dialling pause Updating the system Setting the call volume Video image Setting the date and time 27, 103 Setting the flash time Setting the language Setting the ring tone Setting the volume Settings Siedle app for Smart Gateway Mini Siedle Scope –...
- Page 128 S. Siedle & Söhne © 2014/05.15 Telefon- und Telegrafenwerke OHG Printed in Germany Best. Nr. 0-1106/044823 EN Postfach 1155 78113 Furtwangen Bregstraße 1 78120 Furtwangen Telefon +49 7723 63-0 Telefax +49 7723 63-300 www.siedle.de info@siedle.de...
Need help?
Do you have a question about the Siedle S 851-0 and is the answer not in the manual?
Questions and answers