Table of Contents
Advertisement
Quick Links
INTRODUCTION
P
O
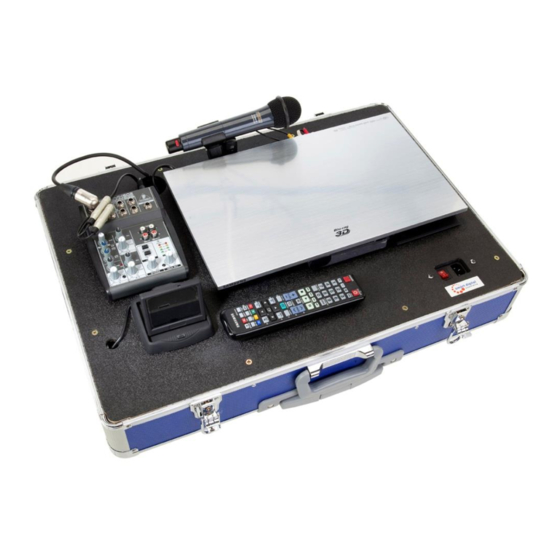
ACKAGE
VERVIEW
Unpack and inspect the box contents to ensure all parts listed below are in the box. If something is
missing, please contact Smart Digital Australia on 03 9729 6300
1x SmartBox Precision
Prewired and ready for use including
1x Samsung Blu-Ray player, with built in TV tuner, with remote
1x Preview Monitor
1x Mixer
1x Projector of your choice
2x Powered Speakers
2x Speaker Stands
2x Speaker Cables
3x Power Cables
1x AUX Audio Lead (for MP3, IPod use)
1x HDMI cable for Projector connection
1x VGA cable for projector to laptop connection
www.smartdigital.com.au
Edition 1.2
1
Advertisement
Table of Contents

Summary of Contents for Smart Digital Precision
- Page 1 ACKAGE VERVIEW Unpack and inspect the box contents to ensure all parts listed below are in the box. If something is missing, please contact Smart Digital Australia on 03 9729 6300 1x SmartBox Precision Prewired and ready for use including...
-
Page 2: Placement Of Speakers
Connecting speakers to SmartBox 1. The SmartSystem is supplied standard with two (2x) 20metre Smart Digital speaker cables. 2. Connect the XLR end of one speaker cable to the “Line level balanced input” on the rear of the speaker (see diagram) 3. - Page 3 Note: Below is an example of 8” Beringer Speaker - Please see your speaker manuals for further details if you have a different size speaker. Powering ON speakers Once placed, connected to SmartBox and plugged into power; turn on each speaker using the switch located on the rear panel of the speaker box (you will need to repeat this for each...
- Page 4 PERATION Powering ON the SmartBox 1. Ensure power cable is plugged into the mains connection on the front right hand side of the SmartBox top panel, 2. Turn on the power switch located directly next to the mains connection to on or (I). Powering ON the Blu-Ray/DVD player 1.
- Page 5 Samsung Blu-Ray player rear panel 1. Antenna Out (to TV) 2. Antenna In 3. HDMI Out 4. Digital Audio Out (Optical) 5. LAN 6. Component Out 7. Video Out 8. Audio Out Powering ON the Projector 1. Remove the lens cap. 2.
- Page 6 required. 4. Under ‘Display’ tab in the menu in use the keystone feature to square up the image if extra tilting of the image was required. 5. For rear projection, go to “Set-up”, then to projection. Use the arrows to select rear projection (when image is backwards).
- Page 7 Laptop Audio Connection 3. Plug a mini jack plug into the headphones or line-out port of the laptop, 4. Connect the 6.5 mm jack plugs into AUX Input of the mixer. Game Console Game Console Video Connection 1. Connect video (Yellow) RCA cable into yellow video connection on the rear of projector and into your game console 2.
- Page 8 Powering OFF the SmartBox 1. Turn OFF the power switch located directly next to the mains connection to on or (O). 2. Close the preview monitor 3. Disconnect power cable is from the mains connection on the front right hand side of the SmartBox top panel.
Need help?
Do you have a question about the Precision and is the answer not in the manual?
Questions and answers