Table of Contents
Advertisement
Advertisement
Table of Contents

Related Manuals for Satlink WS 6951

Summary of Contents for Satlink WS 6951
- Page 1 USER‘S MANUAL...
-
Page 3: Table Of Contents
contents 1 GUIDE ....................2 1.1 Important Safety Instructions.........2 1.2 Unpacking ................2 1.3 PRODUCT OVERVIEW & ILLUSTRATION ....3 1.4 INSTALLATION OF METER ..........4 2 OUTLINE .....................4 3. THE MENU OSD INSTRUCTION..........5 3.1 Satellite Find (PIC2, 3) ............5 3.1.1 Satellite(PIC 4) ..............6 3.1.2 Local Frequency(PIC 5) ..........6 3.1.3 Transponder(PIC 6) ............6 3.1.4 Frequency ...............6... - Page 4 3.4.3 Transponder(PIC 25) ..........12 3.5 Multimedia ................13 3.6 System Setting (PIC 31) ........... 14 4 Technical Specification .............. 15 5 Trouble Shooting ................16...
-
Page 5: Guide
Digital Satellite Finder 1 GUIDE 1.1 Important Safety Instructions Thank you for choosing our product. Before installation, we would like to remind you some notes, which is very important for operating safely and properly, as follows: Be sure to read this user manual before starting your operation. -
Page 6: Unpacking
Digital Satellite Finder 1.2 Unpacking Open the package and make sure it includes all below items, if any missing, please contact the reseller for replacement. 1.Digital SatelliteMeter 2.User’s manual 3.AV cable 4.Car charger cable 5.Power Adaptor 6.Strap of carrying case... -
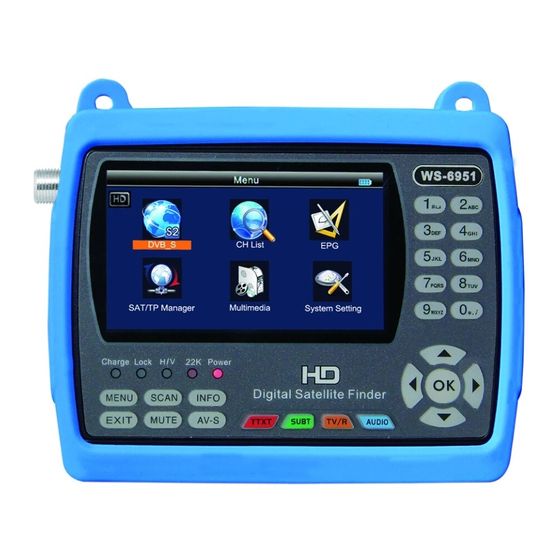
Page 7: Product Overview& Illustration
Digital Satellite Finder 1.3 PRODUCT OVERVIEW& ILLUSTRATION... - Page 8 Digital Satellite Finder NO Description FUNCTION LNB IN Connect to satellite antenna cable USB Port Connect to USB memory DC Slot Connect to Adaptor Input HDMI Use HDMI cable to connect for TV AV IN Connect to AV port for meter AV OUT Connect to AV port for TV DC12V Slot...
-
Page 9: Installation Ofmeter
Digital Satellite Finder 23 Charger (Note1) Charger indicator light 24 LOCK Signal lock indicator light 25 V/H Vertical /Horizontal polarization volta- ge output light 26 22KHZ 22Khz indicator light 27 Power Power indicator light 28 LCD TFT LCD Screen Note1:When the adapter insert dc slot, Charge indicator is red, when the batteries charged sufficient, the charge indicator is orange. -
Page 10: Outline
Digital Satellite Finder 2.OUTLINE 4.3 Inch High Definition TFT LCD Screen Fully DVB-S/DVB-S2, MPEG-2/MPEG4 compliant MPEG-2 / H.264 Hardware decoding Digital meter for signal strength and quality Supports scan of Auto,Blind,Manual or NIT Sound and Light Alarm for Locking Signal Auto Calculate Angle of AZ ,EL Supports DISEQC 1.0/1.1/1.2 ,0/22khz Tone Speaker Integrated... -
Page 11: The Menu Osd Instruction
Digital Satellite Finder 3. THE MENU OSD INSTRUCTION If you have installed and connected the cables of the meter, pressing MENU key to display the Main Menu. (PIC1) Satellite Find CH List Sat/TP Manage Multimedia System Setting Press the keys of ▲▼◄► to move the cursor up or down in the menu interface, then u se OK key to confirm a selection. -
Page 12: Satellite(Pic 4)
Digital Satellite Finder 3.1.1 Satellite As shown in figure PIC<4>. Press ◄►key into the satellite list. Use ▲▼ key to move the cursor, then press OK key to select the satellite of you want. 3.1.2 Local Frequency(PIC 5) Press ◄► key into the LNB list. Use ▲▼ key to move the cur- sor then pressOK key to select the LNB of you want. -
Page 13: Transponder(Pic 6)
Digital Satellite Finder 3.1.3 Transponder(PIC 6) Press ◄► key into the TP list. Use ▲▼ key to move the cursor then pressOK key to select the satellite of you want. 3.1.4 Frequency Frequency of the current transport, Input the value by using the numeric keys. -
Page 14: 6Polarity
Digital Satellite Finder 3.1.6 Polarity Press ◄► key to changeVertical or horizontal of polarization. 3.1.7 TONE Press ◄► key to on or off22kHz TONE Switch. 3.1.8 Beep Tone Press ◄► key to Switch beep tone. If we open the beep tone; when we into the search screen, the beep of lock alarm will open. -
Page 15: Quick Search (Pic 8)
Digital Satellite Finder 3.1.0.1 Quick Search (PIC 8) In the satellite Find interface,pressing OK key will into the quick search. If you set the local Longitude and Latitude Under the system setting, the angle of LNB, theorientation and elevation of an- tenna, all will be display on the screen. -
Page 16: Ch List
Digital Satellite Finder Scan : Press the red key to search the current TP.(PIC 10) Auto :Press the green key to auto blind search the current satellite.(PIC 11) 3.2 CH List In the TV mode into the CH List is edit TV program, in the radio mode is processing radio program. -
Page 17: Sort (Pic 14)
Digital Satellite Finder 3.2.1 Sort (PIC 14) Press red key into the sort list. Use ▲▼ key to move the cursor, then press OK key to select the sort type of we want; then press ok key to confirm or move the cursor to “x” press ok key to cancel. -
Page 18: Lock(Pic 15)
Digital Satellite Finder 3.2.2 Lock(PIC 15) Press ▲▼ key to the program that we want lock or unlock, then press green key to lock or unlock the program. When we deal with all the program need to be processed, press menu key to then press ok key to confirm the operation or select “x”;... - Page 19 Digital Satellite Finder press orange key to label. When we deal with all the program need to be processed, press menu key to then press ok key to confirm the operation or select “x”; press ok key to cancel. 3.2.4 Sat (PIC 17) Press blue key then press ◄►...
-
Page 20: Epg(Pic 18)
Digital Satellite Finder 3.3 EPG(PIC 18) Press ▲▼ key to change program. If the current program has EPG info, it will appear on the right side of the window.Press ◄► key to change the day of the EPG info. 3.4 SAT/TP Manager (PIC 19) Satellite Setting Auto Scan Transponder... - Page 21 Digital Satellite Finder Press orange key to selecte all satellites. Press green key into auto scan interface. Press red key into the Transponder interface. Press ▲▼ key to move the cursor, then press ok key to change the satellite select or unselect. Press ◄►...
- Page 22 Digital Satellite Finder If we select DiSEqC1.2/USALS, press ok into the motor inter- face.(PIC 22) ○ Transponder: Press ok key to change the current tp. ○ Mode: A, Position A1 Direction:Press ◄► key to move direction to west or east. A2 Position: set the satellite save position.
- Page 23 Digital Satellite Finder ○ Mode: C,Drive to stored position; move the cursor to GO, then press OK key, the motor will go to position of we saving in mode A Position. ○ Mode: D, Drive to Satellite move the cursor to GO, then press OK key, the motor will go to position of auto calculate.
- Page 24 Digital Satellite Finder Center Frequency: use value key to input number. Store: store the setting. 3.4.2 Auto Scan(PIC 24) ○ Satellite:Press ◄►key into the satellite list. Use ▲▼ key to move the cursor, then press OK key to select the satellite of you want.
- Page 25 Digital Satellite Finder Press red key to edit satellite (PIC 26) W-E: switch the satellite longitude west or east. Longitude; use number key input value. Satellite Name: press ok will open the keyboard; use the direc- tion key input satellite name. ○...
- Page 26 Digital Satellite Finder ○ Press orange key to add a satellite。(PIC 27) NO.: Satellite number. W-E: switch the satellite longitude west or east. Longitude; use number key input value. Satellite Name: press ok will open the keyboard; use the direc- tion key input satellite name.
-
Page 27: Multimedia
Digital Satellite Finder Press ◄►key to TP manager. (PIC 28) ○ Press red key to edit TP NO.: TP number. Frequency: use number key input value. Symbol Rate: use number key input value. Polarity: Press ◄► to change polarity ○ Press green key to delete TP, then press ok key to confirm or press menu key to cancel. - Page 28 Digital Satellite Finder ○ Movie (PIC 29) Press red key to option the mode of play files and text encode; then press menu key return. Press green key to Change the folder File view to detailed list. Press orange key to change mode to big Icon browsing. Press the arrow keys to move the cursor, then press ok key to enter the file.
-
Page 29: System Setting (Pic 31)
Digital Satellite Finder 3.6 System Setting (PIC 31) ○ Country Setting Press ◄► key to change the country. ○ OSD Language Press ◄► key to change the OSD Language. ○ TV Format Press ◄► key to change the TV Format. ○... - Page 30 Digital Satellite Finder On the basis of the Video Output choice, we can press ◄► key to change the TV resolution. ○ Digital Audio Output Press ◄► key to change the LPCM or RAW format. ○ Time Zone Press ◄► key to change the Time Zone. ○...
- Page 31 Digital Satellite Finder ○Upgrade (PIC 33) Will update the file into the U disk; then insert the machine; press ok key to update interface, use the direction key to select update file. Press ok key to update. Warning: During the upgrade processing, do not power off or pull out the U disk;otherwise it will damage the machine software, can not boot.
-
Page 32: Technical Specification
Digital Satellite Finder 4.Technical Specification TRANSMISSION STANDARDS DVB-S2/S, MPEG-2,MPEG-4,H.264 SATELLITE INPUT/DEMODULATION Connector Type F Type Input Frequency 950 to 2150 MHz Signal Input Level - 65 to -25 dBm Band Switch Control 22KHz LNB Supply 13V/18V, IMax 400mA Demodulation Type QPSK,8PSK Symbol Rate 2<Rs<45Mband(SCPC/MCPC) - Page 33 Digital Satellite Finder Resolving rate PAL-25 frame@720*576,NTSC-30 frame@720*480, Signal compatibility Support conversion for different video formats Video Format 4:3,16:9,By Pan & Scan and Letter Box conversion Audio decompression MPEG-1 Layer I/II ,MPEG-2 Layer I/II, Audio output mode Stereo, Mono,R/L DATA SERVICE PORT Connector Data protocol USB2.0 interface...
-
Page 34: Trouble Shooting
Digital Satellite Finder 5 .Trouble Shooting Problem Possible Causes What To Do No display light Power switch is Check to make sure power on. not onRun out of Even on adapter batteries No sound or AV IN jack insert, Pull out AV IN cable picture, but the but no front panel power... - Page 35 Digital Satellite Finder AV out No The system is Check the UHF channel fixed in picture(Video) connected by your system and tune the UHF SCART cable and properly. TV is not in AV mode. The key is not Out of battery Even on adapter working.
- Page 36 USER‘S MANUAL...
Need help?
Do you have a question about the WS 6951 and is the answer not in the manual?
Questions and answers