Advertisement
About the Radio – Controlled Clock (RCC)
The National Institute of Standard and Technology (NIST) in Fort Collins, Colorado broadcasts
the time signal (WWVB at 60kHz AM radio signal) with an accuracy of 1 second per every
3,000 years. The signal will be able to cover over a distance up to 2,000 miles from the
source. Like a typical AM radio, your RCC will not be able to receive the WWVB signal in places
surrounded by heavy concrete or metal panels. The reception of the time signal is also greatly
affected by electrical or electronic interference. To get the best performance of the RCC clock,
please install the clock nearer to a window and change directions is one direction does not
work. Refer to the "reception" section of the instruction s to ensure the correct installation and
the best reception.
Battery Installation and Set Up – You will need 2 AA Batteries, not included
You will need 2 – AA batteries, not included. Install the batteries. After power up, the
display will show all segments blinking for several seconds. The display will change to January
1, 2005 at 12:00:00. The Time Zone is defaulted to PST – Pacific Standard Time.
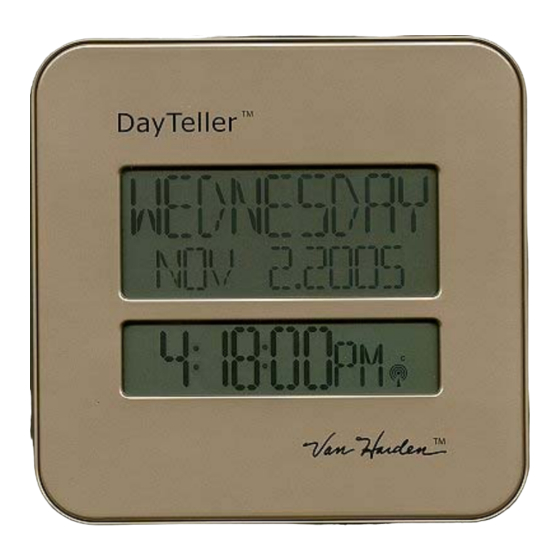
Photos of the DayTeller
Select the correct Time Zone:
1. Press the TIME ZONE key on the back of the clock. The display on the front will show
Pacific Time (P), Mountain Time (M), Central Time (C), Eastern Time (E).
2. Once a Time Zone is selected, your RCC will start to receive the signal.
3. While the RCC is seeking for the signal, the icon will change gradually indicating the seek
condition.
4. If a valid signal is available, the RCC will decode the Local Time in about 3-5 minutes. The
FULL tower icon and "OK" will appear on the display.
5. If the first reception is not successful, the click will attempt EVERY hour until the time is
decoded.
6.
If signal is not availble when setting up, enter the present time and calendar by holding
the SET button for 3 seconds and press (+) or (-) to enter the existing time.
Name & Function of Buttons
SET
Hold the SET button for 3 seconds to enter clock & calendar setting.
Set sequence: Year > Month > Date > Hour > Minute
Press (+) or (-) to adjust, then press SET to confirm.
TIME ZONE
Press to select the current Time Zone:
P = Pacific Time
M = Mountain Time
C = Central Time
DayTeller
Model Number: 00584
Instruction Manual
TM
are on the last page of this manual.
TM
Advertisement
Table of Contents

Summary of Contents for Van Harden DayTeller
- Page 1 The display will change to January 1, 2005 at 12:00:00. The Time Zone is defaulted to PST – Pacific Standard Time. Photos of the DayTeller are on the last page of this manual.
- Page 2 10 steps/seconds for faster backward. LIMITED WARRANTY – INTERNATIONAL Consumer may have more remedies at law than follows. DayTeller L.C. warrants to the owner, this product to be free from defect in material and workmanship for one year from the date of purchase.
- Page 3 Figure A Front View Figure B Back View Figure C Buttons...
Need help?
Do you have a question about the DayTeller and is the answer not in the manual?
Questions and answers
why does the time keep flashing after it is set
The Van Harden DayTeller clock keeps flashing after the time is set because it is still attempting to receive the WWVB radio signal for automatic time synchronization. If the signal is not available, the clock will continue trying every hour until it successfully decodes the time. Positioning the clock near a window and away from electronic interference can improve signal reception.
This answer is automatically generated