Table of Contents
Advertisement
Advertisement
Table of Contents

Subscribe to Our Youtube Channel
Related Manuals for PROCEED PAV


Summary of Contents for PROCEED PAV
- Page 1 PAV Audio/Video Preamplifier...
- Page 2 WARNING: TO REDUCE THE RISK OF FIRE OR ELECTRIC SHOCK, DO NOT EXPOSE THIS APPLIANCE TO RAIN OR MOISTURE. CAUTION RISK OF ELECTRIC SHOCK DO NOT OPEN CAUTION: TO REDUCE THE RISK OF ELECTRICAL SHOCK, DO NOT REMOVE COVER. NO USER-SERVICEABLE PARTS INSIDE. REFER SERVICING TO QUALIFIED PERSONNEL.
-
Page 3: Important Safety Instructions
Important Safety Instructions Please read all instructions and precautions carefully and completely before operating your PAV audio/video pream- plifier. ALWAYS disconnect your entire system from the AC mains before connecting or disconnecting any cables, or when cleaning any component. This product is equipped with a three-conductor AC mains power cord which includes an earth ground connection. -
Page 4: Table Of Contents
A Word About Installation ................ 10 Home Theater and the Proceed PAV ..................11 PAV system diagram ................11 Movie Sound and the PAV ................11 Dolby Pro Logic™ Sources ................12 THX Cinema Sources ..................12 Music and the PAV ................... 12 Subwoofers and Surround Modes .................... - Page 5 ..............45 Mode Defaults ....................46 Setting Mode Defaults ..................46 Programming the IR Input ................48 Changing the PAV’s IR Address ....................49 Configuring the Remote Trigger output ..................49 Using the PAV ..................... 50 Setting the Volume ..................50 Home THX cinema ...................
- Page 6 Mono Surround Defaults ................. 71 Surround Off Defaults ..................71 Mono Defaults ....................71 ........................... 71 PAV Menu Structure (partial) ..............72 Troubleshooting ..................73 Care and Maintenance ................74 U.S. and Canadian Warranty ..............75 90-Day Limited Warranty ................. 75 Five Year Extended Warranty .................
-
Page 7: Maximizing The Value Of Your Purchase
Maximizing the Value of Your Purchase Congratulations on choosing a superb product. Y our Proceed PAV is designed to give you many years of outstanding performance, and we are confident you will be happy with it. We value our relationship with our customers, and often are in a position to help you enjoy your home entertainment system even more—if we have some... -
Page 8: Unpacking And Placement
Ventilation It is normal for your PAV to run quite warm. Be sure to allow 2 to 3 inches of clearance above the PAV to allow heat dissipation through air circulation. The vents on both the bottom and the top of the PAV must be kept free from any ob- struction which would reduce the flow of air through the unit. -
Page 9: Operating Voltage
Operating Voltage The PAV preamplifier is factory-set for 100V , 120V , 200V , 220V , or 240V AC mains operation at either 50 or 60Hz, according to the country for which the unit was manufactured. (230V only in European Union countries, in compli- ance with CE regulations.) Make sure that the label on the bottom of the PAV... -
Page 10: A Word About Installation
PAV . All of these fac- tors influence the ultimate performance of your system. Moreover, the PAV in- corporates many system-specific adjustments which enhance its performance with the widest possible range of associated components. -
Page 11: Home Theater And The Proceed Pav
The Proceed PAV is designed for people (like ourselves) who desire to “have it all.” The PAV offers the musical refinement, control flexibility and movie excite- ment of both a dedicated high end music system and a full-blown home theater system, all in one simple package. -
Page 12: Dolby Pro Logic™ Sources
1970’s. Music and the PAV When it is time to enjoy some of your favorite music, the PAV gives you several simple options, any of which may be selected by pressing the button to mode cycle through the choices. -
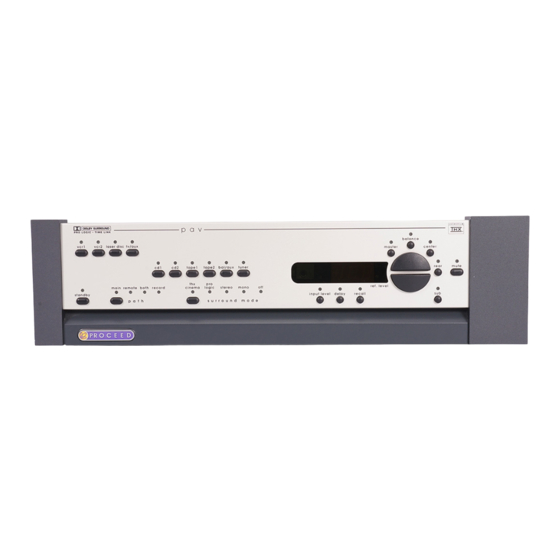
Page 13: Front Panel
PAV including relative volume levels, and is used in conjunction with the buttons which surround it. At all volumes above a relatively quiet back- ground level, and in all modes, the volume control enjoys a resolution of 0.5 dB. - Page 14 Finally , the infrared receiver and transmitter for the remote control are positioned on the left side of the main display. VOLUME +/– These up/down buttons are used to make adjustments on the PAV , apart from source and path selection. While the buttons normally volume +/–...
- Page 15 , as well as by the on screen dis- play. REFERENCE LEVEL INDICATOR This LED indicator is lit when the PAV is playing at Home THX reference level (normally calibrated during initial setup—see Output Level Calibra- tion, p. 37). RECALL BUTTON...
- Page 16 — determines which video and audio sources are sent to remote the Remote outputs on the back of the PAV , to be sent to another system elsewhere in the house. These sources are indicated in green on the front panel LEDs. The remote path may also be used as a secondary Record Output path if necessary .
- Page 17 Lest you think this wasteful, you should know that the PAV draws less than power than a typical light bulb, whether in standby or fully on.
-
Page 18: Rear Panel
TV) would be connected on the right side of the rear panel in the Video Input section. (See below.) Connect the right-channel and left-channel single-ended outputs of your various source components to the corresponding inputs on the PAV . BALANCED AUDIO INPUTS (2) Accepts right-channel and left-channel signals from source equipment with balanced outputs. - Page 19 Audio Engineering Society . Refer to the operating manuals of your bal- anced-output line-level sources to verify that the pin assignments of their output connectors correspond to the PAV . If not, wire the cables so that the appropriate output pin connects to the equivalent input pin.
-
Page 20: Ir Input Tip Polarity
An AC power switch is provided which disconnects the PAV from the wall outlet’s AC power. The PAV is designed to be left in Standby when not in use, rather than completely “off.” Being in Standby allows it to respond to commands from the remote control and maintains a stable operating tem- perature at all times for optimal performance and longevity . - Page 21 The PAV does not provide for “cross-feeding” of S-video and composite sig- nals. Any signal entering the PAV in either format will be output in the same format only. For most people, it is simplest to standardize on one format or the other throughout the system.
- Page 22 Connector ground lug: chassis ground Refer to your amplifier’s operating manual to verify that the pin assignments of its input connectors correspond to the PAV . If not, wire the cable so that the appropriate output pin connects to the equivalent input pin.
- Page 23 If you have two channels of amplification driving multiple subwoofers, sim- ply wire them in parallel from this output, using a Y-adapter. The output circuitry of the PAV can easily handle the extra amplifier without any loss of performance. Please Note: If your system does not have a subwoofer, leave the sub output empty.
-
Page 24: Learning Remote Control
IMPORTANT NOTE: The PAV’ s remote may be programmed to control up to eight devices, in- path cluding the PAV . Before using the remote, it is important to remember to light press the Device Control Selector button that corresponds to the unit you wish to operate. - Page 25 This design allows you to put one or more of the remote controls in your coffee-table collection away in a drawer, leaving only the single PAV remote to provide all of the day-to-day commands you require. NOTE: •...
- Page 26 : pressing this button will turn off the front panel dis- display play of the PAV to facilitate listening to music or watching movies in a darkened room without visual distractions. The PAV’s display will turn back on momentarily when adjusting the unit’s operation in order to acknowledge the changes.
- Page 27 For more information on these buttons see Programming and Using the Remote Control. LIGHT BUTTON All buttons and the LCD on the PAV/PDSD remote are back-lit for seven seconds when the button is pressed. The backlight is extended an light additional seven seconds with any button press while the backlight is on.
- Page 28 PAV/PDSD (for as long as you continue to hold the but- ton). For example, if you ever find yourself wondering what surround mode you are in, pressing will let you know.
-
Page 29: Planning Your Installation
(See A Word About Installation, page 10.) Choosing The Equipment The list of equipment needed for a full home theater system based on the PAV is fairly straightforward: • The Proceed PAV •... -
Page 30: The "Correct" Size For Your Television Screen
It is a good idea to lo- cate a small infrared “repeater” in the vicinity of the screen, set up to relay the signal into the equipment area and/or the PAV’s . This is espe- remote IR input cially true if the equipment has been isolated from plain view , inside cabinetry . -
Page 31: Toe-In Of Left & Right Speakers
Plush drapes, wall hangings, and various commercially-available mate- rials can do the trick nicely . (Consult with your dealer for further ideas.) The Proceed PAV is designed to use a common-bass subwoofer, meaning that the The Subwoofer(s) low frequency information from the controller is summed to a single channel. -
Page 32: The Surround Speakers
phase-induced irregularities at the crossover frequency of 80 Hz.) Of these two guidelines, the first is usually more significant sonically, as it tends to minimize the audibility of the room’s modes. Avoid corner placement, as this typically increases bass quantity at the expense of bass quality (by stimulating every room mode supported by the room). -
Page 33: Conventional Surround Placement
The Large Rooms PAV’s subwoofer output can easily drive several power amplifiers—simply split its output with Y-connectors. Another technique for large rooms involves the construction of risers for the seat- ing area in a dedicated home theater. -
Page 34: System Planning Guide
System Planning Guide Experience shows that almost any reasonable amount of time spent in the planning stages will pay for itself two to three times over during the installa- tion—more if the installation crew includes two or three people. With the background provided in the previous sections, the planning process can be boiled down to a checklist which will ensure that you do not overlook any- thing important. -
Page 35: Additional Notes On Speaker Placement
the same distance from the main listening area as the Left and Right speakers. If THX-certified LCR speakers are used and must be either above or below ear level when seated, aim them down (or up) into the listening area. They are intentionally quite directional in the vertical plane, to improve dialog intelligibility and localization. -
Page 36: System Setup & Calibration
All of the above functions can also be accessed from the front panel of the PAV Operating the On Screen (especially helpful if the remote control is not available). Menus from the Front Panel •... -
Page 37: Setting Up
“level playing field” despite variations in sensitivity and room placement. For an overview of the process, see the flowchart below. Once the physical installation of the PAV is complete, the next step is to configure Set Speakers the PAV for the specifics of the particular system. -
Page 38: Phantom Center Channel
Phantom Center Channel “ none .” Doing so will place the PAV into a “phantom” center channel mode wherein the information which would normally be directed to the center speaker by the Pro Logic circuitry will instead be sent equally to both left and right speakers. -
Page 39: Input Level Calibration
. Expect to see a 1-3 dB variation among various film transfers. Default input level settings may be set for each input in the PAV . Setting these de- faults for each source in the system will have the effect of transparently eliminat-... -
Page 40: Output Level Calibration
In the absence of a dB SPL meter, it is possible to set the output level controls by ear. Use the built-in pink noise generator in the PAV to adjust all volumes to sound the same as they cycle around the various speakers. (This signal is band- width-limited pink noise to minimize the problem of timbre shifts influencing the setting of levels.) The system will then be reasonably well balanced, although... -
Page 41: Setting The Surround Delay
PRESS ENTER TWICE TO SAVE YOUR CHANGES Since these settings are critical to achieving optimal performance from your PAV , the on screen display will ask you whether you are sure you want to make these changes, and tell you to press... -
Page 42: Setting Input Defaults
Before adjusting your input defaults, we suggest turning the master volume down to a relatively low level on your PAV (since you will be using strong signals to calibrate the system’s input levels and don’t want to endanger your loudspeakers). -
Page 43: Cd 1 Menu
Pressing master moves the cursor on to the input offset default for that source. The PAV will automatically load this number as whenever this particular input is selected. input level The primary purpose for this feature is to eliminate the level differences between various source components, in order to give the Dolby Pro Logic circuitry a more consistent signal strength with which to work. -
Page 44: Input Level Offset Menu
PAV into two-channel stereo operation.) MONO When the PAV leaves the factory, all inputs use “none” as their default surround SURROUND mode, which leaves the PAV in the same mode all the time until you change it manually. SURROUND MONO... -
Page 45: Default Surround Mode Menu
Video sources have the same input default options outlined above for audio Programming Video Inputs sources, with one addition: you need to tell the PAV whether you are using the composite or the S-video inputs for each of your four video inputs. The very dif- ferent nature of these two signals requires that on screen displays for each be generated differently. -
Page 46: Mode Defaults
Remember that ad hoc adjustments (to compensate for a poor recording, for ex- ample) on the PAV are easy to make. Simply touch the button for the speaker(s) you wish to adjust, and then raise or lower the volume. These offsets from the... - Page 47 If you simply leave this setting as for all your surround modes, the none PAV will always use the speaker settings from the set speakers menu. If you prefer to add a subwoofer for movies and remove it when listening to mu-...
-
Page 48: Programming The Ir Input
PAV (as when behind closed doors, for example), and if you are using an IR repeater to pass IR commands to the PAV , you may wish to set the IR input on the rear panel to... -
Page 49: Changing The Pav's Ir Address
PAV , as may be the case when they are placed near the speakers (for example). In this application, you can simply leave it in its default setting,... -
Page 50: Using The Pav
Using the PAV Setting the Volume There are, in effect, two volume controls in the PAV. When in either THX cin- modes, the control should be used to compensate pro logic input level for differences between recordings, using its associated green LED as a guide. -
Page 51: Mono Surround
— the display preferences subheading groups together several items which control the appearance of the on screen displays presented by DISPLAY the PAV during use. We will cover to this menu item in detail on the next PREF page. •... -
Page 52: The Display Pref Menu
POSITION suit the needs of your system. This flexibility allows you to place your PAV’s on screen information where it won’t conflict with other on screen information. As an example, you may place the on screen dis- DISPLAY TIMEOUT play in the black area under letterboxed movies. -
Page 53: Programming And Using The Remote Control
PAV . It may also be programmed to “learn” the functions from most current infrared remote controls. This means that once programmed, the PAV/PDSD remote will not only operate your PAV , but most TV sets, VCRs, DVD and LD players, satellite systems, set-top converters and other IR controlled home theater or home automation equipment. -
Page 54: Learning New Functions On The Main Keypad
3 seconds from which you are learning the new function. stop pause The LCD on the PAV remote will show – – – – indicating that it is Play Button receiving the information from the original remote control. Release the button on the original remote control. The LCD on... -
Page 55: Learning New Functions
Press-and-hold both the audio play buttons simultaneously , for about three seconds, until the LCD on the PAV remote shows . The PAV remote is now in the learning mode. LEARN NOTE: Each of the following steps must be completed within 20 seconds. If the remote does not receive any commands within the allotted time, it will return to its normal operating mode. -
Page 56: Erasing Learned Functions
To erase learned functions, please refer to the following procedures: erasing learned functions Erasing Individual Buttons: Press the Device button for the mode where the learned function has been stored. Press-and-hold the Device and the play buttons simultaneously , for about three seconds, until the LCD shows LEARN. Press-and-release the button to be erased. -
Page 57: Device Buttons
NOTE: main device mode When the main Device mode is displayed in the LCD, the PAV remote will operate in a standard operating mode and all the buttons will operate in the preprogrammed, learned and punch-through features for that Device mode. -
Page 58: Planning Your Remote Control
. Refer to the drawing below which shows the PAV remote at the left and the PAV remote at the right with numbers on each button which correspond to the numbers on the worksheets that follow . -
Page 59: Function Reference
_________ _________ _________ _________ _________ _________ _________ _________ tv/vcr1/4 _________ _________ _________ _________ cd1/5 _________ _________ _________ _________ cd2/6 _________ _________ _________ _________ mode _________ _________ _________ _________ * An asterisk indicates buttons normally used by the PAV . - Page 60 _________ _________ _________ _________ _________ _________ _________ _________ _________ _________ _________ _________ _________ _________ _________ _________ _________ _________ light _________ _________ _________ _________ path _________ _________ _________ _________ * An asterisk indicates buttons normally used by the PAV . _________...
-
Page 61: Remote Control Advanced Features
For example, since the PAV will likely be used as the sound system for TV viewing, you may wish to have the PAV’ s volume activated when the remote is set to run the TV . Either the AUDIO or TV volume control may be associated with any of the remote’s devices. -
Page 62: Channel Control "Punch-Through
Y ou can program the remote so that either the Sat or Cable Channel Controls channel control “punch-through” channel + channel – ) will also operate in other modes on the remote control. When this feature is active, the SAT or Cable will NOTE: channel +... -
Page 63: Memory Buttons
Memory Button can be programmed to turn on the TV, turn on the standby PAV , turn on the VCR and turn on the Satellite receiver with one button push. • FAVORITE CHANNELS: Memory Buttons can provide direct access to your channel with a one-button push. -
Page 64: Memory Buttons
Memory Button have been sent out. This will ensure that all the commands are received by the device(s). Example: To program your TV, Cable Box and the PAV to turn on when the power button is pressed, first press-and-hold the sat and mute buttons until appears in the LCD. -
Page 65: Erasing Memory Buttons
To erase the Memory Buttons, follow these steps: erasing memory buttons Select the mode (AUD or SAT) in which you want to erase the Memory button. Press the corresponding Device button ( ) and mute audio button simultaneously . will appear in the LCD. Press the Memory button to be erased. -
Page 66: Programming Pav Functions
(obviously). Therefore, you must navigate the on screen menus by using the buttons on the front panel of the PAV . The buttons on the front panel you need to use are as follows: •... -
Page 67: Remote Only Menu
MENU SPECIAL Y ou may also teach special commands to the PAV remote control which allow direct access to the various surround modes, signal path and con- trol options. These may be assigned to any available button on the PAV remote control. -
Page 68: Room Acoustics
Room Acoustics The following information on room acoustics does not need to be considered in every installation. Rather, it is provided for those who plan a dedicated lis- tening room, or for those who feel they have a problematic room and there- fore need ideas about how to improve their system’s performance further. -
Page 69: Room Modes
The Boundary Effect is particularly important when it comes time to position the front speakers. If they are not placed consistently with regard to adjacent room boundaries, the tonal balance or timbre of sounds panned across the front may change, weakening the illusion of a real object moving across the soundstage. -
Page 70: Your System Settings
Your System Settings The settings in your Proceed PAV are saved in non-volatile memory and should normally survive power outages. Still, it is a good idea to write your preferred settings down against the chance of an inquisitive neighbor or family member changing them without your knowledge. -
Page 71: Cd 1 Input Defaults
• Alias ______ cd 1 Input Defaults • Offset ______ • Surround Mode ______ • Alias ______ cd 2 Input Defaults • Offset ______ • Surround Mode ______ tape 1 Input Defaults • Alias ______ • Offset ______ • Surround Mode ______ •... -
Page 72: Pav Menu Structure (Partial)
PAV Menu Structure (partial) MUTE LEVEL DISPLAY PREF VOLUME OPERATE DISPLAY VOLUME SPEED SETUP: UNLOCKED PAV MENU SPEAKERS SET LEVELS PANEL BUTTONS SET DELAY REMOTE SETUP ONLY TEACH INPUT REMOTE DEFAULTS DIRECT ACCESS MODE DEFAULTS SPECIAL REMOTE REMOTE CONTROL CONTROL... -
Page 73: Troubleshooting
PAV of its environ- ment so it may make the right “decisions” about what it should do. Once setup is completed, the PAV is quite simple to use. But the setup is quite es- sential. -
Page 74: Care And Maintenance
Care and Maintenance To remove dust from the cabinet of the PAV , use a feather duster. To remove dirt and fingerprints, we recommend isopropyl alcohol and a soft cloth. Caution! Always apply the isopropyl alcohol to the soft cloth and then wipe the PAV with the dampened cloth. -
Page 75: U.s. And Canadian Warranty
Mad- rigal Audio Laboratories, Inc., P . O. Box 781, Middletown, CT 06457. The extended warranty for this Proceed product is five (5) years from the date of Five Year Extended Warranty purchase. -
Page 76: Obtaining Service
We take great pride in our dealers. Experience, dedication, and integrity make these professionals ideally suited to assist with our customers’ service needs. If your Proceed component must be serviced, please contact your dealer. Your dealer will then decide whether the problem can be remedied locally , or whether to contact Madrigal for further service information or parts, or to obtain a Return Authorization. -
Page 77: Dimensions
36.2 cm 5.08 cm 1.00" 2.54 cm 14.25" 36.2 cm 13.27" 33.7 cm 0.98" 2.49 cm 14.25" 36.2 cm 4.45" 4.33" 11.3 cm 11.0 cm 0.98" (note that additional space must be allowed 2.49 cm for connections behind the pav) -
Page 78: Specifications
Telephone (860) 346-0896 (860) 346-1540 http://www.madrigal.com/ If purchased in the United States or Canada, the warranty on this Proceed product is owner-transferable. If your product requires service, you must obtain a Return Authorization before shipping it to Madrigal. Madrigal reserves the right to repack any product which arrives improperly packed for shipment and to charge the owner for the required packing material. -
Page 79: Installation Notes
Installation Notes... - Page 80 Madrigal Audio Laboratories, Inc. 2081 South Main Street, P.O. Box 781 Middletown, Connecticut 06457 USA Telephone: (860) 346-0896 Fax: (860) 346-1540 http://www.madrigal.com/ PR O C E E D is a registered trademark of Madrigal Audio Laboratories, Inc. a Harman International company 630377 ©...
Need help?
Do you have a question about the PAV and is the answer not in the manual?
Questions and answers