Table of Contents
Advertisement
Quick Links
Advertisement
Table of Contents

Subscribe to Our Youtube Channel
Summary of Contents for O-Synce NAVI2move
- Page 1 NAVI2move user manual ENGLISH...
-
Page 2: Table Of Contents
Content Content ..............................1 1 FIRST STEPS ............................3 1.1 Downloading and intalling of NaviControlCenter ................. 3 1.2 Recharging ............................. 3 1.3 Switching on and off ........................3 1.4 Display modes ..........................4 1.5 Button functions ..........................4 1.6 Settings ............................4 1.7 General view of the display ...................... - Page 3 4.4 Display tour summary ......................... 11 5 BACKTRACK – Home tracking function ....................12 6 POI (Point of Interest) – Save and recall landmarks ................12 7 DELETING DATA ..........................12 8 NAVIGATION AND ROUTING ......................13 8.1 Route planning (NaviControlCentre software) ................13 8.2 Selecting and following a route ....................
-
Page 4: First Steps
Visit the o-synce website (www.o-synce.com) and download the NaviControlCentre which is found under the section “Software”. Afterwards install the software by double-clicking the downloaded file. If you need a “step-to-step”-guide, you’ll find it on the o-synce website under “Support”. 1.2 Recharging Before the first use theNAVI2move hast to be charged fully. -
Page 5: Display Modes
1.4 Display modes Your Navi2move offers three display modes: a. The navigation mode displays navigation and training facts. b. The data review mode displays a summary of your last tours and the collected data (for example total time, total kilometres). -
Page 6: General View Of The Display
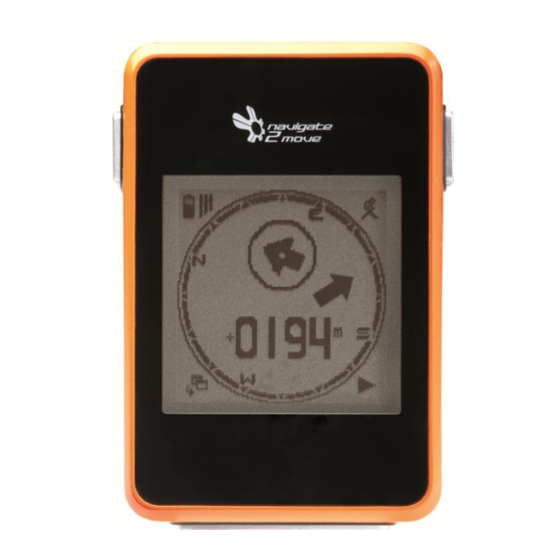
1.7 General view of the display Battery charge condition indicates the actual charge of the battery. GPS signal strength shows the intensity of the satellite reception. For exact measuring of the altitude at least three bars are needed. The correct position, based on approximate altitude, is already accessible with just two displayed bars. - Page 7 The selectable route function allows you to choose several functions like bike speed, altitude, journey time or distance to the next waypoint. When riding a route it is recommendable to choose the function distance to the next waypoint (see page 14 – 8.2 Selecting and following a route). The recording status indicades if a route is currently recorded, if it is pausing or if the recording has been stopped.
-
Page 8: Mounting Of Bike Holders
Handle bar 2.2 Changing holder options The NAVI2move is delivered with the double-legged holder already fixed to the back plate. For mounting the holder directly onto your stem or handlebar, loosen the four screws on the backside. Exchange the double-legged holder plate with the regular holder plate. Depending on where you... -
Page 9: Fixation Of The Bike Holder
2.3 Fixation of the bike holder 2.3.1 Double-leg Glue both rubber stickers onto the contact surface of the holder plate. Afterwards pull both cable straps through the holes, fix them around the handlebar and tighten them. Cut off the remaining ends of the cable straps. -
Page 10: Menu
3.2.2 Time zone – Set up time and date Once the NAVI2move has found a GPS satellite for the first time, the time and date of the GPS satellite will be adopted automatically. Nevertheless the time can vary from the real time, depending on the time zone you are in. -
Page 11: Calibration
Individual settings of turning radius and recording interval. 3.2.6 Totals Set up for total data like total kilometres, time or altitude difference uphill and downhill. ODO - total kilometres Time - total time 3.2.7 Language Set up the device language of your menu NAVI2move... -
Page 12: Recording & Tour Data
4 RECORDING & TOUR DATA 4.1 Start recording For saving or displaying data like time, distance or average speed you necessarily have to start a recording. To start a recording enter the navigation mode and hold the right button for 2 seconds (remote switch: lower button). -
Page 13: Backtrack - Home Tracking Function
5 BACKTRACK – Home tracking function If you start a recording before beginning a tour, the location where you are currently situated will be saved as your starting point. If you start the backtrack function the navigation arrow will point directly to this starting point. -
Page 14: Navigation And Routing
Please remind that you have to plan your routes in advance by using the navigation software NaviControlCentre which can be downloaded in the software section of the o-synce website. Install the NaviControlCentre software on a personal computer and then connect your NAVI2move. Before... -
Page 15: Selecting And Following A Route
8.2 Selecting and following a route Enter the menu and select Navigation -> Route Plan. Now choose the waypoint you want to navigate to. You will find your destination point in the upper position of the displayed list. To travel the whole route, you have to confirm your destination point. -
Page 16: Reading Out
9 Reading out By means of the NaviControlCentre you can readout your tour data. Connect the NAVI2move to your personal computer and start the NaviControlCentre. Enter index card „Track“ and click on the downloading symbol Your tour now will be downloaded and displayed in the map window.
Need help?
Do you have a question about the NAVI2move and is the answer not in the manual?
Questions and answers