Table of Contents

Summary of Contents for KOCOM KCC-D51
- Page 1 High Resolution Day& Night Color Camera KCC-D51 User's Manual This user's manual may be changed for the enhancement of product quality without notice. KCC-D51 07.04 ¢ºPlease read User's Manual carefully before installing or using the product.
-
Page 2: Table Of Contents
Contents Product Features Functions of OSD MENU Buttons Warnings & Attentions How to Set OSD MENU SET UP Functions Product Components - Lens Selection (LENS) Names of Product Parts - Shutter Selection (SHUTTER) - Front Side - White Balance Selection (WHITE BALANCE) - Back Side - Backlight Compensation Selection (BACKLIGHT) Installation... -
Page 3: Product Features
Product Features ¢º High Sensitivity ¢º PRIVACY Function - Clear image even under the illuminance of 0.002 by adopting 1/3 INCH SONY SUPER HAD CCD. - Able to hide a part of screen not to be shown by supporting PRIVACY Function. ¢º... -
Page 4: Warnings & Attentions
Warnings & Attentions ¡Ø Warnings - Please contact your local seller or service center if the product does not work normally. - Do neither disassemble the product at user's discretion nor insert any alien material into it. Warnings: Do not disassemble the product to avoid the danger of electric shock. - Do not personal installation by a user. -
Page 5: Product Components
Product Components Names of Product Parts ¡Ü KCC-D51 Camera (Main Body) ¡Ü User's Manual ¡á Front Side ¡Ü A groove for fixing the C/CS mount Fix C/CS mount here using L-Wrench. ¡Ü A groove for fixing the support Please use the screws complying with the following standards to fix the product. -
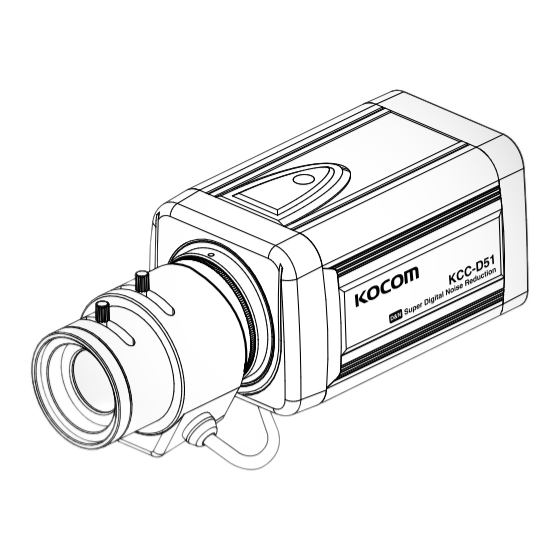
Page 6: Names Of Product Parts
Names of Product Parts Installation ¡á Lens ¡á Back Side ¡Ü Lens is optional. (Automatic iris lens, CS-mount lens, C-mount lens or other lenses may be used). ¡Ø Note : For effective realization of the product's major performances, it is recommended to use DC type iris lens. ¡Ü... -
Page 7: Installation Using C/Cs Mount Lens
Installation Installation ¡á Installation Using C-mount Lens 3. After removing connection plug cap from automatic iris lens, connect and solder lens cable to connector pins of connection plug. - After removing the lens protection cap in the front side of the product, combine C-mount lens by turning it clockwise. VIDEO PIN 1 Damping(-) -
Page 8: Monitor Connection
Monitor Connection Power Connection ¡á Connect the video output terminal of camera to the input terminal of monitor. ¡á Be sure to check the power standard of the product before power connection. - Connect the constant voltage adaptor for DC (DC 12V/300mA) only. ¡Ø... -
Page 9: Camera Operation
Camera Operation ¡á Contents of OSD MENU ¡á How to Set OSD MENU Functions SET UP Menu - Use 5 buttons in the Back side of the product to set up OSD MENU functions. LENS ¡ÜMANUAL ¡ÜDC/VIDEO (sel e cts l e ns) ¢Á... -
Page 10: Functions Of Osd Menu Buttons
Functions of OSD MENU Buttons SETUP Using UP or DOWN button ¢ºLENS Using LEFT or RIGHT button 1. Press SET UP button SHUTTER - - - to select a desired menu item. to change the present modes. - Product goes to the functional set up state. WHITE BAL. -
Page 11: How To Set Osd Menu Set Up Functions
¡á Adjustment of Shutter Mode and Speed How to Set OSD MENU SET UP Functions Selects automatic or manual control of shutter. ¡á Lens Selection 1. If SET UP menu is displayed, make an arrow point to "SHUTTER" item using UP or DOWN button. Functions showing the brightness of screen. - Page 12 ¡á BACKLIGHT (Backlight Compensation) How to Set OSD MENU SET UP Functions If BLC is selected for the subject under the strong backlight, both the subject and its background ¡á Adjustment of WHITE BALANCE can be clearly seen. Use this function if the color adjustment in screen is necessary. 1.
- Page 13 How to Set OSD MENU SET UP Functions ¡á AGC Function (AUTO GAIN CONTROL) ¡á DNR Function (DIGITAL NOISE REDUCTION) 1. If SET UP screen is displayed, make an arrow point to "AGC" item using UP or DOWN button. As GAIN increases or decreases, DNR function automatically reduces background noise of low illuminance. 2.
-
Page 14: Special Functions (Functions Peculiar To Camera)
¡á SPECIAL Functions How to Set OSD MENU SET UP Functions 1. If SET UP screen is displayed, make an arrow point to "SPECIAL" item using UP or DOWN button. ¡á SENS UP 2. Press LEFT or RIGHT button to select a desired mode. Automatically detects darkness at night or under dim light and keeps clear images. - Page 15 N O P Q R S T U V W X Y Z (1) Using LEFT or RIGHT button, move cursor to a desired letter. KCC-D51 a b c d e f g h i j k l m n o...
- Page 16 How to Set OSD MENU SET UP Functions ¡á COLOR (Electronic Day & Night) ¡á MOTION DETECTION ¡Ý AUTO : Automatically discern day or night settings and switches to the appropriate mode for the surrounding conditions. - This product can detect motions of subject in the 4 areas on screen. During the motion detection, While mode is switched to COLOR during the day, it is switched to B/W at night.
- Page 17 How to Set OSD MENU SET UP Functions ¡á PRIVACY ¡á SHARPNESS - If a user increases its level, the contour of image becomes sharpened and clear. (1) Able to hide an area that a user doesn't want to display PRIVACY Please adjust appropriately according to the image values.
-
Page 18: Troubleshooting
Troubleshooting ¡á If a trouble or disorder occurred in the product, please check the following points. Trouble Trouble Check Points Check Points - Is noting displayed in the screen? - Does not the motion detection work? - Check that the power is normally connected to the constant voltage - Check whether MOTION DETECTION function is set as "OFF"? adaptor (DC12V/500mA). -
Page 19: Product Specifications
Product Specifications ¡á Product specifications are as presented in the following table. Description/Mo del KCC-D51 Description/Mo del KCC-D51 Input P ower DC12V/300mA IRIS Contr ol DC / VIDEO Image Sensor D evice Electronic Shut ter Sp eed AUTO / MANU AL (1/60,1/50 ~ 120,000 se...
Need help?
Do you have a question about the KCC-D51 and is the answer not in the manual?
Questions and answers