Table of Contents
Advertisement
Advertisement
Table of Contents

Related Manuals for Timex T231


Summary of Contents for Timex T231
- Page 1 Model T231 AM/FM CLOCK RADIO with DIGITAL TUNING For additional information, online registration, and exclusive special offers visit our website: For questions or comments regarding this or other products, please call our toll-free number 1-800-888-4491.
- Page 2 CAUTION RISK OF ELECTRIC SHOCK. DO NOT OPEN CAUTION: TO REDUCE THE RISK OF ELECTRIC SHOCK, DO NOT REMOVE COVER (OR BACK). NO USER-SERVICEABLE PARTS INSIDE. REFER SERVICING TO QUALIFIED SERVICE PERSONNEL. WARNING: TO REDUCE THE RISK OF FIRE OR ELECTRIC SHOCK, DO NOT EXPOSE THIS APPLIANCE TO RAIN OR MOISTURE.
- Page 3 A Consumer Guide to Product Safety This unit has been designed and manufactured to assure your personal safety. Improper use can result in potential electrical shock or fire hazards. 1. Read these Instructions. 2. Keep these Instructions. 3. Heed all Warnings. 4.
-
Page 4: Fcc Information
FCC Information This device complies with Part 15 of the FCC Rules, operation is subject to the following two conditions: (1) This device may not cause harmful interference, and (2) this device must accept any interference received, including interference that may cause undesired operation. •... -
Page 5: Installing The Batteries
Preparation For Use Battery Back-up System Your new Timex Clock Radio includes a battery back up system that will maintain the time and alarm settings during a temporary power interruption. The battery back up system requires two “AAA” batteries, not included. We recommend you use a well-known brand of alkaline batteries for longest life and best performance. -
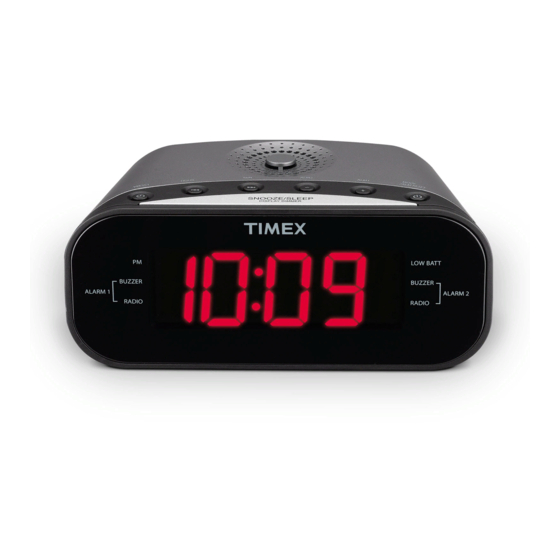
Page 6: Controls And Indicators
Controls and Indicators Front Panel Time and Radio Frequency Display PM Indicator Low Battery Indicator Alarm 1 Buzzer / Alarm 2 Buzzer / Radio Indicators Radio Indicators Top Panel Speaker ALM 2 / Volume – Button Minute / (Tuning Up) Button ALM 1 / Volume + Button Hour / (Tuning Down) Button... - Page 7 Back Panel FM Antenna Wire Auxiliary Input Jack AC Power Cord Bottom Cabinet Battery Back up Compartment This device complies with Part 15 of the FCC Rules. Operation is subject to the following two conditions: (1) this device may not cause harmful interference, and (2) this device must accept any interference received, including interference that may cause undesired operation.
-
Page 8: Setting The Time
The display stops flashing and the clock begins to run. Setting The Alarm Time This Timex clock radio has dual alarms that can be set and used independently. The initial default alarm settings are 6:00 AM for Alarm 1 and 7:00 AM for Alarm 2. The procedure for setting both alarms is the same. -
Page 9: Radio Operation
NOTE: You must make the time and alarm time adjustments while the display is flashing. If no adjustments are made for approximately 10 seconds the display will stop flashing and cannot be adjusted. If this occurs you must start the time and alarm setting procedure again and make sure that you complete the adjustments while the display is flashing. -
Page 10: To Recall/Change A Preset Station
To Recall A Preset Station Tune to the desired band and then press the PRESETS button to scroll through the 10 preset memories to find your desired station. To Change A Preset Station 1. Tune to the new station that you want to store. 2. -
Page 11: Care And Maintenance
You can listen to music from an external source such as an iPod, MP3 player, CD player, etc, through the speaker of your Timex clock radio. Use a 3.5mm stereo audio cable (not included) to connect the headphone jack of your external source to the AUX IN jack on the back panel of your Timex clock radio. -
Page 12: Limited 90 Day Warranty Information
Limited 90 Day Warranty Information Timex Audio Products, a division of SDI Technologies Inc. (hereafter referred to as SDI), warrants this product to be free from defects in workmanship and materials, under normal use and conditions, for a period of ninety (90) days from the date of original purchase.
Need help?
Do you have a question about the T231 and is the answer not in the manual?
Questions and answers
Why does my clock radio that is changing the time set to military time?
The Timex T231 clock radio is displaying military time likely because it is set to 24-hour time mode instead of 12-hour time mode.
This answer is automatically generated
Indicator light for radio stays on
The indicator light stays on for the Timex T231 radio to show that the clock and alarm settings are correct, even after a power failure if batteries are installed.
This answer is automatically generated
Radio highest volume is too low. Need more volume.
To increase the volume on the Timex T231 radio, press the "VOL +" button when the Radio or AUX mode is on.
This answer is automatically generated
When I try to change the time the preset numbers show up. How can I eliminate the preset buttons?
The Timex T231 manual does not mention eliminating preset buttons when changing the time. However, to adjust the time, you must make changes while the display is flashing. If no adjustments are made for about 10 seconds, the display stops flashing, and you must restart the time-setting process.
This answer is automatically generated
Mr. Anderson The red lights came back on the buzzer and the radio after I did what your suggested.
When the red lights come back on the buzzer and radio for the Timex T231, it indicates that power has been restored and the alarm settings (Alarm 1 Buzzer / Alarm 2 Buzzer) and time settings are still correct.
This answer is automatically generated
How do I turn off the Alarm 1 and Alarm 2 red indicators on the Buzzer and the Radio on Timex ****/FM Dual Alarm Clock Radio with Digital Tuning Model T231v23. I do not want the alarms to come on at all.
To turn off the Alarm 1 and Alarm 2 indicators on the Timex T231 FM Dual Alarm Clock Radio, press the 1 button once to cancel the alarm function. The alarm indicators will disappear, and the display will return to the correct time.
This answer is automatically generated
How do I turn the radio off after setting the alarm and after listening to it?
To turn off the radio on a Timex T231 after setting the alarm, press and hold the Power/Mode/Alarm Reset Button until "OFF" appears on the display.
This answer is automatically generated
Randomly blinks then changes the time read out
The Timex T231 may randomly blink and change the time readout because time and alarm adjustments must be made while the display is flashing. If no adjustments are made for approximately 10 seconds, the display stops flashing, and settings cannot be adjusted. If this occurs, the time and alarm setting procedure must be restarted.
This answer is automatically generated
How do I set the clock for 12 hour from 25 hour?
How do I change clock from military time