Table of Contents
Advertisement
Quick Links
Advertisement
Table of Contents
Troubleshooting

Subscribe to Our Youtube Channel
Related Manuals for MPC Profile 6.5

Summary of Contents for MPC Profile 6.5
-
Page 3: Table Of Contents
Contents Chapter 1: Getting Started ..........1 Getting help . - Page 4 Contents Cleaning the mouse ......... . . 33 Cleaning optical discs .
-
Page 5: Chapter 1: Getting Started
CHAPTER Getting Started • Getting help • System Specifications • Checking out your computer • Setting up your computer... -
Page 6: Getting Help
If you ever reinstall Windows from the installation DVD, you will need to enter these numbers to activate Windows. System Specifications Your Profile 6.5 All-in-One computer features a high-performance system board. The following specifications describe your system board. Processor •... - Page 7 www.mpccorp.com Memory • DDR2 667/800 memory support • 2 DIMMS, 4 GB maximum Chipset • Intel Q35 - ICH9DO Audio • 5.1 High Definition Audio integrated • Headphone & microphone ports Built-in I/O • 8 USB ports (6 back, 2 side) •...
-
Page 8: Checking Out Your Computer
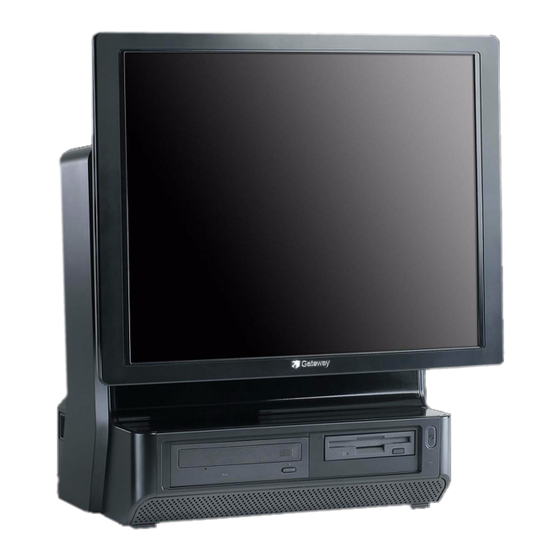
CHAPTER 1: Getting Started Checking out your computer Front DVD/CD drive Memory card reader or Power button/ diskette drive (optional) power indicator Component Icon Description DVD/CD drive Use this drive to listen to audio CDs, install games and programs, watch DVDs, and store large files onto recordable discs (depending on drive type). -
Page 9: Back
www.mpccorp.com Back Opening for cables Power connector Kensington lock slot Component Description Opening for cables Route the cables that are plugged into the side ports through this opening. Power connector Plug the power cord into this connector. Kensington lock slot Attach a cable lock to this slot to prevent unauthorized opening, modification, and theft of your computer. -
Page 10: Right Side
CHAPTER 1: Getting Started Right side Side port cover Display controls Back panel release latch (2) Volume control Headphone jack USB ports Microphone jack Component Icon Description Display controls Press these buttons to adjust the screen image. Volume control Press to adjust the volume level of the built-in speakers. USB ports Plug a USB (Universal Serial Bus) device (such as a USB printer, scanner, camera, keyboard, or mouse) into one of these... -
Page 11: Side Port Panel
www.mpccorp.com Side port panel Important Your computer’s hardware options and port locations may vary from these illustrations. Access the side port panel by removing the port cover on the right side of your computer. Digital (DVI) video in port (optional) USB ports Expansion card slots VGA in port... - Page 12 CHAPTER 1: Getting Started Component Icon Description Digital (DVI) video in port If you have a digital video (DVI) expansion card installed, connect its DVI out port to this DVI in port. (VGA) in port If you have an analog (VGA) video expansion card installed, connect its VGA out port to this VGA in port.
-
Page 13: Setting Up Your Computer
www.mpccorp.com Setting up your computer Working safely and comfortably Please observe and follow safe ergonomic workplace practices when using this equipment. Preparing power connections Protecting from power source problems Warning High voltages can enter your computer through both the power cord and the modem connection. -
Page 14: Starting Your Computer
CHAPTER 1: Getting Started Starting your computer To start your computer: Connect the power, network, mouse, and keyboard cables to your computer according to the setup poster. Press the power button on the front of your computer. If your computer does not turn on, check the power cable connections. -
Page 15: Restarting (Rebooting) Your Computer
www.mpccorp.com • Your system has encountered a software error and has failed to respond to any user input including [Ctrl+Alt+Del]. • The system was booted into command prompt mode (operating system specific). Warning If you have not encountered one of these situations, shut the system off through the operating system shut down function to avoid data loss. -
Page 16: Adjusting The Volume
CHAPTER 1: Getting Started Adjusting the volume You can adjust volume using the volume control buttons on the right side of your computer or the Windows volume controls. You can also adjust the volume of specific sound devices in your computer. -
Page 17: Configuring The Audio Jacks
www.mpccorp.com To adjust device volume levels, click Mixer. The Volume Mixer dialog box opens, where you can click and drag sliders for individual devices. Adjust the Windows Sounds slider to change system sounds volume independently of general volume (such as the volume used for music and game sounds). -
Page 18: Installing A Printer, Scanner, Or Other Device
CHAPTER 1: Getting Started Installing a printer, scanner, or other device Important Before you install a printer, scanner, or other peripheral device, see the device documentation and installation instructions. Your computer has one or more of the following ports: Universal Serial Bus (USB), serial, and parallel. -
Page 19: Chapter 2: Upgrading Your Computer
CHAPTER Upgrading Your Computer • Opening the case • Replacing the processor fan • Installing memory • Replacing the power supply • Replacing the memory card reader • Replacing an optical disc drive • Replacing the diskette drive • Replacing the hard drive •... -
Page 20: Opening The Case
CHAPTER 2: Upgrading Your Computer Opening the case Your computer case provides easy access to internal components. Removing the back panel Warning To avoid exposure to dangerous electrical voltages and moving parts, turn off your computer and unplug the power cord and modem and network cables before opening the case. To prevent risk of electric shock, do not insert any object into the vent holes of the power supply. -
Page 21: Replacing The Back Panel
www.mpccorp.com Pull both back panel release latches (one on each side of the case) toward the back of the case, then lift the back panel away from the case. Replacing the back panel To replace the back panel: Slide the tabs on the top of the panel into the slots in the top of the case. Slots Swing the lower part of the panel down and against the computer until it clicks into place. -
Page 22: Replacing The Processor Fan
CHAPTER 2: Upgrading Your Computer Replacing the processor fan You need to remove the processor fan to replace it or to access system components that are behind the fan. To replace the processor fan: Remove the back panel by following the instructions in “Opening the case”... -
Page 23: Installing Memory
When you upgrade the computer memory, make sure that you install the correct type of memory module for your computer. Your computer uses DIMM memory. Important For optimal performance, MPC recommends installing memory in dual channel mode. To install or replace DIMM memory: Remove the back panel by following the instructions in “Opening the case”... -
Page 24: Replacing The Power Supply
CHAPTER 2: Upgrading Your Computer Turn on your computer. Windows starts and the Windows desktop appears. Click (Start), right-click Computer, then click Properties. The amount of memory in your computer is displayed. Replacing the power supply To replace the power supply: Remove the back panel by following the instructions in “Opening the case”... -
Page 25: Replacing The Memory Card Reader
www.mpccorp.com Replacing the memory card reader To replace the memory card reader: Remove the back panel by following the instructions in “Opening the case” on page Remove the power supply by following the instructions in “Replacing the power supply” on page 20. -
Page 26: Replacing The Diskette Drive
CHAPTER 2: Upgrading Your Computer Lay the computer face-down, then reconnect the cables to the drive. Replace the back panel by following the instructions in “Replacing the back panel” on page Replacing the diskette drive To replace the diskette (floppy) drive: Remove the back panel by following the instructions in “Opening the case”... -
Page 27: Replacing The Hard Drive
www.mpccorp.com Lay the computer face-down, then reconnect the cables to the drive. Replace the power supply by following the instructions in “Replacing the power supply” on page Replace the back panel by following the instructions in “Replacing the back panel” on page Replacing the hard drive To replace the hard drive:... -
Page 28: Adding Or Replacing An Expansion Card
CHAPTER 2: Upgrading Your Computer Make sure the hard drive release lever is still fully extended, then slide the new hard drive all the way into the hard drive bay by pushing on the hard drive itself (not the lever). Make sure that you slide the drive in until it is flush with the edge of the hard drive bay. -
Page 29: Installing A Full-Height Expansion Card
www.mpccorp.com Slide a half-height PCI card into the half-height PCI slot. You can slightly seesaw the card end-to-end to help insert the card, but do not bend the card sideways. Half-height PCI slot Replace the PCI riser card by sliding it back into place. Replace the back panel by following the instructions in “Replacing the back panel”... - Page 30 CHAPTER 2: Upgrading Your Computer Remove the metal EMI shield next to the slot you are adding a card to. The PCI card slot is the slot furthest from the riser card handle, and the graphics card slot is the slot closest to the handle.
-
Page 31: Replacing The Bios Battery
www.mpccorp.com Replacing the BIOS battery Warning Danger of explosion if battery is incorrectly replaced. Replace only with the same or equivalent type recommended by the manufacturer. Dispose of used batteries according to local hazardous waste regulations. If the computer clock does not keep time or the settings in the BIOS Setup utility are not saved when you turn off your computer, replace the system battery. -
Page 32: Replacing The System Board
CHAPTER 2: Upgrading Your Computer Save all your settings and exit the BIOS Setup utility. Replacing the system board To replace the system board: Remove the back panel by following the instructions in “Opening the case” on page Remove the riser card assembly by following the instructions in “Adding or replacing an expansion card”... - Page 33 www.mpccorp.com Slide the system board to the right until it slides free from the case, then remove it completely from the case. Slide the new system board into place, then replace the seven screws you removed previously. Replace the heat sink and tighten the four captive screws. Replace the processor fan by following the instructions in “Replacing the processor fan”...
- Page 34 CHAPTER 2: Upgrading Your Computer...
-
Page 35: Chapter 3: Maintaining Your Computer
CHAPTER Maintaining Your Computer • Caring for your computer • Cleaning your computer • Operating Environment... -
Page 36: Caring For Your Computer
CHAPTER 3: Maintaining Your Computer Caring for your computer To extend the life of your computer: • Be careful not to bump or drop your computer and do not put any objects on top of it. The case, although strong, is not made to support extra weight. •... -
Page 37: Cleaning The Monitor
www.mpccorp.com If you spill liquid on the keyboard, turn off your computer and turn the keyboard upside down. Let the liquid drain, then let the keyboard dry before trying to use it again. If the keyboard does not work after it dries, you may need to replace it. Cleaning the monitor Caution A flat-panel display is made of specially coated glass and can be scratched or... -
Page 38: Operating Environment
CHAPTER 3: Maintaining Your Computer Operating Environment Temperature Concerns The system specifications ensure the computer will operate in ambient (room) temperatures up to 95°F (35°C). It is important to keep your computer out of direct sunlight and other heat sources (such as lamps and heating vents). - Page 39 www.mpccorp.com...
- Page 40 CHAPTER 3: Maintaining Your Computer...
-
Page 41: Chapter 4: Troubleshooting
CHAPTER Troubleshooting • Safety guidelines • First steps • Troubleshooting • Recovering your system • Telephone support... -
Page 42: Safety Guidelines
• If an error message appears on the screen, write down the exact message. The message may help MPC Technical Support in diagnosing and fixing the problem. • If you added or removed peripheral devices, review the installation procedures you performed and make sure that you followed each instruction. -
Page 43: Modem (Cable Or Dsl)
www.mpccorp.com • Make sure that your account with your Internet service provider (ISP) is set up correctly. Contact your ISP technical support for help. • Make sure that you do not have a problem with your modem. For more information, see “Modem (dial-up)”... - Page 44 CHAPTER 4: Troubleshooting If this is the first time you have accessed this category, the Location Information dialog box opens. Enter the information for your area, then click OK. Click the Dialing Rules tab, click the location from which you are dialing, then click Edit. Make sure that all settings are correct.
-
Page 45: Networking
www.mpccorp.com To run modem diagnostics: Close all open programs. Click (Start), then click Control Panel. The Control Panel window opens. Click Hardware and Sound, then click Phone and Modem Options. The Phone and Modem Options dialog box opens. Click the Modems tab, click your modem, then click Properties. The Modem Properties dialog box opens. -
Page 46: Memory Card Reader
CHAPTER 4: Troubleshooting The computer does not recognize an add-in Ethernet card • Shut down and restart your computer. • Make sure that you have installed the required software. For more information, see the documentation that came with your Ethernet card. •... -
Page 47: Hard Drive
www.mpccorp.com A DVD movie will not play • Make sure that you have a DVD drive. • Make sure that the disc label is facing up, then try again. • Try a different disc. Occasionally discs are flawed or become scratched and cannot be read by the DVD drive. -
Page 48: File Management
CHAPTER 4: Troubleshooting You see an “Access Denied” or “Write protect” error message • Move the write-protection tab in the upper-right corner of the diskette down (unprotected). • The diskette may be full. Delete unnecessary files on the diskette and try again. •... -
Page 49: Mouse
www.mpccorp.com Liquid spilled in the keyboard • If you spilled liquid in the keyboard, turn off your computer and unplug the keyboard. Clean the keyboard and turn it upside down to drain it. Let the keyboard dry before using it again. If the keyboard does not work after it dries, you may need to replace it. -
Page 50: Sound
CHAPTER 4: Troubleshooting Sound You are not getting sound from the speakers • Make sure that the volume controls are turned up. For more information, see “Adjusting the volume” on page • Make sure that mute controls are turned off. For more information, see “Adjusting the volume”... -
Page 51: Recovering Your System
Problem-solving may also involve re-installing some or all of the computer’s software (also called recovering or restoring your system). MPC provides everything you need to recover your system under most conditions. Caution To prepare your computer for additional system recovery options, you should create a set of software and driver recovery discs as soon as possible. -
Page 52: Using Microsoft System Restore
CHAPTER 4: Troubleshooting Important Before proceeding with the instructions below, verify that your boot order matches the table in the Boot Device Priority section. To use the Operating System Recovery CD, complete the following steps: Insert the Operating System Recovery CD into the primary optical drive and restart your system. - Page 53 www.mpccorp.com On the left side of the window, click Repair Windows using System Restore, then click Next. The Choose a restore point dialog box opens. Click the restore point you want, click Next, then click Finish. A confirmation message box appears.
- Page 54 CHAPTER 4: Troubleshooting Click Create. The Create a restore point dialog box opens. Type a description for the restore point (such as the date and time), then click Create. The restore point is created. Click OK.
-
Page 55: Telephone Support
If you have recently installed hardware or software, make sure that you have installed it according to the instructions provided with it. If you did not purchase the hardware or software from MPC, see the manufacturer’s documentation and technical support resources. •... - Page 56 CHAPTER 4: Troubleshooting...
-
Page 57: Appendix A: Legal Notices
APPENDIX Legal Notices • Important safety information • Regulatory compliance statements • Environmental information • Notices... -
Page 58: Important Safety Information
MPC system. Your MPC system is designed and tested to meet the latest standards for safety of information technology equipment. However, to ensure safe use of this product, it is important that the safety instructions marked on the product and in the documentation are followed. -
Page 59: Regulatory Compliance Statements
Phone: 800-438-3343 Caution Changes or modifications not expressly approved by MPC could void the FCC compliance and negate your authority to operate the product. This device complies with Part 15 of the FCC Rules. Operation of this device is subject to the following two conditions: (1)this device may not cause harmful interference, and (2) this device must accept any interference received, including interference that may cause undesired operation. -
Page 60: Laser Safety Statement
If an outside antenna or cable system is to be connected to your MPC PC, make sure that the antenna or cable system is electrically grounded to provide some protection against voltage surges and static charges. -
Page 61: Lightning Protection
Lightning protection For added protection of any MPC product during a lightning storm or when it is left unattended or unused for long periods of time, unplug the product from the wall outlet and disconnect the antenna or cable system. -
Page 62: Macrovision Statement
When your electrical or electronic equipment is no longer useful to you, “take it back” to your local or regional waste collection administration for recycling. In some cases, your “end of life” product may be “traded in” for credit towards the purchase of new MPC equipment. Call MPC to see if this program is available in your area. -
Page 63: Index
Index configuring audio jacks cleaning AC power connector speakers troubleshooting accessories connecting DVD drive safety precautions modem adding audio PS/2 keyboard locating drive audio in jack PS/2 mouse replacing configuring jacks to Ethernet network troubleshooting front speaker jack to network headphone jack connections line in jack... - Page 64 Index See connections jack installing troubleshooting screen troubleshooting serial port keyboard cleaning opening setting up PS/2 port computer case safety precautions troubleshooting shutting down computer USB port side panel parallel port removing replacing password label sound peripheral devices Microsoft Certificate of adjusting Plug and Play devices Authenticity...
- Page 65 www.mpccorp.com telephone support Web site connection speed turning off computer turning on computer uninterruptible power supply (UPS) USB port volume adjusting adjusting modem controls muting troubleshooting Windows Product Key Code wired Ethernet troubleshooting working safely Zip drive...
- Page 66 Index...
- Page 68 MAN PFL 6.5 HW REF R1 3/08 EMA001131-00...
Need help?
Do you have a question about the Profile 6.5 and is the answer not in the manual?
Questions and answers