
Subscribe to Our Youtube Channel
Summary of Contents for General Music rp-x
- Page 1 D I G I T A L K E Y B O A R D S Owners manual rp-x •English •Italiano •Deutsch •Français...
- Page 3 D I G I T A L K E Y B O A R D S Owners manual rp-x •English...
- Page 4 SPECIAL MESSAGES ALARM SYMBOLS: The exclamation mark within an equilateral triangle is intended to alert. Generalmusic electronics products could present labels similar to that The lightning flash with arrowhead symbol, within an equilat- eral triangle, is intended to alert the user to the presence of displayed in this section.
-
Page 5: Table Of Contents
Connect a speaker system Connect a midi master controller Connect pedals Using the input connection Connect The Rp-x To A Pc Connect To A Pc Via Midi Connect To A Pc Via Usb Start the rp-x Listen to the demo sequence... - Page 6 Product Package • rp-x expander • Owners manual • Gem PC - Software Editor • AC Adapter • MIDI Cable...
-
Page 7: Introduction
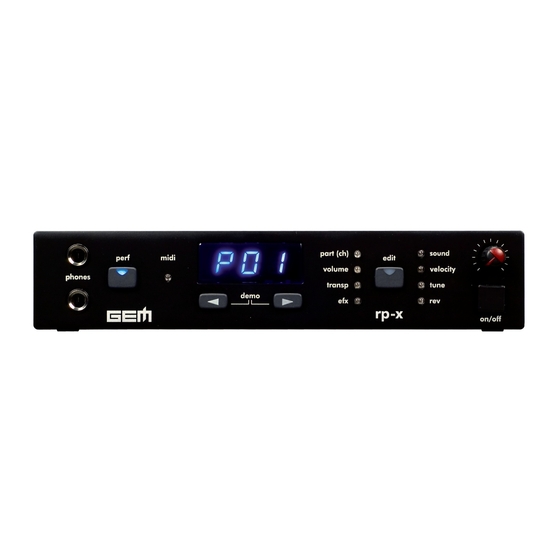
INTRODUCTION Congratulations & thank you for purchasing the GEM rp-x Expander. Utilizing our proprietary DRAKE technology, the rp-x produces a vast variety of acoustic and electric piano sounds with exceptional quality. The rp-x also incorporates an intuitive, yet easy to use operational interface that will satisfy even the most demanding live or professional studio applications. FRONT PANEL r p - x phones edit This button enter the edit mode and select the editing These jack connectors allows to plug two headphones parameters. to the module. perf volume the Volume knob, set the output level of the instru- The perf button (PERFORMANCE), select the per- ment. formance mode. See the relative chapter, in this manual. -
Page 8: Getting Started
NOTE: always turn on the speaker of your system after all the others devices. The rp-x expander is a professional suond generator with a top quality pcm physical/modelling sound library. Always use an adequate stereo external speaker system in order to get the maximum performance from this instrument. -
Page 9: Connect A Midi Master Controller
It is not possible to change these parameters set from the rp-x internal edit menu. However using the advanced PC editor supplied with the module, it’s possible to edit some of these parameters in a very detailed way. USING THE INPUT CONNECTION The rp-x is equipped with RCA stereo input connections. These jacks allow you to connect another instru- ment (or external LINE audio source) and mix the signal into the audio OUTPUT of the module. Please note that the external mixed signal will be not processed in any way from the rp-x, this is a dry input only. AUDIO OUT SPEAKER SYSTEM MIDI OUT MIDI IN This connection allows you to use two mixer inputs to connect a digital piano and the rp-x at the same time. -
Page 10: Connect The Rp-X To A Pc
You can use the rp-x connected to a PC or to play its sound via MIDI from a software sequencer or to create or edit the internal performances (see the next chapter), using the PC editor included in the instrument package. -
Page 11: Start The Rp-X
The data stored in the PERF mode is memorized when the instrument is powered off. The rp-x comes with a complete set of pre-programmed performances. These performance are designed to highlight the sound and power of this instrument. Severeal of the factory programmed performances utilize Split or Layer mode. In order to hear all PARTS used in any of the factory programmed Split or Layered performances, your MIDI master controller must be assegned to transmit on MIDI channel 1. -
Page 12: Select The Performances
SELECT THE PERFORMANCES It is possible to recall the internal 99 performances rp-x in two different way. MANUAL RECALLING Press the DATA buttons to select the internal performances. Please consult the PERF list on page 17 to visualize the performance r p - x names and theyr structure (single, layer, Split, etc.). -
Page 13: Edit The Performance
NOTE The parameter set directly available from the panel of the rp-x module is a reduced set than available in the in- strument, (this is due to the simplified navigation system used in the module). The best way to fully edit the rp-x performance is to use the PC EDITOR software included in the package. -
Page 14: Selecting The Parameters To Edit In The Selected Parts (Ch): Sound
Each time you press the DATA button a next sound is selected. The rp-x has a database with 50 sounds in total. Please consult the complete list on Page 16. r p - x SELECTING THE PARAMETERS TO EDIT IN THE SELECTED PARTS (CH): VOLUME... -
Page 15: Selecting The Parameters To Edit In The Selected Parts (Ch): Velocity
SELECTING THE PARAMETERS TO EDIT IN THE SELECTED PARTS (CH): VELOCITY NOTE The parameter VELOCITY it's GLOBAL, then its setting will affect ALL the parts at the same time. For this reason it can be selected if the "ALL" mode has been enabled only. About the "ALL" mode please consult pages #7 and #10 . -
Page 16: Selecting The Parameters To Edit In The Selected Parts (Ch): Rev
SELECTING THE PARAMETERS TO EDIT IN THE SELECTED PARTS (CH): REV Set the REVERB (REV) level in the selected PART. Press the EDIT button to select the REV. The display indicates the current default value (REV = 024), in this example. r p - x Pressing the DATA buttons to increase or de- crease the REV send in the selected part. The display shows you in realtime the value changing. The pa-... -
Page 17: Memorize The Performance
MEMORIZE THE PERFORMANCE STORE THE EDIT IN THE SAME PERFORMANCE LOCATION Once your PERFORMANCE edit it's complete press the blinking PERF button on the display. r p - x r p - x At this point both the PERF button and the digit "P01"... -
Page 18: Exit The Performance Store
EXIT THE PERFORMANCE STORE Once your PERFORMANCE edit it's complete press the blinking PERF button on the display. r p - x r p - x At this point both the PERF button and the digit "P01" in the display (indicating the number of the edited performance in this example)��... -
Page 19: Memory Management System
MEMORY MANAGEMENT SYSTEM This menu contains some important function for the global instrument setting: •COMMON CHANNEL SETTING •MIDI IDENTIFICATION NUMBER •SYSTEM RESET •MIDI DATA BULK These setting are automatically stored in the expander memory and also saved switching ON/OFF the instrument. COMMON CHANNEL SETTING The MIDI COMMON channel is a very useful function allowing a high grade of versatility in MIDI programming. In the default assign the COMMON channel allows you to control the performances playing and selection using the MIDI ch.#01 only. Many of the internal rp-x performance are programmed using different parts (and differ- ent MIDI channel) in layer or split mode. The MIDI COMMON allows to fully play and select these performances using a master MIDI controller transmitting in a single MIDI channel. To enter the MIDI COMMON channel setting mode keep al least for 2 seconds the PERF and the EDIT buttons pressed at the same time. -
Page 20: System Reset
SYSTEM RESET This function restore the original programmed factory set up of the entire instrument. Enter the MEMORY MANAGEMENT SYSTEM mode keep- ing pressed al least for 2 seconds the PERF and the EDIT buttons at the same time. As already seen the first menu is the MIDI COMMON channel setting. - Page 21 MIDI DATA BULK This function transmits the user data contained in the PERFORMANCE to an external MIDI device, such as a PC or a MIDI recorder to create an archive. To transmit the data BULK to an external device the rp-x MIDI OUT has to be connected to the MIDI IN of the receiving data recorder MIDI IN. Enter the MEMORY MANAGEMENT SYSTEM mode keep- ing pressed al least for 2 seconds the PERF and the EDIT buttons at the same time.
-
Page 22: Sound List
SOUND LIST Sound Name Sound# Prg.Chng Concert Piano 1 (st) Concert Piano 2 (st) Rock Concert Piano (st) Bright Concert Piano (st) Grand Piano 1 Grand Piano 2 Rock Grand Piano Bright Grand Piano Pop Piano Upright Piano... -
Page 23: Performance List
PERFORMANCE LIST Performance Name Performance Name Mode Mode Note Note Performance Name Performance Name Mode Mode Note Note Concert Piano 1 Concert Piano 1 Single Single 50 Synth 01 50 Synth 01 Layer Layer Concert Piano 2 Concert Piano 2... -
Page 24: Technology
TECHNOLOGY The rp-x is powered by Generalmusic’s break-through technology DRAKE. DRAKE (Dsp-Risc-Advanced-Keyboard-Engine) is the ultimate DSP: probably the most advanced piece of musical hardware in the world. Its 32-bit and 50-MIPS internal structure and its totally programmable software architecture make this processor so fast and powerful that any kind of algorithm, from Wavetable to Physical Modeling, can be implemented in real time, either in generation or in post-processing. Using the Physical Modelling power offered by DRAKE, Generalmusic has created and patented a number of new algorithms which replicate some of the world’s most famous vintage instruments like Rhodes™, Wurlitzer™ and Clavinet™. DRAKE has found unanimous, enthusiastic appraisal from experts in these fields. Physical Modeling Physical Modeling is a method of sound synthesis based upon a mathematical model which describes the physical construction of the instrument be- ing simulated. Unlike sampling technology, in which an existing sound is simply recorded at a particular moment in time, (to remain essentially the same forever), the sounds produced by a Physical Model continuously react and respond to the player’s input, maintaining all the little nuances and imperfections which provide the most reliable subconscious assurance that the instrument being played is the real thing. A sampled sound can be likened to a “snapshot” of a particular moment in time during which an instrument is being played. It’s like taking a photograph. The goal of Physical Modeling is this: Instead of simply recording the final audible product of a instrument like an electric piano, we replicate all the elements which are incorporated into its construction. If the physical model is constructed carefully and accurately with meticulous attention to detail, the resulting sound should be exactly like the real thing and, more importantly, the experience of playing and interacting with the instrument should be similarly convincing. In the rp-x, all the acoustic piano sounds are created by combining sample playback with Generalmusic’s Natural String Resonance, Damper Physical Model, Advanced Release and FADE technologies, (described below). Other instruments such as RHODES, WURLI and CLAVINET are created using pure Physical Modeling. Natural String Resonance This physical modeling technology, patented by Generalmusic as Natural String Resonance, allows all of the complex harmonics normally produced by a piano’s soundboard to be faithfully reproduced. This means that a note’s individual sound will always be slightly different depending upon which... -
Page 25: Midi Implementation Chart
MIDI IMPLEMENTATION CHART Date: ott-06 Version: 1.01 MIDI Implementation Chart Model RP-X Function Transmitted Recognized NOTE Basic Default 1-16 These data are memorized also switching the module OFF Channel Changed 1-16 Default Mode 3 Mode Messages Mode 3, 4... - Page 26 GENERALMUSIC TECHNOLOGIES s.r.l. Via delle Rose, 12 47842 S.Giovanni in Marignano (RN) - Italy Tel. +39 0541 959511Fax +39 0541 957404 www.generalmusic.com...
- Page 27 D I G I T A L K E Y B O A R D S Manuale d'istruzioni rp-x •Italiano...
- Page 28 MESSAGGI SPECIALI SIMBOLI DI PERICOLO: Il punto esclamativo all'interno di un triangolo equilatero serve a segnalare l'esistenza di importanti istruzioni d’uso e di manutenzione I prodotti elettronici Generalmusic nella documentazione che correda lo strumento. possono avere etichette simili a quelle illustrate di seguito in questa il simbolo del fulmine con la freccia all'interno di un triangolo sezione.
- Page 29 Collegare Un Midi Master Controller Collegamento Dei Pedali (Opzionali) Usare Gli Ingressi Audio "input" Collegamento Ad Un Pc Collegamento Via Midi Collegamento Via Usb Accensione di Rp-x Ascolto Delle Demo Il Modo Performance Di Default Selezionare Le Performance Selezione Manuale Selezione Via Midi...
- Page 30 • Expander rp-x • Manuale d'istruzioni • Gem Software Editor per PC • Alimentatore • Cavo MIDI...
-
Page 31: Introduzione
è uno stru- mento estremamente potente in grado di soddisfare l'utente professionale più esigente. Per un uso corretto dello strumento leggete con attenzione il presente manuale d'istruzioni. -
Page 32: Prima D'iniziare
- x rp-x è un generatore sonoro professionale con una libreria suoni (pcm e modelli fi sici) di altissima qualità. Usate sempre un sistema di amplifi cazione stereo di qualità adeguata, per valorizzare al massimo il po- tenziale sonoro di questo strumento. -
Page 33: Collegare Un Midi Master Controller
Questo collegamento di esempio realizzato usando gli ingressi INPUT, permette di collegare un piano digitale ed il modulo a due soli ingressi di un mixer (o ad un unico ingresso stereo). Allo stesso modo potremmo collegare due moduli tra loro, come per esempio un rp-x ed gm-x, per avere un unico segnale di uscita stereo. -
Page 34: Collegamento Ad Un Pc
COLLEGAMENTO AD UN PC Rp-x può essere collegato ad un computer in due modi diversi: via MIDI (Musical Instrument Digital Interface) oppure con la porta USB (Universal Serial Bus). Per usare il collegamento MIDI il vostro PC deve essere dotato di questo tipo di interfaccia (ved. nota sottostante). Nel caso della USB invece, è possibile collegare direttamente il modulo al vostro PC. In entrambi i casi comunque il tipo di protocollo e la velocità di trasmissione è conforme allo standard MIDI, la sola differenza è nel tipo di connessione usata per il collegamento stesso. Nel vostro PC deve essere correttamente installato un programma Sequencer per l'esecuzione o l'editing dei fi les MIDI. MIDI IN rp-x PC editor MIDI OUT r p - x Software NOTA: Normalmente i PC di tipo "Desktop" dispongono delle connessioni MIDI sulla presa "joystick" della scheda audio. Il tipo di connessione dipende dalla scheda audio installata sul PC. -
Page 35: Ascolto Delle Demo
(Ved. Lista a Pag. 17) Alcune PERFORMANCE dell'rp-x sono programmate in SPLIT (un suono a destra un suono a sinistra della tastiera) o in LAYER (due o più suoni sovrapposti). E' possibile controllare le PARTS usate nelle performance anche con una tastiera MIDI che trasmette su un solo canale. -
Page 36: Selezione Manuale
SELEZIONARE LE PERFORMANCES Su rp-x è possibile richiamare le PERFORMANCE in due modi diversi. SELEZIONE MANUALE Premendo i tasti DATA le PERFORMANCE sono selezionate in modo progressivo. Consultate a questo proposito la lista delle PERFORMANCE a Pag.17 di questo manuale, per visualizzare il nome e la struttura delle PER- r p - x FORMANCE di fabbrica (Single, Layer, Split, ecc.). -
Page 37: Edit Delle Performance
NOTA I set di parametri accessibili direttamente dal pannello di rp-x è estremamente ridotto rispetto a quelli realmente di- sponibili in questo strumento, questo è dovuto alla natura estremamente semplificata dell'interfaccia utente. Usate il PC editor in dotazione al rp-x per modificare in modo completo le vostre peformance, l'interfaccia grafica del programma permette l'accesso chiaro ed immediato a tutti i parametri di programmazione. - Page 38 EDIT. Premendo ripetutamente il tasto DATA viene selezionato il suono seguente. rp-x possiede 50 suoni singoli in totale. Consultate l'elenco completo a Pag. 16 di questo manuale. r p - x SELEZIONE DEI PARAMETRI DI EDIT NELLA PARTS (CH) RICHIAMATA: VOLUME...
- Page 39 SELEZIONE DEI PARAMETRI DI EDIT NELLA PARTS (CH): VELOCITY NOTE La VELOCITY è un parametro GLOBALE, influenza cioè tutte le PARTS contemporaneamente, per questa ragione, può essere selezionato solamente dopo aver selezionato il modo ALL nel menu PART (CH), vedere a pag. 7.
-
Page 40: Il Modo "All" Nel Menu Di Edit
SELEZIONE DEI PARAMETRI DI EDIT NELLA PARTS (CH): REV (mandata riverbero) Regola il livello del riverbero della PARTS (CH) selezionata. Premere il tasto EDIT per selezionare il parametro REV. Il dispay indica il valore di DEFAULT della parte selezionata, REV = 24 in questo esempio. r p - x Premere i tasti DATA per aumentare o diminuire il valore di REV (riverbero) nella parte selezionata. Il display mostra in tempo reale la modifica del parametro. L'ambito di regolazione varia da 0 a 127. r p - x REV - REV + IL MODO "ALL"... -
Page 41: Memorizzare Una Performance
MEMORIZZARE UNA PERFORMANCE MEMORIZZARE LA PERFORMANCE NELLA STESSA LOCAZIONE Una volta terminata la procedura di EDIT�� premete il tasto PERF lampeggiante. r p - x r p - x A questo punto sia il LED del tasto PERF sia la loca- zione della PERFORMANCE editata (P01 in questo esempio)��... -
Page 42: Annullare La Memorizzazione Della Performance
ANNULLARE LA MEMORIZZAZIONE DELLA PERFORMANCE Una volta completato l'edit della PERFORMANCE premere il tasto lampeggiante PERF. r p - x r p - x A questo punto il tasto PERF ed il numero della PER- FORMANCE modificata in questo esempio "P01" sul display��... -
Page 43: Memory Management System
MEMORY MANAGEMENT SYSTEM Questo menù contiene alcune importanti funzioni per l'impostazione generale dello strumento. •COMMON CHANNEL SETTING •MIDI IDENTIFICATION NUMBER •SYSTEM RESET •MIDI DATA BULK Le impostazioni di questo menù sono memorizzate automaticamente e mantenute in memoria anche spegnendo lo strumento. IMPOSTAZIONE DEL CANALE MIDI COMMON (COMMON CHANNEL) Il canale MIDI COMMON aumenta la versatilità nel controllo MIDI dello strumento. Normalmente infatti, per poter suonare con una performance multi canale (SPLIT, LAYER) da una tastiera MIDI, occorrerebbe usare una master keyboard in grado di trasmettere contemporaneamente su tutti i canali, corrispondenti ad altrettante PARTS dell'rp-x, usate nella PERFORMANCE. Questo tipo di funzioni sono disponibili solitamente in master key- board di livello professionale e quindi di costo elevato. MIDI controller o strumenti MIDI più economici, come i pianoforti digitali ad esempio, trasmettono solitamente su un solo canale MIDI alla volta. Per questo, il canale COMMON permette di usare PERFORMANCE formate da PARTS diverse usando MIDI controller con un solo canale di trasmissione. Per entrare nel MEMORY MANAGEMENT SYSTEM e rchia- mare il menù... -
Page 44: System Reset
SYSTEM RESET Questa funzione ripristina le impostazioni di fabbrica (DEFAULT) dell'intero strumento. Per entrare nel menu MEMORY MANAGEMENT SYSTEM�� tenere premuti contemporaneamente per almeno 2 se- condi i tasti PERF ed EDIT sul pannello. Come già visto il primo menù ad essere selezionato è quello del canale MIDI COMMON. -
Page 45: Midi Data Bulk (Dump)
MIDI DATA BULK Questa funzione permette la trasmissione dei dati personali delle PERFORMANCE ad una apparecchiatura MIDI esterna, come un PC o un MIDI recorder per la loro archiviazione. Per trasmettere i dati MIDI ad una apparecchiatura esterna la presa MIDI OUT di rp-x deve essere collegata al MIDI IN del recorder esterno. Entrare nel modo MEMORY MANAGEMENT SYSTEM tenen- do premuti contemporaneamente i tasti PERF ed EDIT per almeno 2 secondi��... -
Page 46: Lista Dei Suoni
LISTA DEI SUONI Sound Name Sound# Prg.Chng Concert Piano 1 (st) Concert Piano 2 (st) Rock Concert Piano (st) Bright Concert Piano (st) Grand Piano 1 Grand Piano 2 Rock Grand Piano Bright Grand Piano Pop Piano Upright Piano... -
Page 47: Lista Delle Performance
LISTA DELLE PERFORMANCE Performance Name Performance Name Mode Mode Note Note Performance Name Performance Name Mode Mode Note Note Concert Piano 1 Concert Piano 1 Single Single 50 Synth 01 50 Synth 01 Layer Layer Concert Piano 2... -
Page 48: Tecnologia
Flash Ram 64 MB Dimensioni memoria Extra info Midi Velocity Fix IN, PC editor, interfaccia "easy to use" PC- Software rp-x PC editor Peso 2,5 Kg./5,5 lbs Dimensioni 218 x 44 x 198 mm/ 8,5 x 1,7 x 7,8 inch... -
Page 49: Midi Implementation Chart
MIDI IMPLEMENTATION CHART Date: ott-06 Version: 1.01 MIDI Implementation Chart Model RP-X Function Transmitted Recognized NOTE Basic Default 1-16 These data are memorized also switching the module OFF Channel Changed 1-16 Default Mode 3 Mode Messages Mode 3, 4... - Page 50 GENERALMUSIC TECHNOLOGIES s.r.l. Via delle Rose, 12 47842 S.Giovanni in Marignano (RN) - Italy Tel. +39 0541 959511Fax +39 0541 957404 www.generalmusic.com...
- Page 51 D I G I T A L K E Y B O A R D S B e d i e n u n g s a n l e i t u n g RP-X •Deutsch...
- Page 52 SPEZIELLE HINWEISE ALARMSYMBOLE: Das Ausrufungszeichen in einem gleichschenkeligen Drei- eck weist den Benutzer darauf hin, daß es sich um wichtige Die elektronischen Produkte der Serviceunterlagen handelt. Firma Generalmusic können ähnliche Aufkleber aufweisen wie Blitz mit Pfeil in einem gleichschenkligen Dreieck weist in der Abbildung.
- Page 53 Verbindung mit einem PC über MIDI Erste Schritte Anschluss eines Lautsprechersystems Anschluss eines Masterkeyboard Pedal - Anschlüsse Input (Chinch Buchsen) des RP-X Verbindung mit einem PC über MIDI Verbindung über USB Spielen des GEM RP-X Soundmodul Demosong des GEM RP-X Der PERFORMANCE Mode Anwählen der PERFORMANCES...
- Page 54 RP-X Lieferumfang • Bedienungsanleitung • GEM RP-X -PC Editor (auf CD) • Netzteil • Midikabel...
-
Page 55: Einleitung
Hier können Sie 2 Kopfhörer anschließen. Sound, Perf, Kanälen ect., vornehmen. perf volume Der Volumen Regler regelt die Gesamtlautstärke ihres Der PERF-Knopf (PERFORMANCE), schaltet den Per- GEM RP-X Soundmodul. formance Mode ein. midi data entry/demo Die Pfeiltasten erlauben Ihnen das Wechseln von Hier sehen Sie, wann Midi Informationen das RP-X Performances oder das Anhören von DEMO (beide erreichen. gleichzeitig drücken). display on/off An und Auschalter des RP-X Pianomoduls. Das 3-stellige Display zeigt Ihen an, was gerade Aktiv ist (Perf Nummer, oder Editierungs Wert). Rückseite mit Anschlüssen 12 D.C. in PEDALS .Es ist möglich 2 Pedale anzuschliessen. In1: das Gem... -
Page 56: Erste Schritte
Das GEM RP-X kann auf verschiedene Arten mit einem PC benutz werden: MIDI oder USB (Universal Serial Bus). Ihr PC sollte mit ausgesattet sein. Mit USB ist es möglich das RP-X direkt mit dem PC zu verbinden. In beiden Fällen: MIDI oder USB, wird der Datenaustasch als MIDI Specifi cation gesendet oder empfangen. -
Page 57: Anschluss Eines Masterkeyboard
INPUT (Chinch Buchsen) des GEM RP-X Das GEM RP-X hat ein Stereo Eingang, an dem Sie weitere Klanquellen anschliessen können. Dieses Signal wird an die Output Buchsen (Ausgang) des RP-X weitergegeben. AUDIO OUT SPEAKER SYSTEM MIDI OUT MIDI IN Diese Beispiel zeigt den Anschluss eines Digital Piano an den GEM RP-X. Dieses Beispiel zeigt den Anschluss eines GEM GM-X (GM Sound Modul) an das RP-X. AUDIO MIDI OUT OUTPUT TO MIDI IN SPEAKER MIDI IN... -
Page 58: Verbindung Mit Einem Pc Über Midi
Verbindung mit einem PC über MIDI Es muss natürlich gewährleistet sein, daß Ihr MIDI Interface und Ihr Software MIDI Player richtig installiert ist und ar- beitet.Ist dies der Fall, verbinden Sie Ihren PC (Midi Out) mit dem MIDI IN (am GEM RP-X).. MIDI IN PC MIDI OUT SPEAKER SYSTEM ACHTUNG: Das MIDI Interface übertragt keine AUDIO Signale nur Mididaten,.deshalb muss das RP-X immer mit einem Lautsprechersystem verbunden sein. Verbindung über USB D.C. adapter to the speaker system USB cable Optional Die Installations-software für den rp-x PC Editor finden Sie auf der beiligenden CD ROM. -
Page 59: Spielen Des Gem Rp-X Soundmodul
Nach einigen Sekunden startet das RP-X Pianomodul mit dem Performance Mode. r p - x Der Performance Mode ist die Grundeinstellung des RP-X. Jede Performance beinhaltet max 4 Sounds (Parts) und alle wichtigen Einstellungen wie: Sounds, Volume, Transpose, Tune, Rev, Efx etc. Im PERFORMANCE (PERF) Mode können Sie 99 Registrationen (Performances) abspeichern und verän- dern. -
Page 60: Anwählen Der Performances
Bedienungsanleitung Anwählen der PERFORMANCES Sie können die Performances (Registrationen) in zwei unterschiedlichen Arten anwählen: Manuelle Anwahl Drücken Sie die DATA Tasten um eine in- terne Performance auszuwählen. r p - x Performance - Performance + Anwahl über MIDI MIDI OUT MIDI IN MIDI MASTER KEYBOARD r p - x Wählen Sie am Masterkeyboard/Akkordeon die MIDI Program Change Funktion an um eine PERFORMANCE... -
Page 61: Erstellen Einer Performance (Registration)
Bedienungsanleitung Erstellen einer PERFORMANCE (REGISTRATION) Um eine PERFORMANCE zu Erstellen, muss eine PERF angewählt sein. Drücken Sie den PERF Taster und Wählen Sie eine der 99 Performances aus. Drücken Sie die EDIT Taste des RP-X. Nun leuchtet das PART(CH) LED am Modul , und zeigt, r p - x welcher Kanal ( Part) angewählt ist. Wird ein WERT geändert�� so blinkt die PERF LED und Sie wissen��... -
Page 62: Ändern Der Klangfarbe Des Angewählten Part(Ch):Sound
Drücken Sie die DATA Taste, um den nächsten Klang auszuwählen. r p - x Durch Drücken der DATA Taste kommen Sie zum nächsten Klang. Das GEM RP-X hat 50 Single TOP- Sounds. r p - x Ändern der Lautstärke des angewählten PART (CH): VOLUME Um die Lautstärke (VOLUME) eines Klanges (PART/CH) zu verändern, drücken Sie die EDIT-Taste mehrmals, bis die LED auf VOLUME ist. (Volume = 105, in diesem Beispiel). -
Page 63: Ändern Der Anschlagdynamik :Velocity
Bedienungsanleitung Ändern der Anschlagdynamik : VELOCITY NOTE The parameter VELOCITY it's GLOBAL, then its setting will affect ALL the parts at the same time. For this reason it can be selected if the "ALL" mode has been enabled only. About the "ALL" mode please consult page 6. -
Page 64: Ändern Des Halleffekt Des Angewählten Part (Ch):Rev
VELOCITY erhöhen, die von einem Masterkeyboard oder MidiController gesendet werden. WERT: von -64 bis +63. (00 ist original Dynamik). TRANSPOSE einstellen der GLOBAL Transpose für das RP-X +/- 12 Halbtöne. Der maximale Transpose Wert ist: +/- 36 Halbtöne (+/- 24 Halbtöne im einzelnen PART, plus +/- 12 semitone im ALL mode). TUNE ändert die GLOBAL Stimmung des RP-X , von A = 427 to A= 452 Hz. ändert den globalen Multieffekt (EFX). ändert den globalen (REV) Hall Anteil des Moduls. (*) die SOUND Anwahl können im ALL Mode nicht verändert werden. NOTE Ändern Sie die Stimmung (TUNE) im ALL Modus, so werden alle PARTS (Kanäle) gleichzeitig geändert. Der Wert geht von A = 427 bis A= 452 Hz. -
Page 65: Speichern Einer Performances (Registration)
- x Speichern einer PERFORMANCE auf einem anderen Speicherplatz Wenn Ihre PERFORMANCE geändert ist�� drücken Sie die blinkende PERF-Taste am RP-X. r p - x r p - x Jetzt blinkt die PERF -Taste und das Display "P01"... -
Page 66: Abbrechen Des Speichervorgangs
Bedienungsanleitung Abbrechen des Speichervorgangs Sie sind dabei eine PERORMANCE zu sichern �� wollen aber nicht speichern. r p - x r p - x Die PERF-Taste und P01(in diesem Beispiel) blinken zum abspeichern. r p - x Jetzt nur nochmal die EDIT-Taste drücken und das Modul bricht den Speichvorgang ab. -
Page 67: Memory Management System
Die LED im Display hört auf zu blinken und das Modul geht wieder in den PERFORMANCE Mode zurück. r p - x MIDI IDENTIFIKATIONSNUMMER Sie können dem RP-X eine Idenfikationsnummer zuweisen. Das heisst: Benutzen Sie mehrere Module (Gem RP-X, Gem GM-X,ect.) kann jedes Gerät unabhängig kontrolliert und angesteuert (verwaltet) werden. Dies ist sehr sinvoll in Verbindung mit dem Gem X-Serie PC- Editor. Um in das MEMORY MANAGEMENT SYSTEM zu gelangen halten sie für 3 Sekunden die PERF und EDIT Tasten... -
Page 68: System Reset (Werkseinstellung)
Bedienungsanleitung SYSTEM RESET Diese Funktion stellt die Werkseinstellungen wieder her. Halten Sie die PERF und EDIT Tasten für 3 Sekunden gedrückt. Nach Drücken beginnt die PART (CH) LED zu blinken. r p - x Drücken Sie die EDIT-Taste erneut�� um in das MIDI-ID Menü zu gelangen. -
Page 69: Midi Data Bulk
- x Neuem. Um aus der Funktion BULK und dem MANAGEMENT SYSTEM zu gelangen�� muss die PERF Taste gedrückt werden. r p - x Das RP-X Modul befindet sich nun wieder in der „PERF Mode“. r p - x Seite 15... -
Page 70: Sound List (Klangliste)
Bedienungsanleitung SOUNDLISTE RP-X Sound Name Sound# Prg.Chng Concert Piano 1 (st) Concert Piano 2 (st) Rock Concert Piano (st) Bright Concert Piano (st) Grand Piano 1 Grand Piano 2 Rock Grand Piano Bright Grand Piano Pop Piano Upright Piano... -
Page 71: Performance Liste ( Registrationen)
Bedienungsanleitung PERFORMANCE LIST (REGISTRATIONEN) Performance Name Performance Name Mode Mode Note Note Performance Name Performance Name Mode Mode Note Note Concert Piano 1 Concert Piano 1 Single Single 50 Synth 01 50 Synth 01 Layer Layer Concert Piano 2... -
Page 72: Technische Daten/ Technologie
Flash Ram 64 MB memory size Extra info Midi Velocity Fix IN / PC editor, "easy to use" interface PC- Software rp-x PC editor 2,5 Kg./5,5 lbs Weight Dimensions 218 x 44 x 198 mm/ 8,5 x 1,7 x 7,8 inch... -
Page 73: Midi Implementation Chart
Bedienungsanleitung MIDI IMPLEMENTATION LISTE Date: ott-06 Version: 1.01 MIDI Implementation Chart Model RP-X Function Transmitted Recognized NOTE Basic Default 1-16 These data are memorized also switching the module OFF Channel Changed 1-16 Default Mode 3 Mode Messages Mode 3, 4... - Page 74 GENERALMUSIC TECHNOLOGIES s.r.l. Via delle Rose, 12 47842 S.Giovanni in Marignano (RN) - Italy Tel. +39 0541 959511Fax +39 0541 957404 www.generalmusic.com...
- Page 75 D I G I T A L K E Y B O A R D S Mode d'emploi rp-x •Français...
- Page 76 PRECAUTIONS IMPORTANTES A TUTELLE DE LA SURETE PERSONNELLE. INSTRUCTIONS CONCERNANT LE RISQUE D’INCENDIE, DE SECOUSSES ELECTRIQUES OU DE DOMMAGES AUX PERSONNES. ALARM SYMBOLS: Le point exclamatif à l’intérieur d’un triangle équilatéral signale l’existence d’importantes instructions pour l’utilisa- Generalmusic electronics products tion et l’entretien dans la documentation qui accompagne could present labels similar to that l’instrument.
- Page 77 CONNECTION D'UN REGULATEUR MASTER MIDI CONNECTION DE PEDALE LA CONNECTION EN ENTREE CONNECTION A UN PC CONNECTION VIA MIDI CONNECTION A UN PC VIA USB ALLUMER LE rp-x ECOUTER LA SEQUENCE DEMO LE MODE PERFORMANCE PAR DEFAUT SELECTION DES PERFORMANCES RAPPEL MANUEL RAPPEL MIDI...
- Page 78 RP-X Product Package • rp-x expander • mode demploi • Gem PC - Software Editor • AC Adaptateur Adaptateur • MIDI Cable...
-
Page 79: Introduction
Mode d'emploi INTRODUCTION Nous vous félicitons pour avoir choisi l’Expander du piano Gem rp-x! un des meilleur modules sonores present sur le marché. GEM rp-x est basé sur le propriétaire révolutionnaire de technologie Drake, un DSP d’élevée capacité da calcul, qui permet une qualité sonore exceptionnelle dans un instrument de cette catégorie. Rp-x possède d’ailleurs une interface simple, qui satisfait en meme temps, le client professionel plus éxigeant. Afin de bien utiliser l'instrument, svp lisez attentivement ces instructions. PANNEAU FRONTAL r p - x phones edit Cette touche permet d'entrer le mode édition et de Ces connections jack permettent d'insérer 2 écouteurs sélectionner les paramètres à éditer. au module. perf volume Le poignée volume, règle le niveau en sortie de La touche perf (PERFORMANCE), selectionne le mode l'instrument. -
Page 80: Premiers Pas
Allumez le rp-x r p - x Le rp-x expander est un générateur de sons professionel avec une librairie modèle physique pcm de haute qualité. Utilisez toujours une installation stéréo externe pour obtenir la meilleure performance de l'instrument. Toujours NOTE: allumer les enceintes de votre installation après les autres appareils. -
Page 81: Connection De Pedale
Il n'est pas possible de changer ces paramètres réglés à partir du menu du rp-x. Cependant, en utilisant l'éditeur PC inclus avec le module, vous pourrez éditer quelques uns de ces paramètres. LA CONNECTION EN ENTREE Le rp-x a une connection stéréo en entrée équippée avec un jack RCA. Ces Jacks permettent de relier un autre instrument (ou LIGNE source audio externe) a la SORTIE audio du module. Le signal externe ne sera envoyé d'aucune manière à partir du rp-x, c'est uniquement un signal sec en entrée. AUDIO OUT SPEAKER SYSTEM MIDI OUT MIDI IN Cette connection permet d'utiliser une paire d'entrée mixer pour relier un piano numérique et le rp-x simultanément. -
Page 82: Connection A Un Pc Via Usb
Mode d'emploi CONNECTION A UN PC VIA MIDI Supposant que une interface MIDI et un software MIDI sont bien installés sur votre PC. Nous vous prions de consulter les instructions de cet appareil pour une configuration correcte et que votre PC transmette correctement les MIDI file standard via la sortie MIDI. MIDI IN PC MIDI OUT Avec cette configuration en selectionnant une séquence de votre votre PC l'expander jouera directement cette meme sequence. SPEAKER SYSTEM ATTENTION! L'interface MIDI ne transmet aucun signal AUDIO mais uniquement des données control, vous devez donc toujours connecter la sortie audio de l'instrument MIDI que vous controllez à... -
Page 83: Ecouter La Sequence Demo
Les données de set up emmagazinée dans le mode PERF sont mémorisées aussi si vou éteignez l'instrument. Le rp-x est fournis avec un set complet de performances live, programmées par les musiciens de notre usine. Ces performances permettent de "sentir" le réel potentiel sonore de cet instrument. -
Page 84: Selection Des Performances
Mode d'emploi SELECTION DES PERFORMANCES Il est possible de rappeler les performances interne du rp-x de 2 différentes manières. RAPPEL MANUEL Pressez la touche DATA pour sélectionner la performance interne. Consultez la liste de PERF à la fin de ce mode d'emploi pour r p - x voir le nom et la structure de la performance (single, layer, Split, etc.) -
Page 85: Editer La Performance
NOTES Le set de paramètres directement accessible du panneau du module rp-x soit en GM2 qu'en mode PERF est plus petit que le set réellement disponible sur l'instrument, ceci est du au système de navigation simplifié utilisé dans le module. la meilleure manière d'éditer complètement les performances du rp-x est d'utiliser l'éditeur PC inclus dans le pack, ce software permet... - Page 86 Chaque fois que vous appuyez la touche DATA le son suivant est sélectionné. r p - x Le rp-x a 50 sons singulier en total. SELECTION DES PARAMETRES A EDITER DANS LES PARTS (CH): VOLUME Pour sélectionner les paramètres de VOLUME des PARTS (CH) son choisis, pressez la touche EDIT de nouveau. La valeur courante par défaut du paramètre est indiquée à...
- Page 87 Mode d'emploi SELECTION DES PARAMETRES A EDITER DANS LES PARTS SELECTIONNER (CH): VITESSE NOTE Ce paramètres est GLOBALE, donc sont réglage affecte les 4 parts simultanément. Le paramètre VELOCITY peut etre modifié seulement après avoir sélectionné le ALL MODE. Ce paramètre te permet de placer un excentrage programmable de VITESSE, afin d’augmenter ou diminuer la valeur de vitesse des notes entrantes du MIDI transmises par un contrôleur du MIDI. Valeur : -64/00/+63.
- Page 88 Mode d'emploi SELECTION DES PARAMETRES A EDITER DANS LES PARTS SELECTIONNER (CH): REV Régler le niveau du REVERB (REV) dans le PART sélectionné. Pressez la touche EDIT pour sélectionner le REV. L'écran affichera la valeur courante par défaut (REV=024) dans l'exemple. r p - x En appuyant la touche DATA pour augmenter ou diminuer l'envois de REV dans le part choisit.
-
Page 89: Memoriser La Performance
Mode d'emploi MEMORISER LA PERFORMANCE MEMORISER L'EDITION DANS LE MEME EMPLACEMENT DE LA PERFORMANCE une fois complètée l'édition de la PERFORMANCE�� pressez la touche PERF clignottante. r p - x r p - x Soit la touche PERF que le digit "P01" à l'écran (indi- quant le nombre de performances éditée dans cet... -
Page 90: Sortir Du Database Des Performances
Mode d'emploi SORTIR DU DATABASE DES PERFORMANCES Quand l'édition de votre PERFORMANCE est complètée pressé la touche PERF clignottante à l'écran. r p - x r p - x Là�� soit la touche PERF que le digit "P01" sur écran (qui indique le nombre de performances éditées dans cet... -
Page 91: Edition Des Canaux Common
Mode d'emploi SYSTEME DE GESTION DE LA MEMOIRE Ce menu contient certaine fonction globale telle que l’arrangement de la canalisation des MIDI COMMUN, la restaura- tion de données d’usine de l’instrument et le Bulk des données MIDI programmées dans l’EXÉCUTION. •COMMON CHANNEL SETTING •MIDI IDENTIFICATION NUMBER •SYSTEM RESET •MIDI DATA BULK Ces arrangements sont automatiquement stockés dans la mémoire du rp-x et sont maintenus meme si vous éteigner l'instrument. EDITION DES CANAUX COMMON La canal MIDI COMMON est une fonction très utile qui permet une grande versatilitée dans la programmation MIDI. Par défaut le canal COMMON permet de contrôler la performances et sa sélection en utilisant uniquement le canal MIDI n°16. beaucoup des performances interne de la rp-x sont programmées en utilisant différentes parties (et différents canaux MIDI)en mode layer ou split. Le MIDI COMMON permet de jouer et sélectionner complète- ment ces performances en utilisant une commande générale MIDI transmettant sur un seul canal MIDI. Pour accéder au mode d'édition de la canalisation des MIDI COMMON maintenir presser ensemble pendant au moin 2 secondes les touches PERF et EDIT. -
Page 92: Reset Du Systeme
Mode d'emploi RESET DU SYSTEME Cette fonction restaure les set up programmés d'usine de tout l'instrument. Accéder au SYSTEME DE GESTION DE LA MEMOIRE en pressant au moin pendant 2 secondes les touches PERF et EDIT en meme temps. Comme déjà vus précédem- ment le premier menu est celui d'édition du canal MIDI r p - x COMMON. - Page 93 Pour transférer le BULK des données, a un apareil externe le rp-x MIDI OUT doit être connecté au MIDI IN de l'enregistreur MIDI qui reçoit. La transmission du Bulk de données vers un PC est aussi possible via USB. Voir Page XX Accéder au mode MEMORY MANAGEMENT SYSTEM en...
- Page 94 Mode d'emploi SOUND LIST Sound Name Sound# Prg.Chng Concert Piano 1 (st) Concert Piano 2 (st) Rock Concert Piano (st) Bright Concert Piano (st) Grand Piano 1 Grand Piano 2 Rock Grand Piano Bright Grand Piano Pop Piano Upright Piano...
- Page 95 Mode d'emploi PERFORMANCE LIST Performance Name Performance Name Mode Mode Note Note Performance Name Performance Name Mode Mode Note Note Concert Piano 1 Concert Piano 1 Single Single 50 Synth 01 50 Synth 01 Layer Layer Concert Piano 2 Concert Piano 2...
-
Page 96: Specifications Techniques
Flash Ram 64 MB memory size Extra info Midi Velocity Fix IN / PC editor, "easy to use" interface PC- Software rp-x PC editor 2,5 Kg./5,5 lbs Weight Dimensions 218 x 44 x 198 mm/ 8,5 x 1,7 x 7,8 inch... - Page 97 Mode d'emploi MIDI IMPLEMENTATION CHART Date: ott-06 Version: 1.01 MIDI Implementation Chart Model RP-X Function Transmitted Recognized NOTE Basic Default 1-16 These data are memorized also switching the module OFF Channel Changed 1-16 Default Mode 3 Mode Messages Mode 3, 4...
- Page 98 GENERALMUSIC TECHNOLOGIES s.r.l. Via delle Rose, 12 47842 S.Giovanni in Marignano (RN) - Italy Tel. +39 0541 959511Fax +39 0541 957404 www.generalmusic.com...
-
Page 99: Federal Communications Commission
- Consult the dealer or an experienced radio/TV technician for help. CAUTION : Changes or modifi cations to this product not expressly approved by the manufac- turer could void the user’s authority to operate this product. Gem RP-X Owners Manual Version 1.03 / Maj 2008... - Page 100 STOCK CODE 271480 Specifications are subject to change without prior notice. GENERALMUSIC TECHNOLOGIES s.r.l. Via delle Rose, 12 47842 S.Giovanni in Marignano (RN) - Italy Tel. +39 0541 959511Fax +39 0541 957404 www.generalmusic.com...
Need help?
Do you have a question about the rp-x and is the answer not in the manual?
Questions and answers