Advertisement
Quick Links
BMC User Manual
READ THIS FIRST
There are frequent changes to the camera firmware, it is hard to keep up with
them all. Make sure to subscribe to the
applications guides for new camera firmware releases.
NOTE JULY 2014: Blackmagic has released new firmware for all of their cameras
(4th change to the audio). Earlier, when the camera was not in the hands
of many experienced audio users, we provided application guidance on
what settings to use in the camera, and EQ settings in post. We are currently
booked, and will not have a chance to evaluate the new firmware for quite
some time. Today, there are many experienced users on the various forums
who can assist with camera settings. Thank you for understanding.
METER CALIBRATION: Since every camera has a different sensitivity sweet
spot, you will need to calibrate the meter of the BMC388 to the needs of the
camera.
BMCC: With the BMCC, you will use Ultrascope. This
•
firmware v1.3
and also describes a methodology to fix the camera frequency response
in post. The meter calibration section of the
describes the procedure for the Riggy-Assist. You will follow a similar
procedure with the BMC388, using Ultrascope (instead of the meters
of the camera). Note, the BMC388 has eliminated the meter sensitivity
switch used on the Riggy-Assist.
BMPC: The BMPC does not have Thunderbolt, so you can not use the
•
meters of Ultrascope for calibration. You will proceed with an iterative
test recording to determine the meter calibration.
Riggy-Assist User Manual describes this process (you can ignore the
discussion on AGC Disable). For the BMPC, we are using the MIC level
gain at 100%.
Videos
Videos are helpful to illustrate things that are easier to communicate
visually. However, these videos do not cover all of the details in their entirety. If
you need more detail, then please consult the written User Manual, below.
OVERVIEW
Watch this video for an overview of the inputs, outputs, signal routing, switch-
bank, and other features such as phantom power, audio bracketing, and
selective power-down.
describes what settings to use in the camera for calibration,
made in USA
juicedLink Blog
for updated audio
Riggy-Assist User Manual
This video
blog post with
from the
Advertisement

Related Manuals for juicedLink BMC366

Summary of Contents for juicedLink BMC366
- Page 1 BMC User Manual READ THIS FIRST There are frequent changes to the camera firmware, it is hard to keep up with juicedLink Blog them all. Make sure to subscribe to the for updated audio applications guides for new camera firmware releases.
- Page 2 Watch this video to see what is necessary to cable up to the BMCC. MOUNTING DIRECTLY TO TOP OF BMCC The BMC366 mounts so nicely directly to the top of the BMCC. It provides a low-profile on the left side, for shoulder mounted situations. It sends the XLR connectors out the right side of the camera (for similar reasons).
- Page 3 (and, each different camera). CAMERA SETTING FOR SIGNAL-TO-NOISE: The BMCC firmware remains a • work in progress. Please make sure you are subscribed to the juicedLink blog post related to BMCC camera settings. blog. Here is our latest SIGNAL LEVEL ADJUSTMENT / METERING: Adjust the front panel •...
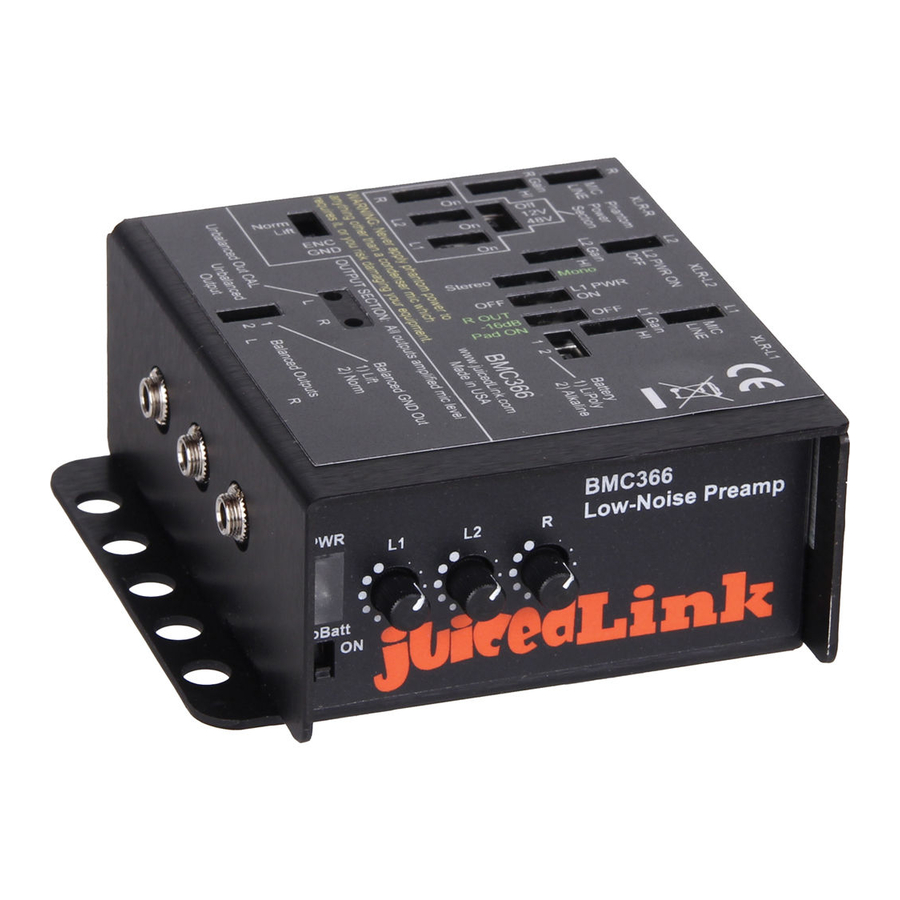
- Page 4 made in USA Explanation of Switches • ENC GND: The NORM position connects analog ground to the enclosure. The LIFT position disconnects the enclosure from analog ground. See the “Mounting, Grounding, Ground Loops, and the ENC GND Switch” section below for more details. Balanced GND Out: The NORM position connects analog ground to the minijack output cable shield ground.
- Page 5 made in USA and are created when multiple ground paths between pieces of equipment exist. You will always have one ground connection between the preamp and your camera, and that is via the shield in the stereo minijack cable that goes from the MIC OUT of the preamp into the MIC IN of the camera.
- Page 6 made in USA of the enclosure. So, if the camera enclosure finds a path to the preamp enclosure, you will LIFT the ground to the preamp enclosure to eliminate the ground loop. A potential path could be where your camera is mounted to a rig, and the preamp is mounted to the same rig via the silver female 1/4-20 tripod mounting hole on the bottom of the preamp.
- Page 7 made in USA of a voltage drop that will occur when supplying large currents, thus triggering the low battery indicator. Maximizing power efficiency: Phantom power sucks a lot of current from the battery. Whenever it is not needed, make sure that phantom power is off.
- Page 8 made in USA transmitted up the mic cable from the mixer to the mic. This is known as phantom power. PHANTOM - OFF/12V/48V: This controls the switching power supply of the phantom voltage generating circuit. Check your microphone user manual for its powering requirements.
- Page 9 • The BMCC firmware is still a work in progress. Please see make blog sure you subscribe to the juicedLink blog. Please see our post regarding how to work with the current version of the BMCC firmware. Turn down the potentiometer volume controls all of the way for any unused XLR input.
- Page 10 made in USA occur. So, if you were to attempt to use a limiter approach, you would need to re-calibrate the point at which the limiter would kick in for each different gain setting of the camera (and, each different camera). WARNINGS: •...
Need help?
Do you have a question about the BMC366 and is the answer not in the manual?
Questions and answers