Table of Contents
Advertisement
Advertisement
Table of Contents

Related Manuals for TC-Helicon Voicetone

Summary of Contents for TC-Helicon Voicetone
- Page 1 synth PRODUCT MANUAL ENGLISH VERSION...
-
Page 3: Table Of Contents
MIDI patch change and channel select over USB . .25 Using VoiceTone Synth Loading Presets ......18 Understanding the Presets . -
Page 4: Introduction
Introduction Welcome to VoiceTone Synth Features: VoiceTone Synth was designed to meet the demands of o HardTune processor with options for octave shift all genres of singing artists for a portable, high quality and gender processing. vocoder and HardTune pitch shifting effect with exciting new sonic possibilities. - Page 5 Introduction About TC-Helicon vocalist. Our products focus on removing barriers and At TC-Helicon we truly believe that the voice is the inspiring creativity in performance. That's why our world's most beautiful instrument. We don't mean to degrade other beautiful instruments, but the singing products range from near-field personal vocal monitors voice is the anthropological source for all things melodic.
-
Page 6: Quick Start
Quick Start Step 1: Step 2: Connect your microphone to a mic cable. Connect the mic cable to the Mic Input on Synth. NOTE: Make sure Synth is not powered at this time. - Page 7 Quick Start Step 3: Step 4: While you’re connecting and setting up, lower the fader Connect a 1/4” cable from your guitar or instrument to on your mixer channel to off. Connect a mic cable from to the Inst in. Connect the Thru to your amp, if you want the Mono Out to a mic input on your sound system.
- Page 8 Quick Start Step 5: Step 6: Set the Input Knob fully left. Connect Synth's power adapter to main power and to the Power Input on Synth.There is no power switch so plugging it in automatically turns Synth on.
- Page 9 Quick Start Step 7: Step 8: While singing through your microphone, raise the Input For your first listen, check that the LEDs conform to the Knob until the Input Light turns green, sometimes status shown in the boxes below. Press the button orange on louder parts, but never red.
- Page 10 Don’t be scared to sing, talk, and make noises when you vocalize. Make sure to install the VoiceSupport application. It keeps VoiceTone Synth up to date with the latest software as well as tips and tricks on using the product. Visit www.tc-helicon.com/support if you need support.
-
Page 11: Setup
Setup: Singer Only Connections Connect your mic to the Mic Input. If you’re using a condenser mic, press and hold the Vocoder & Trans buttons to enable +48V phantom power. Connect the Mono Out to a PA. Getting the HardTune Effect Select preset 1 which has only HardTune enabled. - Page 12 Setup: Singing Electronic Artist Connections Connect your mic to the Mic Input. If you’re using a condenser mic, press and hold the Vocoder & Trans buttons to enable +48V. In additon you need to connect an instrument or audio source to the Inst in. Connect the Mono Out to a PA.
- Page 13 Setup: Singing Guitarist Connections Connect your mic to the Mic Input. If you’re using a condenser mic, press and hold the Vocoder & Trans buttons to enable +48V phantom power. In addition you need to connect your guitar to the Inst in. Connect the Mono Out to a PA.
-
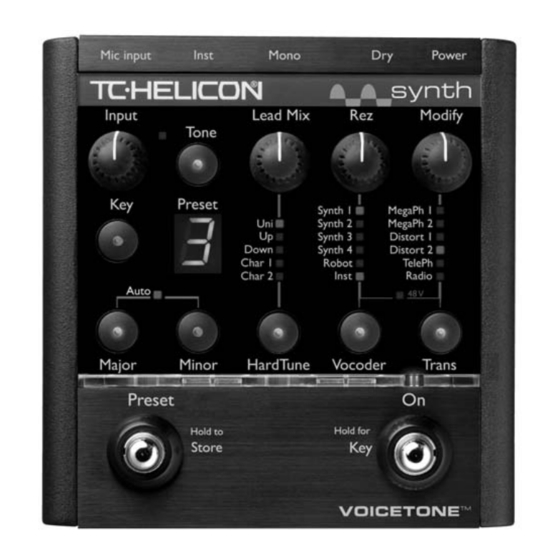
Page 14: Front Panel Diagram
This control gives additional sonic flexibility to the 2.Tone Button Transducer effects. Each effect has its own assignment of This engages TC-Helicon’s Live Engineer Effects which parameters controlled by the Modify knob. automatically modifies your voice and makes it sound smoother and brighter. - Page 15 Front Panel or Modify knobs are turned, this briefly displays their numerical value. 8. Major / Minor Buttons and Auto LED The scale type may be Major, Minor or Chromatic (no key). Hold both buttons for a moment to enter Auto mode where musical information is derived from the Inst input.
- Page 16 You can hold the On footswitch to set the key for the HardTune and Synth effects from a standing position.The Press to select Transducer options or effect off. On and Preset LEDs will flash. VoiceTone Synth can recognize simple major or minor chords played on an 12. LED Indicator Bar...
-
Page 17: Back Panel Diagram
Back Panel the preamplified Mic Input signal if needed for external mixing. Instrument In and Thru Connections Connect an instrument here to provide the vocoder carrier signal (“Inst” input only). A chordal instrument connected here such as a guitar can also set key and scale for the HardTune and Vocoder’s Synth and Robot effects.This input is high impedance to accept single coil guitar pickups. -
Page 18: Using Voicetone Synth
Using VoiceTone Synth Loading Presets Creating HardTune Effects Press the Preset button to load the next preset. The The HardTune effect quickly and un-naturally shifts the numeric display will show the next number. Pressing pitch of your voice to the nearest scale tone while you repeatedly will loop through all 10 presets (where 10 is sing.This is the desired effect. - Page 19 Using VoiceTone Synth buttons.Your voice will be tuned to the scale tones To create the HardTune effect: of the key you’ve selected. Alternatively, you can 1. Find a preset with only the HardTune button lit. use a chromatic scale which does not require a key 2.
-
Page 20: Using The Lead Mix Control
Using the Lead Mix Control In VoiceTone Synth, the carrier can be an external The Lead Mix control allows you to boost the effects or instrument such as a guitar, synthesizer, fully mixed tracks, mix in more lead voice with HardTune or Vocoder. -
Page 21: Creating Vocoder Effects With The Onboard Synth
Using VoiceTone Synth To make a vocoder effect with your instrument as carrier: To produce a vocoder effect with the onboard synthesizer: 1. Connect any instrument to the Inst input. 1. Find a preset with Vocoder on and its option set to 2. -
Page 22: Using The Rez Control
Using VoiceTone Synth Robot: the onboard synth produces a monotone note far enough in either direction to pass through and pick- fixed to either the the root of the chord you play (Auto up its value. on) or the scale root e.g. the “C” in C Major (Auto off). -
Page 23: Using The Modify Control
Using VoiceTone Synth stored at a different value in each preset if desired. Note Radio - Emulates the bandwidth and distortion of an old that the position of the knob does not always represent radio.The Modify control adjusts a LoCut filter. -
Page 24: For Advanced Users
For Advanced Users Choosing Alternate Tone Settings Advanced HardTune & Vocoder Style Select The factory default for the Tone button accommodates Each HardTune and Vocoder style (Uni, Up, Synth, Robot, a wide range of singers but there are options to further respectively) have additional selections. -
Page 25: Performing A Factory Reset
For Advanced Users Performing a Factory Reset Note that the tuning reference is not stored. It will be reset to A440 when the power is disconnected. A reset will delete all of your edited presets and return all settings to the factory defaults.To reset the unit, insert Changing the Number of Presets the power connector while holding the Major and Trans buttons. - Page 26 MIDI channel you would like Synth to receive 2. Connect the USB cable between your computer according to the following Hex table. Note that 0 and VoiceTone Synth. is zero, not the letter O. 3. Run the MIDI application and confirm Synth is...
-
Page 27: Faq And Troubleshooting
FAQ and Troubleshooting I can’t hear any audio coming out of the sure there is audio coming from you instrument. Try turning up your instrument level if the problem product persists. o Confirm you have power and a working mic by singing through the mic and confirming that Input The effects sound out-of-tune LED flashes green, and sometimes orange. - Page 28 FAQ and Troubleshooting I'm turning knobs but nothing is happening guitar and Synth’s input. o Ensure that the audio coming to the instrument o Simply twist a knob from left to right until it input is made up of at least a root note and a catches the stored value and then make your edit.
-
Page 29: Presets And Style Descriptions
Presets and Style Descriptions P P r r e e s s e e t t N N a a m m e e K K e e y y H H a a r r d d T T u u n n e e V V o o c c o o d d e e r r T T r r a a n n s s d d u u c c e e r r HardTune... - Page 30 Presets and Style Descriptions V V o o c c o o d d e e r r D D e e s s c c r r i i p p t t i i o o n n V V o o c c o o d d e e r r D D e e s s c c r r i i p p t t i i o o n n S S y y n n t t h h 1 1 -M M o o n n o o S S y y n n t t h h s s S S y y n n t t h h 4 4 - S S c c i i F F i i S S y y n n t t h h s s...
-
Page 31: Specifications
Specifications Conversion Characteristics Analog Inputs Sample Rate 48 kHz, Converter AKM AK4620B Mic Connector Balanced XLR, Input Impedance 1kOhm AD / DA Conversion 24 bit, 128x oversampling Mic Input Sensitivity @ 0dBFS -44dBu to +2dBu bitstream Mic Input Sensitivity @ 12dB headroom -56dBu to -10dBu EMC &...
Need help?
Do you have a question about the Voicetone and is the answer not in the manual?
Questions and answers