
Summary of Contents for Elfa BLDF99
- Page 1 BLDF99,BLDF99A,BLMF99,BLMF99A, BLDF98,BLDF98A,BLMF98,BLMF98A, BLMF90,BLMF90A,BLDF90,BLDF90A, BLMF92,BLDF92...
-
Page 2: Close-Up View
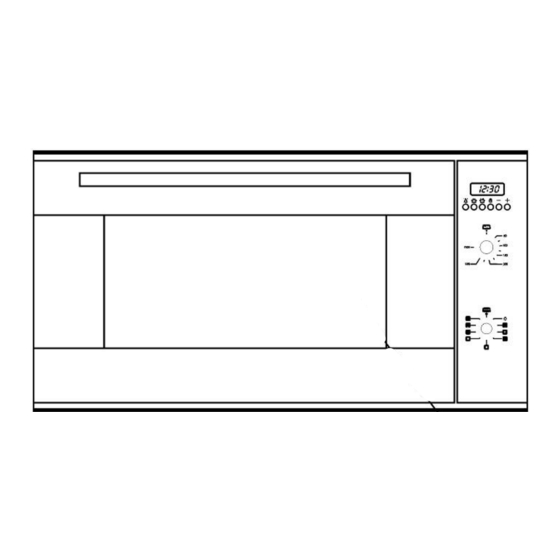
Congratulations on choosing our appliance, which you will find is dependable and easy to use. We recommend that you read this manual for best performance and to extend the life of your appliance. Thank you. Close-up View A. Control Panel B. -
Page 3: How To Use Your Appliance
A. Control Panel B. Knob for selecting the cooking features. C. Knob for adjusting the cooking temperature. D. Electronic cooking programmer(3-KEYS) E. Oven Light – When the light is on, it indicates that the oven is heating. It will turn off when the temperature setting has been reached. - Page 4 8 Functions No Circle heating With Circle heating Oven light When the selector knob is in any position other than the “0”position, the oven light comes on. Attention: The first time you use the oven we recommend that you set the thermostat on the highest setting and leave the oven on for about a half an hour with nothing in it.
- Page 5 Upper heating element Set the thermostat knob (C) between 50℃ and 250℃. By turning the knob to this position. The oven light and upper heating element come on. This position is recommend for finishing off the cooking of food (in baking trays) which is already inside well-cooked but still soft superficially. Upper heating element grill Set the thermostat knob (C) between 50℃...
- Page 6 Ventilated Maxigrill Important: do not the thermostat knob (C) to over 175℃. During grilling, keep the oven door closed. Both of the heating elements of the grill are activated, as well as the fan and all grill components. This combination of features increases the effectiveness of the thermal radiation of the heating elements through forced air circulation of the air throughout the oven.
- Page 7 guide "C" Start the motor by turning the knob to the grill setting INSTRUCTIONS FOR USE OF CONTROL DEVICES Timers Our ovens (8 models) are fitted with different types of timers (some with mechannical time and the others with electronic timer), The following function for your reference according to your oven.
- Page 8 Cooking time and manual function =saucepan symbol Automatic function =AUTO Minutes counter =bell symbol The symbols light up when the corresponding function are selected Setting To set ,press and release the desired function ,and within 5 seconds set the time with +and –buttons .
- Page 9 When the cooking end time corresponds to the time of day , the relay and the cooking time symbol switch off. When the cooking time is up. The AUTO symbol flashes, the sound singal rings and both the relay and the cooking time button switch off. Automatic use with cooking time and end time setting Press the cooking time button and select the length of the cooking time with +or –button.
- Page 10 With this arrangement it is possible to select the following four functions: ● Minute minder ● Operation period ● Operation stop ● Time-of-day These modes can be selected by repeatedly pressing the mode button. The desired time for minute minder, operation period, operation stop or time-of-day can be set with the “+”and “-“buttons. As an option, the duration of a pyrolysis can be controlled, if an oven features such function.
- Page 11 dark again. It is possible to adjust the time-of-day by pressing the mode button until L4 flashes, then the time-of-day can be adjusted. Minute minder (interval time) In order to set the interval time, the “Mode” button has to be pressed repeatedly until LED L3 is flashing.
-
Page 12: How To Keep Your Oven In Shape
How to keep Your Oven in Shape This appliance is for household use only,don’t use it outdoors! Important: Before cleaning your oven, or performing maintenance, disconnect it from the power supply. To extend the life of your oven, it must be cleaned frequently, keeping in mind that: ◎... -
Page 13: Fitting On A Power Supply Cable
possibility of electric shock. Warning: Do not operate appliance with damaged cord or plug or after the apliance malfunctions, or has been damaged in any manner, return appliance to the nearest Authorized Service Center for exanmination. Repair, or adjustment! The following maintenance should by Authorized Service Center or similarly qualified persons in order to avoid a hazard! 1.Fitting on a power supply cable Opening the terminal board:... - Page 14 Check that the electrical capacity of the system and sockets will support the maximum power of the appliance, as indicated on the data plate. If you have any doubts, call in a qualified technician. If the socket and appliance plug are not compatible, have the socket replaced with a suitable model by a qualified technician.
-
Page 15: Protective Kit
Protective kit During operation, the oven glass door and adjacent parts of the appliance become hot. Make sure, therefore, that children do not touch the appliance. This appliance is not intended for use by persons (including children) with reduced physical, sensory or mental capabilities or lack of experience and knowledge, unless they have been given supervision or instruction concerning use of the appliance by a person responsible for their safety. -
Page 16: Practical Cooking Advice
Practical Cooking Advice Preheating If the oven must be preheated (generally this is the case when cooking leavened foods) the " Ventilation mode"as possible in order to save on energy. Once the food has been placed in the oven. The most appropriate cooking mode can then be selected. -
Page 17: Cooking Pizza
I used more than one level and they are not all at the same cooking point Use a lower temperature setting. It is not necessary to remove the food from all the racks at the same time. Cooking Pizza For best results when cooking pizza use the "Ventilation mode": ●... -
Page 18: Safety Is A Good Habit To Get Into
Grilling Type of dish Cooking time Position (minutes) of shell Chops (0.5 kg) min. 25 guide rail Sausages min. 15 guide rail Grilled chicken (1 kg) min. 60 guide Veal on the spit (0.6 kg) min. 60 rail Chicken on the spit (1 kg) min. -
Page 19: Installation
Attempting to install or repair the appliance without the assistance of qualified personnel. WARNING- Accessible parts will become hot when in use. To avoid burns and scalds children should be kept away During use the appliance becomes hot, Care should be taken to avoid touching heating elements inside the oven. -
Page 20: Fastening The Oven
To provide adequate ventilation, there must be appropriate ventilation openings in the front bottom and the top part of 200 cm , and an exhaust opening on the bottom of an least 200 cm , and an exhaust opening of at least 60 cm The unit panels next to the cooker must be heat resistant. -
Page 21: Technical Specifications
the circuit-breaker). The power supply cable must be positioned so that it does not exceed 50℃ more than room temperature at any point of its length. Before making the connection check that: ● the limiter valve and the home system can support the appliance load(see data plate); ●...
Need help?
Do you have a question about the BLDF99 and is the answer not in the manual?
Questions and answers