
Summary of Contents for Fernbedienung CV1000
- Page 1 Bedienungsanleitung User guide Guide utilisateur CV1000 IR / RF Fernbedienung IR / RF remote control Télécommande IR / RF...
- Page 2 Vielen Dank. Sie haben ein Gerät mit hohem technischen Standard erworben. Mit dem CV 1000 können bis zu 8 A/V Geräte betrieben werden: TV, VCR, CD, SAT, CBL, DVD, AUDIO und AUX. Bitte lesen Sie die Installations- und Bedienungsanleitung vor Inbetriebnahme genauestens durch.
- Page 3 - 3 -...
-
Page 4: Table Of Contents
General Safety Note............36 Introduction ...............38 Installing the batteries ............39 Description of the CV1000 “rubber” keys ......40 Description of the CV1000 “LCD” keys ......41 Programming using 3 Digit Code Tables for the TV, VCR, CD, SAT, CBL, DVD, AUDIO and AUX ....45 Programming using Brand search method......47... -
Page 5: General Safety Note
1) General Safety Note Technical manipulation of the product or any changes to the product are forbidden, due to security and approval issues. Do not use sharp or metal objects on the LCD screen. Do not press hard on the glass LCD screen. Take care of proper starting up the device - consult your user guide. - Page 6 Battery change : The device may only be used with 4 AAA batteries - never try to connect to another power supply. When inserting batteries be sure the right polarity is used. Remove the batteries when the device is not used for a longer period.
-
Page 7: Introduction
2) Introduction The CV 1000 is designed to control up to 8 devices (TV, VCR, CD, SAT, CBL, DVD, AUDIO, AUX). The AUX key can be used to control any other audio/video appliance. To allow direct control of all these appliances, in a convenient way, the CV 1000 includes a LCD screen. -
Page 8: Installing The Batteries
3) Installing the batteries 1. Open the cover on the back of the CV 1000 2. Insert 4 batteries (LR03 alkaline). Make sure the batteries are the same brand and are NEW and observe polarities indicated inside the battery compartment. 3. -
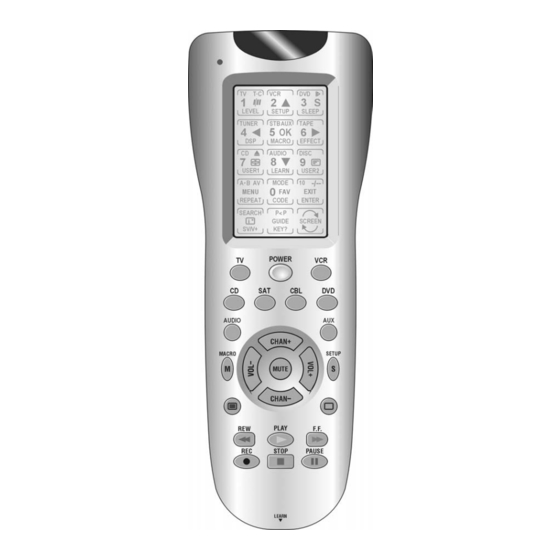
Page 9: Description Of The Cv1000 "Rubber" Keys
4) Description of the CV1000 “rubber” keys 1 : LED : Turns on whenever a rubber key or an LCD key is pressed and indicates when commands are being transmitted. 2 : TV, VCR, CD, SAT, CBL, DVD, AUDIO, AUX mode : To select the appliance you wish to control. -
Page 10: Description Of The Cv1000 "Lcd" Keys
5) Description of the CV1000 “LCD” keys The LCD Display The Liquid Crystal Display (LCD) acts as a “Virtual Keypad” comprising a 15 position segmented “key” area. Pressing the “SCREEN” key lets you toggle between two available sets, or “screens” of keys for the mode you are in. - Page 11 All the appliance can be controlled through 2 LCD screens. Common screen keys are described below. Numeric keys 0 - 9 : For digit or numeric key Typical Screen1 entries e.g. to select the channel number, or to enter the code of your device -/-- : In connection with the numeric keys this key allows you to directly select channels higher than 9 (depending on the appliance).
- Page 12 Other Useful LCD Keys: : Teletext Mix : (TV, CBL & SAT) Allows to mix the Teletext and the picture of the selected channel : Teletext Hold : (TV, CBL & SAT) Stops page change in teletext mode. SV/V+ : (VCR) corresponds to “Showview” or “Videoplus” functions (see chapter 14.5).
- Page 13 SLEEP key until the remote beeps twice. Programming the CV1000 You program the CV1000 using the Setup key and following the procedures below. Each keypress is acknowledged with an LED blink and a beep from the sounder. 3 LED blinks and sounder beeps indicate an incorrect or invalid entry.
-
Page 14: Programming Using 3 Digit Code Tables For The Tv Vcr, Cd, Sat, Cbl, Dvd, Audio And Aux
6) Programming using 3 Digit Code Tables for the TV, VCR, CD, SAT, CBL, DVD, AUDIO and AUX Note : you can dedicate any appliance (TV, DVD, SAT...) to the VCR, DVD, SAT, CD, AUDIO, CBL and AUX keys : you need first to enter the 3 digit code of the appliance you wish to control (found in the code book). - Page 15 Setup Screen - Code 6. Display will show the Code Setup Screen. Enter the 3 digits of the Device Code from the Library Code Tables. For a valid Code, SETUP the LED blinks off after the last digit is entered. For an invalid Code, the LED will flash rapidly for three seconds before going off.
-
Page 16: Programming Using Brand Search Method
7) Programming using Brand Search Method It is possible to search for your appliance’s code by entering the brand of the appliance you wish to control. Setup Screen - Main 1. Make sure your appliance is switched on. If not switch it on manually 2. - Page 17 Display will show the Code Setup Screen. Using the Table blow, press and release the Setup Screen - Code numeric key (0-6) corresponding to desired Manufacturer. Note – pressing “0” carries out a full library search same as normal Code Search SETUP Method.
- Page 18 Repeat this procedure for any other appliance you want to control (TV, VCR, DVD, SAT, CD, CBL, AUDIO and AUX). 10. The Code Search Method entry is now complete. Press and release the LCD “EXIT” key to return to normal operation. Notes : a.
- Page 19 4. Display will show the Mode Setup Screen. Setup Screen - Mode Press and release desired Mode key (TV, VCR, SAT, etc.) on the rubber keypad. SETUP MODE EXIT KEY? 5. Display will show the Code Setup Screen. Setup Screen - Code Press and release the LCD “SEARCH”...
- Page 20 Setup Screen - Search 6. Display will show the Search Setup Screen. Press the LCD “UP” key (or Power or Play) repeatedly until the Device to be controlled SETUP changes channel. Alternatively, you can use the Channel Up key. Press and release the LCD “OK”...
-
Page 21: Identifying Codes Found Using The Search Procedures
9) Identifying codes found using the search procedures Setup Screen - Main 1. Press and hold Setup key until the LED remains on (occurring after approximately 2- SETUP SLEEP 3 seconds) and display will show the Main Setup Screen. MACRO 2. -
Page 22: Programming A Macro
6. Display will show the Code Identification Setup Screen - Code ID Screen (Initially blank except for “SETUP”, “INFO” and “CODE” labels). The display will now show the code using the LCD digits. The 3 digits will be shown in sequence for 1second SETUP each followed by a 0.5second gap where no digits are shown. - Page 23 Setup Screen - Macro1 4. The Macro Setup Digit Screen will be shown. Press and release the digit key the Macro is to be stored under. SETUP MACRO EXIT KEY? 5. The Macro Mode Setup Screen will be Setup - Macro Mode shown.
- Page 24 6. Display will show the Macro Key Setup Screen. Setup Screen - Macro2 This screen comprises the current screen labels for that Mode plus the SETUP and MACRO LCD T - C labels will be shown. Press and release the remote keys (maximum of 20) that are required LEVEL SETUP...
-
Page 25: Channel Toggle Key
5. It is not possible to include a Macro within a Macro. To Delete a Macro : 1. Press and hold the Setup key until the LED remains on (occurring after approximately 2-3 seconds) and the display shows Main Setup Screen. - Page 26 To Program the Channel-Toggle Feature Setup Screen - Main 1. Press and hold Setup key until the LED remains on (occurring after approximately SETUP SLEEP 2-3 seconds) and display shows the Main Setup Screen. MACRO 2. Release Setup key. LEARN 3.
- Page 27 5. Display will show the “P<P2” Setup Screen. Setup Screen - P<P2 This screen comprises the current screen labels for the Mode plus the SETUP and T - C “P<P” LCD labels will be shown. You can LEVEL SETUP SLEEP now press up to 3 keys (a minimum of 1 key TUNER TAPE...
-
Page 28: Setting Key Labels
12) Setting Key Labels : You can select which keys are shown or “hidden” in the display for each of the Device Modes. You can select any LCD key for change except for the SCREEN, SLEEP, SEARCH and P<P keys. Setup Screen - Main Press and hold Setup key until the LED remains on (occurring after approximately... - Page 29 Setup Screen - SCREEN 5. Display will show the SCREEN Setup Screen. This screen comprises the current screen labels for the Mode plus the SETUP T - C and SCREEN LCD labels will be shown. LEVEL SETUP SLEEP You can now press any of the LCD panel TUNER TAPE keys within the current Mode to select the...
-
Page 30: Code Learning
It is possible to learn IR commands (up to 40 keys per Mode) from your original remote. Tips On Learning : 1. Always use of fresh batteries for the CV1000 and original remote 2. Carry out a Master Reset before attempting any Learning. Note this will reset all User programming back to factory defaults. - Page 31 To Learn Commands : Setup Screen - Main 1. Press and hold Setup key until the LED remains on (occurring after approximately 2- SETUP SLEEP 3 seconds) and the display shows the Main Setup Screen. MACRO 2. Release Setup key. LEARN 3.
- Page 32 5 Display will show the Learn Setup Screen. Setup Screen - Learn1 This screen comprises the current labels for the Mode along with the SETUP and LEARN T - C LCD labels. Press and release the remote LEVEL SETUP SLEEP key to be taught with the original remote key TUNER TAPE...
- Page 33 To Clear all stored Learned Commands under a Mode : Setup Screen - Main Press and hold Setup key until the LED remains on (occurring after approximately 2-3 seconds) and display shows the Main Setup Screen. SETUP SLEEP Release Setup key. MACRO Press and release the LCD “LEARN”...
-
Page 34: Extra Functions
Setup Screen - Learn1 Display will show the Learn Setup Screen. T - C Press and hold the Setup Key until the Main Setup Screen is displayed. All Learned LEVEL SETUP SLEEP Command entries under that Mode are now TUNER TAPE cleared. - Page 35 3. To disable the beep, press and hold the rubber Stop key until the LED blinks. To enable the Beep, press and hold the rubber Play key until the LED blinks. 4. Beep Feature now toggled On or Off and the Main Setup Screen is shown.
- Page 36 4. Channel Scan/Search Key (LCD) : The Channel Scan/Search function is only available in TV, DVD, CBL/SAT and CD/Audio Modes. Pressing the LCD “SEARCH” Key allows the User to sequentially scan up available program channels. This key cannot be learned. When pressed, a Channel Up command for the Current Mode code is sent once every 3 seconds.
-
Page 37: Problems And Troubleshooting
8. CBL/SAT Volume Control : Some Cable and Satellite have their own volume control. By default in CBL/SAT modes, the CV1000 Volume and Mute key control the TV volume. To change the volume and mute control either to TV or CBL/SAT for CBL/SAT mode, proceed as follows : 1. - Page 38 We, X10 Europe 3 Rue de Penthièvre 75008 Paris France, herewith declare that the following designated product : Universal Remote Control CV1000 Complies with the essential protection requirements of the R&TTE directive 1999/5/EC on the approximation of the laws of the Member States relating to Radio Spectrum Matters, EMC and Electrical Safety.
Need help?
Do you have a question about the CV1000 and is the answer not in the manual?
Questions and answers