Philips HTS3541 User Manual
Hide thumbs
Also See for HTS3541:
- User manual (39 pages) ,
- Specifications (3 pages) ,
- Service manual (61 pages)
Table of Contents
Advertisement
Available languages
Available languages
Quick Links
Advertisement
Chapters
Table of Contents

Subscribe to Our Youtube Channel
Related Manuals for Philips HTS3541


Summary of Contents for Philips HTS3541
- Page 1 Register your product and get support at www.philips.com/welcome HTS3541...
-
Page 3: Table Of Contents
Contents Change settings Language settings Picture and video settings Important Audio settings Safety Parental control settings Care for your product Display settings Care for the environment Energy saving settings Help and support Speaker settings Restore default settings Your home theatre Update software Main unit Connectors... -
Page 4: Important
• Do not mix batteries (old and new or carbon from the power socket immediately. Contact and alkaline etc.). Philips Consumer Care to have the product • Danger of explosion if batteries are checked before use. incorrectly replaced. Replace with the same •... -
Page 5: Care For Your Product
Care for the environment number. Alternatively, you can contact Philips Consumer Care in your country. Before you contact Philips, note down the model number and serial number of your product. You can fi nd this information on the back or bottom of your product. -
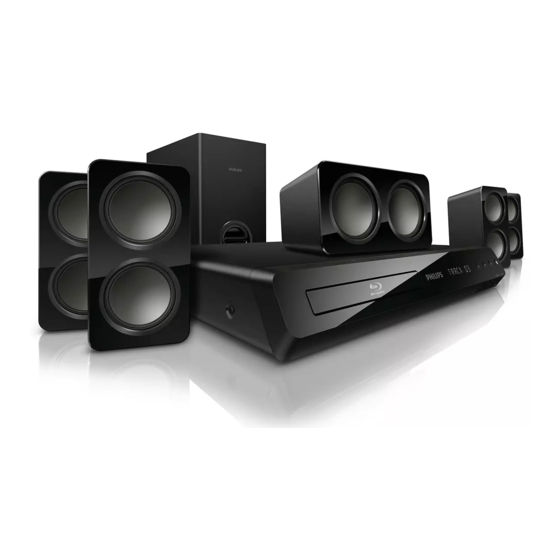
Page 6: Your Home Theatre
Audio, video or picture input from a USB storage device. MUSIC iLINK Congratulations on your purchase, and welcome Audio input from an MP3 player. to Philips! To fully benefi t from the support that Philips offers, register your product at www.philips. com/welcome. Rear connectors Main unit This section includes an overview of the main unit. -
Page 7: Remote Control
( Home ) Remote control Access the home menu. Source buttons This section includes an overview of the remote • DISC / POP-UP MENU : Switch to disc control. source. Access or exit the disc menu when you play a disc. •... -
Page 8: Connect And Set Up
For information about the basic connections of Mute or restore volume. your home theatre and accessories, see the quick AUDIO start guide. For a comprehensive interactive guide, Select an audio language or channel. visit www.connectivityguide.philips.com. SUBTITLE Select subtitle language for video. Note Colour buttons •... -
Page 9: Connect To Tv
Using a High-Speed HDMI cable, connect Note the HDMI OUT (ARC) connector on your home theatre to the HDMI ARC connector • Surround sound depends on factors such as on the TV. room shape and size, type of wall and ceiling, •... -
Page 10: Connect Audio From Tv And Other Devices
Note • When your home theatre and TV are connected through HDMI ARC, an audio connection is not required (see 'Option 1: Connect to TV through HDMI (ARC)' on page 6 ) . Option 1: Connect audio through a digital optical cable Option 3: Connect to the TV through Best quality audio... -
Page 11: Set Up Speakers
Using an analogue cable, connect the AUX • Philips does not guarantee 100% interoperability connectors on your home theatre to the with all HDMI-CEC devices. AUDIO OUT connectors on the TV or other device. -
Page 12: Connect And Set Up A Home Network
Familiarise yourself with the network router • To view the network settings, select and networking principles. If necessary, read [Setup] > [Network] > [View Network documentation that accompanies the network Settings] . components. Philips is not responsible for lost, damaged or corrupt data. -
Page 13: Use Your Home Theatre
Use your home Play buttons theatre Button Action Navigation Navigate menus. buttons This section helps you use the home theatre to Confi rm an entry or selection. play media from a wide range of sources. ( Play ) Start or resume play. Before you start •... -
Page 14: Data Fi Les
Select [2nd Audio Language] or [2nd Subtitle To stop play, press . • Language] . To resume the video from where you stopped, press ( Play ). Select the language, and then press OK . • To play the video from the start, press OK . BD-Live on Blu-ray Note Access additional features on the Blu-ray discs with... -
Page 15: Audio Options
VOD code for DivX Audio options Before you purchase DivX videos and play them While playing audio, repeat an audio track, a disc on your home theatre, register the home theatre or a folder. on www.divx.com using the DivX VOD code. Press OPTIONS repeatedly to cycle through Press ( Home ). -
Page 16: Radio
• [Repeat A-B] : Mark two points within a Radio chapter or track to repeat play, or turn off the repeat mode. • [Picture Settings] : Select a predefi ned Listen to FM radio on your home theatre, and colour setting. store up to 40 radio stations. -
Page 17: Mp3 Player
MP3 player Picasa web albums Connect an MP3 player to play audio fi les. Access Picasa Web Albums through your home What you need theatre. • An MP3 player. What you need • • A 3.5-mm stereo audio cable. An account with Picasa Web Albums. Using the 3.5 mm stereo audio cable, Connect your home theatre to a home connect the MP3 player to the MUSIC iLINK... -
Page 18: Surround Sound Mode
Sound settings Description Surround sound mode SOUND Select a sound mode. Experience an immersive audio experience with SURROUND Select surround sound or surround sound modes. stereo sound. SOUND SETTINGS . Press TREBLE Change the high frequency Select SURROUND , and then press OK . output. -
Page 19: Change Settings
Change settings Press the Navigation buttons and OK to select and change: • [TV Display] : Select a picture format to fi t the TV screen. • [HDMI Video] : Select the resolution of the The home theatre settings are already confi gured video signal that is output from HDMI OUT for optimal performance. -
Page 20: Display Settings
Select [Preference] , and then press OK . Speaker settings Press the Navigation buttons and OK to select and change: • [Change Password] : Set or change your ( Home ). Press password for parental control access. Select [Setup] , and then press OK . If you do not have a password or have Select [Advanced] , and then press OK . -
Page 21: Update Software
Do not install a lower version of software than the version currently installed on your product. Connect the USB fl ash drive containing the Philips is not liable for problems caused due to downloaded fi le to your home theatre. software downgrading. -
Page 22: Product Specifi Cations
Product Audio formats specifications Your home theatre supports the following audio fi les. Extension Container Audio Bit rate codec .mp3 32 kbps ~ Note 320 kbps • Specifi cations and design are subject to change .wma 64 kbps ~ without notice. 160 kbps .aac AAC, HE-... - Page 23 .divx fi les in AVI container Video Audio Video codec Bit rate • Signal system: PAL/NTSC codec • HDMI output: 480i/576i, 480p/576p, 720p, 1080i, 1080p, 1080p24 PCM, DivX 3.11, 10 Mbps max Dolby DivX4.x, DivX5.x, Digital, DivX6.x Audio MP3, • S/PDIF Digital audio input: •...
-
Page 24: Troubleshooting
• Speaker drivers: 1 x 63.5 mm (2.5") woofer you are still having problems, get support at www. • Dimensions (W x H x D): 159 x 84.5 x philips.com/support. 80 mm • Weight: 0.35 kg Main unit Front/Rear speaker: •... - Page 25 EasyLink does not work. Sound • Make sure that the home theatre is connected to a Philips brand EasyLink TV, and No sound from home theatre speakers. the EasyLink option is turned on (see 'Set up • Connect the audio cable from your home EasyLink (HDMI-CEC control)' on page 8 ) .
-
Page 26: Notice
Performers' Protection Acts 1958 to 1972. Open source software Compliance Philips Electronics Singapore Pte Ltd hereby offers to deliver, upon request, a copy of the complete corresponding source code for the copyrighted open source software packages used in this... -
Page 27: Trademarks
ABOUT DIVX PLUS® HD: DivX® is a digital Trademarks video format created by DivX, Inc. This is an offi cial DivX Certifi ed® device that plays DivX video, including DivX® Plus HD video (H.264/.MKV) up to 1080p and premium content. Visit www.divx. com for more information and software tools to convert your fi... -
Page 28: 10 Index
10 Index data fi les deep color default settings 2nd audio language disc language 2nd subtitle language disc menu display panel disposal DivX 5.1 speakers Easylink (HDMI-CEC) eject disc advanced settings enhanced audio amplifi er environment audio connection (analogue cable) audio connection (coaxial cable) audio connection (HDMI ARC) audio connection (optical cable) - Page 29 one-touch play troubleshooting (picture) one-touch standby troubleshooting (play) options troubleshooting (sound) tune radio stations parental control PBC (play back control) update software (through Internet) Picasa web albums update software (through USB) picture options USB storage device picture resolution user manual picture settings picture-in-picture play disc...
- Page 31 Contenido Cambio de los ajustes Confi guración del idioma Confi guración de imagen y video Importante Confi guración de audio Seguridad Confi guración de control para padres Protección del producto Ajustes de pantalla Cuidado del medio ambiente Confi guración de ahorro de energía Ayuda y asistencia técnica Confi...
-
Page 32: Importante
Póngase en contacto con el Riesgo de sobrecalentamiento. servicio de atención al cliente de Philips para • Nunca instale este producto en un espacio comprobar el dispositivo antes de usarlo. -
Page 33: Protección Del Producto
También puede comunicarse con el servicio de atención al cliente de Philips en su país. Antes Cuando se adhiere este símbolo de cubo de de comunicarse con Philips, anote el número de basura con ruedas tachado al producto, signifi... -
Page 34: Su Home Theater
Entrada de audio, video o imágenes de un dispositivo de almacenamiento USB. MUSIC iLINK Felicitaciones por su compra y bienvenido a Philips. Entrada de audio de un reproductor de MP3. Para acceder a los servicios de asistencia técnica de Philips, registre su producto en www.philips. -
Page 35: Control Remoto
( Modo de espera encendido ) Control remoto • Enciende el sistema de Home Theater o activa el modo de espera. • Si EasyLink está activado, manténgalo En esta sección se incluye una descripción del pulsado durante al menos tres segundos control remoto. -
Page 36: Conectar Y Confi Gurar
Home Theater y accesorios, consulte la Activa o desactiva el modo de repetición. guía de inicio rápido. Para acceder a una guía interactiva TOP MENU completa, visite www.connectivityguide.philips.com. Permite acceder al menú principal de un disco. Nota OPTIONS •... -
Page 37: Conexión Con El Televisor
Enchufe el conector HDMI OUT (ARC) de Nota su Home Theater al conector HDMI ARC de su televisor mediante un cable HDMI de alta • El efecto envolvente depende de factores como velocidad. la forma y el tamaño de la habitación, el tipo •... -
Page 38: Conexión De Audio Desde El Televisor Y Otros Dispositivos
Nota Conexión de audio desde el televisor y otros dispositivos • Si su televisor tiene un conector DVI, puede usar un adaptador de HDMI a DVI para conectarlo al televisor. Sin embargo, es posible que algunas de Reproduzca audio desde el televisor u otros las características no estén disponibles. -
Page 39: Confi Gurar Altavoces
Confi gurar EasyLink (control HDMI-CEC) Este Home Theater es compatible con Philips EasyLink, que utiliza el protocolo HDMI-CEC (Consumer Electronics Control). Los equipos compatibles con EasyLink que se conectan a través de HDMI pueden controlarse por medio de un único control remoto. -
Page 40: Conectar Y Confi Gurar Una Red Doméstica
Actualización de software Precaución • Familiarícese con el router de red y los principios básicos de la red. De ser necesario, lea la información suministrada con los componentes de la red. Philips no se hace responsable por los datos perdidos o dañados. -
Page 41: Uso Del Sistema De Home Theater
Uso del sistema de Procedimientos preliminares • Para acceder a la actualización de software, el Home Theater router de red debe tener acceso a Internet de alta velocidad y no debe encontrarse restringido por fi rewalls u otros sistemas de seguridad. - Page 42 Utilice el control remoto para controlar la Pulse el botón Botones de navegación (arriba/ reproducción. (consulte 'Control remoto' en abajo) para sincronizar el audio con el video. la página 5 ) Pulse OK para confi rmar. • Es normal escuchar un ruido leve durante la reproducción de un disco Utilización de Bonus View en Blu-ray Blu-ray.
-
Page 43: Archivos De Datos
Pulse Botones de navegación para navegar Mientras reproduce el video, pulse SUBTITLE por BD-Live y, a continuación, pulse OK para para seleccionar un idioma. seleccionar una opción. Para videos DivX, si los subtítulos no aparecen correctamente, siga los pasos a continuación para cambiar el conjunto de caracteres. -
Page 44: Opciones De Audio, Video E Imagen
• Un archivo de medios de uno de los Pulse OPTIONS . formatos de archivo compatibles (consulte » Aparecerá el menú de opciones de video. 'Formatos de archivo' en la página 22 ) . Pulse Botones de navegación y OK para seleccionar y cambiar: •... -
Page 45: Radio
Pulse Botones de navegación y OK para Radio seleccionar y cambiar los siguientes ajustes: • [Rotar +90] : Gira la imagen 90 grados hacia la derecha. Escuche la radio FM en su Home Theater y • [Rotar -90] : Gira la imagen 90 grados almacene hasta 40 estaciones de radio. -
Page 46: Reproductor De Mp3
Botón Acción Intervalo de sintonización Botones de Arriba: accede al teclado en pantalla. En algunos países, puede cambiar los intervalos de navegación Abajo: accede a los botones de sintonización FM entre 50 kHz y100 kHz. Cuando reproducción en pantalla. se cambia el intervalo de sintonización, se borran Izquierda/derecha: selecciona un todas las estaciones de radio presintonizadas. -
Page 47: Selección De Sonido
• Pulse OK nuevamente para ver una MUSIC : recrea el ambiente original de presentación de fotos. grabación de la música, en el estudio o en vivo. Durante la presentación, pulse OPTIONS para • ORIGINAL : experimente el sonido acceder a más opciones de reproducción. original de las películas y la música sin Pulse BACK para volver a la pantalla... -
Page 48: Cambio De Los Ajustes
Cambio de los Confi guración de imagen y video ajustes ( Inicio ). Pulse Seleccione [Confi guración] y, a continuación, pulse OK . Los ajustes del Home Theater ya están Seleccione [Video] y, a continuación, pulse OK . confi gurados para que su rendimiento sea óptimo. A menos que tenga una razón para cambiar la Pulse Botones de navegación y OK para confi... -
Page 49: Confi Guración De Control Para Padres
• [Audio HDMI] : confi gura la salida de audio Confi guración de ahorro de HDMI desde el televisor o deshabilita la salida de audio HDMI desde el televisor. energía • [Ajustes de sonido predet.] : restablece los ajustes de ecualizador de todos los modos ( Inicio ). -
Page 50: Predeterminada
» El Home Theater vuelve a la más reciente disponible en el sitio web de soporte confi guración predeterminada excepto de Philips, actualice el Home Theater con el para algunas confi guraciones, como software más reciente. control para padres y código de registro DivX VoD. -
Page 51: Actualización De Software Vía Internet
Internet de alta velocidad (consulte 'Conectar y confi gurar En el sitio web de asistencia de Philips, una red doméstica' en la página 10 ) . encuentre su producto y acceda a Software y controladores . -
Page 52: Especifi Caciones Del Producto
Especificaciones del .aac AAC, HE- 192 kbps producto .wav 1,4 Mbps .m4a 192 kbps .mka 27,648 Mbps .mka Dolby 640 kbps Digital Nota .mka DTS core 1,54 Mbps • Las especifi caciones y el diseño están sujetos a .mka MPEG 912 kbps modifi... - Page 53 Archivos con extensión .mp4 o .m4v con Audio formato MP4 • Entrada de audio digital S/PDIF: Codec de Codec de Velocidad binaria • Coaxial: IEC 60958-3 audio video • Óptica: TOSLINK • Frecuencia de muestreo: Dolby MPEG 1, MPEG 20 Mbps (pico de •...
-
Page 54: Solución De Problemas
84,5 x 159 x 80 mm de solicitar una reparación. Si aún tiene problemas, • Peso: 0,35 kg c/u obtenga asistencia en www.philips.com/support. Baterías del control remoto Unidad principal • 2 x AAA-R03 (1,5 V) Los botones del sistema de Home Theater no funcionan. - Page 55 • Compruebe que el Home Theater esté de la confi guración predeterminada' en la conectado en un televisor Philips con página 20 ) y, a continuación, apague el Home EasyLink y que la opción EasyLink esté Theater y vuelva a encenderlo.
-
Page 56: Aviso
Aviso Software de código abierto Por el presente, Philips Electronics Singapore Pte Esta sección contiene avisos sobre asuntos legales Ltd se ofrece a entregar una copia completa del y marcas registradas. código fuente correspondiente a los paquetes de sistemas de software abierto protegidos por... - Page 57 HDMI, el logotipo de HDMI y High-Defi nition Multimedia Interface son marcas comerciales o marcas comerciales registradas de HDMI Licensing Fabricado con licencia de acuerdo con Números LLC en Estados Unidos y otros países. de patente: 5.956.674; 5.974.380; 6.226.616; 6.487.535; 7.392.195; 7.272.567; 7.333.929; 7.212.872 y otras patentes de Estados Unidos y de todo el mundo publicadas y pendientes.
-
Page 58: 10 Índice
10 Índice cambio de contraseña cambio de subtítulos automático código VOD (DivX) 2do. idioma de audio códigos de región 2do. idioma de subtítulos conectar al televisor conectores conexión de audio (cable análogo) conexión de audio (cable coaxial) conexión de audio (cable óptico) altavoces 5.1 conexión de audio (HDMI ARC) ambiental... - Page 59 grilla de sintonización radio reciclaje red con cables red doméstica HDMI ARC repetición HDMI-CEC reproducción de un toque reproducir disco reproducir música reproducir radio reproducir unidad de almacenamiento USB idioma de audio resolución de imagen idioma del disco resolución de problemas (imagen) idioma del menú...
- Page 61 Language Code...
- Page 62 © 2012 Koninklijke Philips Electronics N.V. All rights reserved. sgpjp_1210/55_MKII_v1...
Need help?
Do you have a question about the HTS3541 and is the answer not in the manual?
Questions and answers