Advertisement
Table of Contents
Advertisement
Table of Contents

Related Manuals for YBIKE Explorer

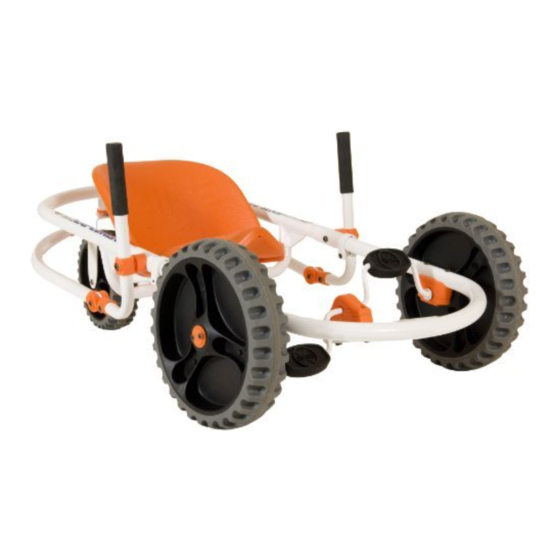
Summary of Contents for YBIKE Explorer
- Page 1 OWNER’S MANUAL...
- Page 2 DO NOT ride the Explorer with one or no hands. Hold the handlebars tightly with two hands. Ride Explorer only on flat and level ground. DO NOT ride Explorer on slopes. DO NOT go down a long descending slope, driveway or hill. Please be careful when passing these areas.
- Page 3 Never use near cars, motor vehicles, roadways, near streets or traffic. DO NOT use in traffic. Never allow more than one child to ride on Explorer at any time. Not to be used by children weighing more than 50 kgs due to insufficient strength.
- Page 4 YBIKE EXPLORER PARTS LIST & COMPONENTS...
- Page 5 YBIKE EXPLORER PARTS LIST & COMPONENTS Open the box and take out the parts. Below is a parts lists. Please check whether all parts and components are included: NAME REAR FRAME FRONT FRAME CLAMPS x 4 REAR WHEEL PLASTIC SPACER x 2...
- Page 6 ASSEMBLY INSTRUCTION 1. Rear Wheel Assembly Place the rear wheel (No. 4) onto the rear body (No. 1) . Align the wheel with the hole on the rear body, and insert the rear shaft (No.10). Tighten with bolt (No.8) using the Allen Keys (No.
- Page 7 2. Attach the clamps Take 2 clamps (No. 3), and place each clamp on either side of the rear frame (No. 1) tube to align with the holes provided as shown in picture below. Use the clamp shaft (No. 9) and bolt (No. 8) to slightly tighten and hold the clamps in place.
- Page 8 3. Body Assembly A Take the rear frame (No. 1) and place it Insert clamp shaft (no. 9) into the last hole on between your legs so that the frame faces the clamp (No. 3) and fasten with bolt (No. 8) to forward as in picture A below.
- Page 9 4. Body Assembly B Steering: Align the 1st open hole on the clamp with plastic spacer (No. 5), a washer (No. 7) and with the hole on the steering handlebar as in the picture below. Now insert a metal bush (No.6) into the hole, and then insert a steering handlebar shaft (No.11).
- Page 10 5. To Adjust the Seat Remove the four shafts and bolts from the seat using the set of Allen Keys (No.12).Now align the 4 holes on the Seat with the extra 4 holes provided on the rear frame (No.1) to change the seat position.
- Page 11 6. Caring for your Explorer 1. Please clean the wheels regularly after playing. Use a wet cloth to wipe the wheels. Dry the wheels thoroughly after cleaning. 2. Clean handle and seat regularly. 3. Regularly check to see if all parts are securely.
- Page 12 CHECK BEFORE RIDING Check that all the bolt and shaft sets are tightened. Check that the steering system is securely fastened and turns smoothly. Check that the wheels and pedal system can spin smoothly and each part is securely fixed. Finally after checking the above points, you can now start to ride.
Need help?
Do you have a question about the Explorer and is the answer not in the manual?
Questions and answers
How can I get extra parts for my YBIKE Explorer Pedal Car?
I need to get replacement drive wheels for the two ybike explorer go karts I have. How do I order them?
Where can I order replacement parts? We had a bolt fall out and are missing the small red piece that goes between the arm bar and main frame that the bolt goes through to connect the handles.
Is the steering bracket available to purchase if the old one broke?