Advertisement
Table of Contents
- 1 Table of Contents
- 2 Contents of Package
- 3 Smartguard Motion Light with Video Camera
- 4 Insert/Remove Memory Card
- 5 Installation
- 6 Programming Your Smartguard
- 7 Set the Date and Time of Smartguard
- 8 Viewing Video
- 9 Technical Specifications
- 10 General Information and Safety
- 11 FCC Information
- 12 FAQ (Frequently Asked Questions) Section
- Download this manual
Advertisement
Table of Contents

Related Manuals for Smartguard AEC-931A2BSD-SP4

Summary of Contents for Smartguard AEC-931A2BSD-SP4
- Page 1 User Manual AEC-931A2BSD-SP4 Smartguard Motion Light with Video Camera...
-
Page 2: Table Of Contents
3. Insert/remove memory card ............Page 3 4. Installation .................. Page 4 5. Programming your Smartguard ..........Page 7 6. Set the date and time of Smartguard ........... Page 9 7. Viewing video................Page 11 8. Technical Specifications ............. Page 12 9. - Page 3 U s e r M a n u a l S m a rt g u a r d M o ti o n L i g h t w i t h V i d e o C a m e r a Smartguard Memory Card User Manual ④...
-
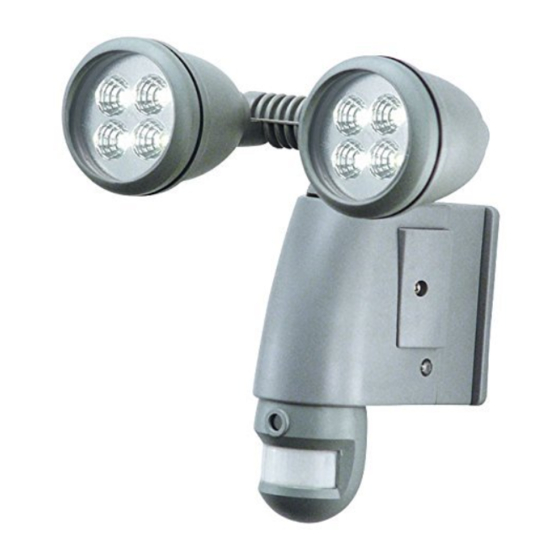
Page 4: Smartguard Motion Light With Video Camera
Smartguard Motion Light with Video Camera overview LED lamphead Wnterproofed cover LED Indicator Camera lens PIR lens Fig. 1 Fig. 2 Step 1. Insert/remove memory card (see fig. 3): Unscrew the waterproofed cover using provided Allen key ④ ②... - Page 5 Incorrect voltage may cause electric shock. If you are not sure, please contact your retailer. Note: It is recommend to mount Smartguard Motion Light with Video Camera 6 – 7ft above the ground for optimum performance, do not mount the fixture below 3.94ft. See below figure for details of performance range.
-
Page 6: Installation
(part no. 5. Connect the white wire from the AC power cord to the white wire coming from Smartguard using one of the supplied wire nuts (part no. ⑧ 6. Connect the green/yellow wire from the AC power cord to the... - Page 7 (part no. 4. Connect the white wire from the AC power cord to the white wire coming from Smartguard using one of the supplied wire nuts (part no ⑧ 5. Connect the green/yellow wire from the AC power cord to the 2 green/yellow wires coming from Smartguard using one of the supplied wire nuts (part no.
-
Page 8: Programming Your Smartguard
Screw E Screw A Fig. 7 Please allow 1 minute warm-up time after switching on. * Push the RESET button after switching on. Remove plastic lens cover from camera after installation. (see fig. 8) Fig. 8 Step 3 Adjusting the Settings (see fig. 9-11) ... - Page 9 Sensitivity control:Adjust the detector range of Passive Infrared Motion Sensor ( 6.56ft ~ 32.8ft) Selecting working mode: Mode 1: Suggested setting when out of town - Light + camera + speaker: all day detection - Daytime and nighttime: light, camera and speaker are all in operation Mode 2: Suggested for day to day use - Light at night + camera all day + speaker in the daytime...
-
Page 10: Set The Date And Time Of Smartguard
OFF/REC button to avoid loss of data. : Step 4. Set the Date and Time This will allow the security video taken by Smartguard to display the correct date and time it was taken. 1. Push TIME/DATE SET button (see fig. 12) for 3 seconds. - Page 11 The LCD screen will shut off automatically 10 seconds later. Note: On the ”P” (photo) setting, SmartGuard will take a series of digital photographs at a rate of 1-3 photos every second when the motion sensor is triggered ①...
-
Page 12: Viewing Video
Step 5. Viewing video 1. Viewing image by computer through a card reader (see fig. 13) Open the waterproofed cover on the Smartguard Motion Light with Video Camera ② Press OFF/REC button and remove memory card (part no. -
Page 13: Technical Specifications
Technical Specifications Features and specification: PIR detection angle 180 Deg and detection range up to 32.8ft Records 20 seconds image recording for image stream: 10fps at 720P (HD) Built in memory card slot for memory card Memory card slot for additional storage, max memory size up to 32GB ... -
Page 14: General Information And Safety
General Information and safety Special care instructions!!! The Smartguard Motion Light with Video Camera is designed to be weather resistant. Never attempt to immerse the unit in water or any other liquid. This will damage the unit and void the warranty. -
Page 15: Fcc Information
FCC Information This device complies with Part 15 of the FCC Rules. Operation is subject to the following two conditions: (1) This device may not cause harmful interference, and (2) This device must accept any interference received, including interference that may cause undesired operation. Warning: Changes or modification to this unit not expressly approved by the party responsible for compliance could void the user’s authority to operate the equipment. -
Page 16: Faq (Frequently Asked Questions) Section
4000 Q. What happens when the card is full? A: SmartGuard will automatically return to the oldest file and save over it each time a new video clip is stored. That means you don’t have to take out the memory card unless you wish to review or save the video files.
Need help?
Do you have a question about the AEC-931A2BSD-SP4 and is the answer not in the manual?
Questions and answers