
Related Manuals for X-Rite Colormunki

Summary of Contents for X-Rite Colormunki
- Page 1 Quick Start Guide Kurzanleitung Guide de démarrage rapide Guida rapida all’uso Guía de Inicio Rápido 基本操作の手引き 快速入门指南...
-
Page 2: Important Notices
Important Notices CE Declaration Manufacturer’s Name: X-Rite, Incorporated Authorized Representative: X-Rite, Incorporated • Siemensstraße 12b • 63263 Neu-Isenburg • Germany Phone:+49 (0) 61 02-79 57-0 • Fax: +49 (0) 61 02 -79 57-57 Model Name: colormunki Directive(s) Conformance: EMC 89/336/EEC LVD 73/23/EEC... -
Page 3: Safety Information
100 mm may pose an eye hazard. EQUIPMENT INFORMATION Use of this equipment in a manner other than that specified by X-Rite, Incorporated may compromise design integrity and become unsafe. WARNING: This instrument is not for use in explosive environments. -
Page 4: Package Contents
Package Contents Lieferumfang Contenu du coffret Contenuto della confezione... - Page 5 包装内容 Contenido del paquete 1. ColorMunki. 2. Monitor holder and protection bag. 3. USB cable. 4. Quick Start Guide. 5. Software CD. 1. ColorMunki 2. Monitorhalterung und Schutztasche 3. USB-Kabel 4. Kurzanleitung 5. Software-CD 1. Instrument ColorMunki 2. Support pour moniteur et sac de protection 3. Câble USB 4.
-
Page 6: Installation
Installation 1 Installation 1 Installation 1 Installazione 1... - Page 7 Veuillez lire attentivement ces instructions avant de commencer à utiliser votre ColorMunki. Pour de plus amples informations, reportez-vous au contenu sur le CD. Installez l’application ColorMunki à partir du CD sur votre PC ou votre Macintosh ® Leggere attentamente queste istruzioni prima di utilizzare ColorMunki per la prima volta.
- Page 8 Installation 2 Installation 2 Installation 2 Installazione 2...
- Page 9 Die Software muss installiert werden ehe das Gerät per USB-Kabel an Ihren Computer angeschlossen werden darf. Installez le logiciel avant de brancher le câble USB à l’arrière du ColorMunki et de le connecter à votre ordinateur. Il software deve essere installato prima di collegare il cavo USB al ColorMunki e al computer.
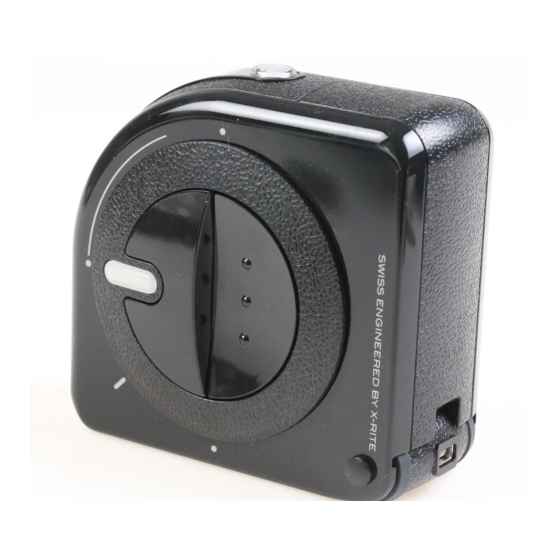
- Page 10 Overview 1 Übersicht 1 Présentation 1 Cenni generali 1...
- Page 11 概要 1 概览 1 Visión general 1 1. Rotary Disk to set measurement mode. 2. Target Flag to measure small color patches. 3. Target Lock to unlock and lock Target Flag. 4. Button to trigger measurements. 1. Wahlscheibe zur Auswahl des Messmodus 2. Zielhilfe zur Messung kleiner Felder 3.
- Page 12 Overview 2 Übersicht 2 Présentation 2 Cenni generali 2...
- Page 13 概要 2 概览 2 Visión general 2 Choose the measurement mode you want to work with by easily turning the Rotary Disk. Wählen Sie mit der Wahlscheibe den Messmodus, den Sie verwenden möchten. Sélectionnez le mode de mesure à utiliser en faisant simplement tourner le disque rotatif. Per scegliere la modalità...
- Page 14 Overview 3 Übersicht 3 Présentation 3 Cenni generali 3...
- Page 15 概要 3 概览 3 Visión general 3 Turn Rotary Disk to access desired mode: A. Ambient Light measurement mode. B. Projector measurement mode. C. Instrument Calibration mode. D. Monitor, Chart Scanning & Spot measurement mode. Drehen Sie die Wahlscheibe, um den gewünschten Modus zu wählen: A.
- Page 16 Calibrate Kalibrieren Étalonnage Calibrazione...
- Page 17 Drücken Sie die Messtaste, um eine Messung durchzuführen. ColorMunki führt eine Kalibrierung durch. Avant de commencer à prendre des mesures, vous devez étalonner votre instrument. Faites tourner le disque rotatif jusqu’à la position C et prenez une mesure en appuyant sur le bouton. L’étalonnage de ColorMunki nécessite quelques secondes.
-
Page 18: Spot Measurement
Spot measurement 1 Einzelmessung 1 Mesure ponctuelle 1... - Page 19 スポット測定 1 专色测量 1 Misurazione punto campione 1 Medición de color especial 1 Measure the color of a single patch. Choose the measurement mode D. Unlock the Target Flag by pressing the Lock Button. Messen Sie die Farbe eines einzelnen Messfeldes. Wählen Sie den Messmodus D. Drücken Sie den Schalter, um die Zielhilfe zu entsperren.
- Page 20 Spot measurement 2 Einzelmessung 2 Mesure ponctuelle 2...
- Page 21 Drücken Sie ColorMunki an, und lösen Sie die Messung mit der Messtaste aus. Une fois sorti, le guide vous permet de positionner avec précision le ColorMunki sur le patch de couleur à mesurer. Abaissez le ColorMunki sur le patch, puis prenez une mesure en appuyant sur le bouton.
- Page 22 Spot measurement 3 Einzelmessung 3 Mesure ponctuelle 3...
- Page 23 スポット測定 3 专色测量 3 Misurazione punto campione 3 Medición de color especial 3 Lock Target Flag after spot measurement by pushing the Target Lock button in the opposite direction. Sperren Sie die Zielhilfe nach der Einzelmessung wieder, indem Sie den Schalter wieder in die Sperrposition schieben.
- Page 24 Scan measurement 1 Scan 1 Mesure de nuancier 1...
- Page 25 スキャン測定 1 扫描测量 1 Misurazione di acquisizione 1 Medición de escaneo 1 Follow these steps for successful scanning of patches on color chart: 1. Make sure Target Flag is locked while scanning. 2. Start by placing the device on the test chart. Make sure the measurement aperture (indicated through indicator lamp ) is positioned on white area of the paper at the beginning of the row.
- Page 26 Scan measurement 1 Scan 1 Mesure de nuancier 1...
- Page 27 スキャン測定 1 扫描测量 1 Misurazione di acquisizione 1 Medición de escaneo 1 Siga estos pasos para escanear correctamente los parches en un gráfico de colores: 1. Asegúrese de que la Marca de Objetivo esté bloqueada durante el escaneo. 2. Empiece posicionando el dispositivo sobre el gráfico de prueba.
- Page 28 Monitor measurement 1 Monitormessung 1 Mesure de moniteur 1...
- Page 29 Das Gerät wird mit der Schutztasche an Ihrem Monitor befestigt. Die Tasche wird zusätzlich zum Schutz und Transport des Geräts verwendet. Le sac fourni vous permet de fixer le ColorMunki à un moniteur. Il protège également l’appareil et sert de sac de transport.
- Page 30 Monitor measurement 2 Monitormessung 2 Mesure de moniteur 2...
- Page 31 Sie das Gerät richtig herum in die Tasche stecken. Die Tasche passt formgenau. Ouvrez la fermeture à glissière du sac et placez le ColorMunki à l’intérieur en vous assurant de faire correspondre la forme du sac à celle de l’appareil.
- Page 32 Monitor measurement 3 Monitormessung 3 Mesure de moniteur 3...
- Page 33 Prüfen Sie, ob die Öffnung unten an der Tasche geöffnet ist, ehe Sie versuchen, Ihren Monitor zu kalibrieren. Connectez le ColorMunki à l’aide du câble USB. Fermez la fermeture à glissière du sac. Avant d’étalonner l’écran, vérifiez que vous avez bien ouvert le volet au-dessous du sac.
- Page 34 Monitor measurement 4 Monitormessung 4 Mesure de moniteur 4...
- Page 35 モニタ測定 4 显示器测量 4 Misurazione del monitor 4 Medición del monitor 4 Use the Velcro patches on the strap of the Bag to best accommodate your screen model. Smaller screens may require strap to be folded. Verwenden Sie den Klettverschluss an der Taschenschlaufe, um das Gerät an Ihrem Monitor zu befestigen. Für kleinere Bildschirme muss die Schlaufe eventuell umgeschlagen werden.
- Page 36 Monitor measurement 5 Monitormessung 5 Mesure de moniteur 5...
- Page 37 Misurazione del monitor 5 Medición del monitor 5 Fix ColorMunki in the middle of your display and start calibration by triggering from the software application. Befestigen Sie ColorMunki in der Mitte Ihres Monitors, und starten Sie die Kalibrierung aus Ihrer Software heraus.
- Page 38 Projector measurement Projektormessung Mesure de projecteur...
- Page 39 Siga la aplicación que lo guía a apuntar correctamente ColorMunki hacia el medio de la imagen proyectada. Configure la iluminación para el ambiente de visualización deseado minimizando la luz externa. Para obtener mejores resultados, la distancia de ColorMunki de la pantalla debe ser igual al ancho de la imagen proyectada. プロジェクタ画像の中央に ColorMunki を正しくターゲットするために、アプリケーションの手順に沿...
- Page 40 Ambient light measurement Umgebungslichtmessung Mesure de la lumière ambiante...
- Page 41 環境光の測定 周围光源测量 Misurazione Luce ambientale Medición de la luz ambiente To measure the ambient light, turn the Rotary Disk to the Ambient Light mode position A. Trigger the measurement by pushing the Button (indicated by arrow) or through the software application. Drehen Sie die Wahlscheibe auf Position A, um das Umgebungslicht zu messen.
-
Page 43: System Requirements
Macintosh: Power Mac G3 with 300 MHz,128 MB RAM, USB port, Mac OS X (10.3 or higher) The ColorMunki will not work if it is connected to the USB port on your keyboard or to a USB-Hub without external power supply. Power rating: 5VDC, 500mA. -
Page 44: Warranty Conditions
Repairs or replacement by X-Rite shall not revive an otherwise expired warranty, nor shall the same extend the duration of a warranty. X-Rite shall in no event be liable for losses or costs to Buyer in manufacturing, or for Buyer`s overhead, other expenses, lost profits, goodwill, or any other special, indirect, consequen- tial, incidental or other damages to people or property resulting from a breach of any of the foregoing warranties. -
Page 45: Support And Service
Do not try to dismantle the ColorMunki for any reason. Unauthorized dismantling of the equipment will void all warranty claims. Contact the X-Rite support or the nearest X-Rite Service Center, if you believe that the unit does not work anymore or does not work correctly. - Page 47 有毒有害物质或元素名称及其标识 Toxic/Hazardous Substances and Elements Table 部件名称 有毒有害物质或元素 铅(Pb) 汞(Hg) 镉(Cd) 六价 (Cr(VI)) 多溴联苯(PBB) 多溴二苯 (PBDE) 印刷电路板 ○ ○ ○ ○ ○ ○ PCB Board 主动电子件 ○ ○ ○ ○ ○ Active electrical part 被动电子件 ○ ○ ○ ○ ○ Passive electrical part 焊接金属...
- Page 48 Corporate Headquarters Room 808-810, Kornhill Metro Tower, 1 Kornhill Road, Quarry Bay, Hong Kong, China Asia Phone (+852) 2 568 6283, Fax (+852) 2 885 8610 Please visit www.xrite.com for a local office near you. TM Trademark of X-Rite. Part No. 42.13.94 (01/2008)
Need help?
Do you have a question about the Colormunki and is the answer not in the manual?
Questions and answers