Table of Contents
Advertisement
Advertisement
Table of Contents

Subscribe to Our Youtube Channel
Related Manuals for DAVID SLS-2

Summary of Contents for DAVID SLS-2
- Page 1 QUICK GUIDE...
-
Page 2: Table Of Contents
2.3. Connection 2.4. Installing the Camera Driver 2.5. Setting up the Projector 2.6. Setting up the Projector as Extended Desktop in Windows 3. The Scan Software DAVID 3.1. Software Updates 4. Setup and Calibration of the Scanner 4.1. Menu ”Hardware Configuration“... -
Page 3: Introduction
1. Introduction Thank you for choosing a DAVID product! In order to setup and run your 3D scanner safely, please read the following safety instructions. This manual is part of this product. In case of passing this product, please enclose this guide. -
Page 4: Scope Of Delivery
– Base rail with camera slide • Tripod with protective bag • Glass calibration panels + 2 fixing brackets 90° • USB flash drive with DAVID-Laserscanner Pro Edition and camera drivers • Projector Accessories – External power supply and power cable –... -
Page 5: Initial Setup
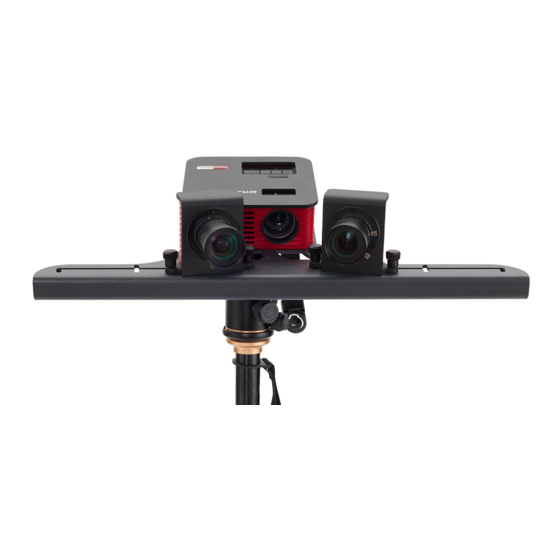
2. Initial Setup 2.1. Position of the Camera The camera can be mounted on the right or left side of the projector: Size of the scan object / Position of the Camera scan area (seen from rear) up to 110 mm to the left of the projector 110 to 350 mm optional, better to the left... -
Page 6: Connection
2.3. Connection Connect the camera, the projector and the DAVID USB flash drive according to the wiring diagram to your computer (Fig. 2.3). To connect the projector to your computer, you can use HDMI (recommended) or VGA. -
Page 7: Setting Up The Projector
2.5. Setting up the Projector The projector is already delivered with optimal settings, we recommend not to change anything in the menu. Note: You can restore the recommended settings in the projector‘s menu at any time as follows (See Figure 2.4.) 1 Select ”Reset“... -
Page 8: The Scan Software David
Any window can be moved between monitor and projector back and forth. So in case the main DAVID window is displayed on the projector, please grab its title bar with the mouse and drag it sideways onto the monitor. -
Page 9: Setup And Calibration Of The Scanner
4. Setup and Calibration of the Scanner An advantage of the modular design of the SLS-2 is that it can be adjusted to scan a wide range of objects sizes. Therefore, a calibration (measurement of the scanner hardware in the software) is necessary so that the software can then obtain precise and undistorted 3D data at the correct scale. - Page 10 Figure 4.2: Adjusting rings (A) aperture and (B) focus, Figure 4.3: Setup of the object and arrangement of the projector (C) fixing screws and camera 9 Camera brightness/aperture: The ”Projector Brightness“ slider in the software should be set to maximum. You should only reduce it if a clean modulation is not possible in the following.
-
Page 11: Menu "Calibration
10 Fasten all screws (projector, camera and camera slide), so that nothing can be displaced from now on. The camera lens dials can be fixed with their locking screws (C). The scanner is now optimized for your ob- ject (size of the scanning area, working distance, brightness of the object) and must be calibrated like this. 4.2. - Page 12 Figure 4.11: Ideal live camera image for calibration the scanner as a whole, and you can close the DAVID software and restart it without losing the calibration. You can also change the value of ”Projector Brightness“ to adjust the brightness (red sine curves) to the respective object to be scanned.
-
Page 13: D Scanning
5. 3D Scanning 5.1. Menu ”Structured Light“: Place the scanner and the object in front of each other, at the same distance as during setup and calibration. With a wrong working distance, the camera image and projected stripes would be blurred. If necessary, correct the distance between object and scanner, but by no means change the focus of camera or projector. - Page 14 Figure 5.3: Display of the scan result in 3D If you activate ”Auto. Grab Texture“, a color texture will be recorded with each scan. If the texture is too bright or too dark, you can adjust its settings in the ”Texturing“ menu (see next sub-chapter). You can toggle the visibility of the texture in the 3D view using the appropriate button under ”Visibility“.
-
Page 15: Menu "Texturing
White Balancing: Whenever you change the texture settings, you should re-perform the white balancing. That means DAVID calibrates color transmission characteristics of the entire system (projector, camera), in order to be able to measure the colors of the object correctly. For white balancing, the camera image must show exclusively a large white object (such as the glass calibration panels or a white wall). -
Page 16: Alignment And Fusion Of Multiple Scans
In the following, we will describe the general case how to fuse variously positioned scans. Notes on special cases and more detailed information can be found on http://www.david-3d.com/manual Figure 6.1: Menu ”Shape Fusion“ 6.2. Alignment of Multiple Scans In general, the individual scans are collected via the ”Add to List“ button during scanning. You can import more scans (OBJ) into the List of Scans - either by drag and drop from the Explorer, or using the ”+“... - Page 17 DAVID offers several alignment modes. First, start with the alignment mode ”Free“, which allows you to align arbitrarily positioned scans one-on-one. In order for the automatic mode to align two scans suc- cessfully, the two scans must have a unique region of overlap in common, which must not be too small.
-
Page 18: Fusion Of Multiple Scans
If the automatic alignment finds false solutions, you should activate ”Contact Pair Selection“ . Then you can help DAVID by clicking on distinctive points that are to be aligned with each other (e.g., tip of the nose). Relevant here is the area within the red circle at the mouse pointer. If you would like to define the contact pair points very precisely, zoom up close with the mouse wheel before you click. -
Page 19: Disposal / Recycling
7. Disposal / Recycling The electronic components of the DAVID 3D scanner, including disused batteries or accumulators, may not be disposed of as household waste. Every consumer has a statutory obligation to properly dispose of these items at officially designated points of disposal. In accordance with the EU Directive 2002/96/ EC on waste electrical and electronic equipment this must be disposed of in accordance with local regu- lations. -
Page 20: Troubleshooting
Make sure in the projector‘s menu that the keystone correction is off: Set the manual value to zero and deactivate the automatic. (*) (*) Requires recalibration Other possible problems and their solutions can be found on our website in the FAQ: http://www.david-3d.com... - Page 21 Small outliers will be automatically removed in the final processing step, Fusion. The color textures do not look good Open the ”Texturing“ menu and perform a new white balance. Other possible problems and their solutions can be found on our website in the FAQ: http://www.david-3d.com...
-
Page 22: Problems With Alignment / Fusion
8.2. Problems with Alignment / Fusion Problem Cause / Solutions Shape Fusion: The scans are aligned DAVID aligns the scans such that the overlapping areas are maximized. That completely wrong maybe causes wrong solutions if there are more than one matching overlap- ping areas. -
Page 23: Other Problems And Solutions
64-bit version ”DAVID_x64“. In 32-bit it can help to occasionally restart DAVID and not work with too many scans simultaneously. In the Advanced Settings under ”Service“, you can enable the ”Debug Conso- le“. It may show some useful information about the error. -
Page 24: Terms Of Warranty
After the warranty period has expired you still have the option of sending the defective device to your supplier or to the DAVID after-sales service for repair. Repairs made after expiry of warranty will be subject to a charge. Your statutory rights are not affected through this warranty. -
Page 25: Ce Declaration Of Conformity
11. CE Declaration of Conformity DAVID Vision Systems GmbH Rudolf-Diesel-Str. 2a 56070 Koblenz Germany hereby declares under sole responsibility that the product DAVID-SLS-2 is in conformity with the follow- ing standards or standardized documents: USB flash drive: EN 55022:2010 EN 55024:2010... - Page 26 BIBUS SK, s.r.o Trnavská 31, SK-94 901 Nitra Email: 3d@bibus.sk Tel.: 037/ 7777 911 http://www.bibus.sk Fax.: 037/ 7777 999...
Need help?
Do you have a question about the SLS-2 and is the answer not in the manual?
Questions and answers