Table of Contents
Advertisement
Quick Links
Advertisement
Table of Contents

Related Manuals for MikroKopter ARF-MikroKopter OktoXL

Summary of Contents for MikroKopter ARF-MikroKopter OktoXL
- Page 1 ARF-MikroKopter OktoXL Instruction manual...
-
Page 3: Table Of Contents
First Test flight................................18 Settings..................................21 Settings..................................21 Step 1: Setup MK-USB ............................21 Step 2: Connect MK-USB to the ARF-MikroKopter ....................22 Step 3: Download MikroKopter-Tool......................... 22 Step 4: First Start MikroKopter-Tool.......................... 22 Step 5: Connect battery with the ARF-MikroKopter ....................23 Step 6: Checking the channel assignment........................24... - Page 4 Maintenance.................................. 48 Technical Data................................49 Delivery ..................................50 License..................................50 Troubleshooting................................52 Fehlermeldungen (Error Codes)..........................53 Disposal..................................55 General..................................55 Batteries..................................55 Impressum..................................55...
-
Page 5: Introduction
The "Info-Arrow" shows locations with additional tips and hints. Intended Use The ARF-MikroKopter is a model aircraft. An appropriate liability insurance is mandatory for operation. Please check your insurance cover before using ! You as a user / pilot are responsible for a safe operation and correct function of the model ! The product is not a toy and it is not suitable for children under 14 years. -
Page 6: Safety
Plastic propellers can become brittle / fragile through time and by sun exposure. – Please observe the following notes: The pilot must be able to fly the ARF MikroKopter in any situation without aids, such as the GPS system. • •... -
Page 7: Functions Of The Arf Mikrokopter
Functions of the ARF MikroKopter The ARF MikroKopter comes with the GPS-System. You can use many additional functions with this GPS-System. Functions of the ARF-MikroKopter: Highly versatile. For example Photo / Video flight, action shots, inspection / maintenance flights, surveys, •... -
Page 8: Control
Control An ARF-MikroKopter is easy to fly. But it takes practice and time to be able to control the Kopter safely. The pilot must also be able to fly the Kopter in any situation without aids such as the GPS-System. -
Page 9: Flight Simulator
To get familiar with the controls we recommend practicing with the AeroSIM RC – Flight simulator. In this PC-Program various MikroKopter models can be flown like in reality. The same transmitter can be used, which is later also used for the control of the ARF-MikroKopter. -
Page 10: Battery (Lipo) - General Information
After landing the Kopter and turning off the motors the connection between LiPo and Kopter should be seperated. Keep the battery pack out of the ARF-MikroKopter if that one is not used (e.g. storage or transport). That avoids a fully discharge of the battery. -
Page 11: Charge Lipo
LiPo should cool down before the next recharge. The LiPo in the ARF-MikroKopter consists of multiple internal cells. In addition to the cable with the Deans connector another jack, the balancer, is connected with 5 cables to the LiPo. In that case the individual battery cells are monitored during charging. -
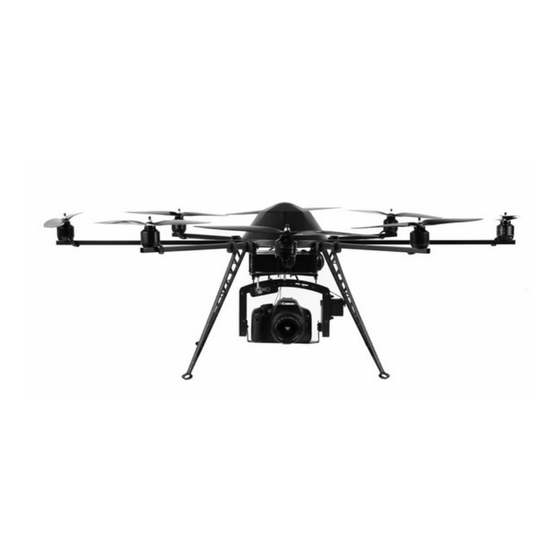
Page 12: Overall View
Overall View 1 – Protective hood 2 – Motor MK3638 with 12“ propeller 3 – Rigger 4 – Landing gear „HiLander-26“ 5 – Battery holder with LiPo 6 – Camera mount SLR2 (optional) 7 – Additional camera (optional) 8 – Video transmitter (optional) 9 –... -
Page 13: Connections At The Arf-Mikrokopter
ARF-MikroKopter Connections As shown in the „Overall View“ (Pg.7) the ARF-MikroKopter is already equipped with the FlightCtrl and the GPS-System (NaviCtrl + MKGPS). The GPS has an additional GPS-Shield to get a better receiving signal of the GPS-Satellites. All required connections can be found on the Flight- and NaviCtrl boards Some connections are already passed out on the bottom-side of the ARF-MikroKopter. -
Page 14: Final Assembly
Final Assembly First Test Flight Page 10 HiSystems GmbH... -
Page 15: Mounting The Battery Holder
Final Assembly First at all the landing gear, the battery holder, the propellers and a suitable receiver need to be assembled. info info For the first start-up the propellers should not be mounted. An assembly of the propellers can be done just before the first flight. For the assembly you need the following tools: Phillips screwdriver (Size PH1) •... - Page 16 The completely assembled battery holder needs to be mounted on the bottom side of the ARF-MikroKopter. For this purpose the cover must be removed from the Kopter. Now the battery holder can be fixed with the 4 supplied metal screws (M3x16).
-
Page 17: Assembly Of The Landing Gear
The numbering of the riggers is in a clockwise direction beginning with the different colored front rigger. Example: „ARF-MikroKopter“ with 8 rigger => Landing gear on rigger 2, 4, 6 and 8 (short riggers) Assembly step 1 - 4:... -
Page 18: Connecting The Receiver
A telemetry transmission of the Kopter to the transmitter is possible with the Graupner HoTT-System. info No other sensors are required. An appropriate mount for the GR-16 receiver is applied to the ARF-MikroKopter. This will be hooked up with the receiver to the back side of the battery holder. You need to connect: the three-wire PPM-Connection PPM-Sum-signal •... -
Page 19: Propeller Assembly
Propeller assembly Propellers should not be mounted for the first start-up of the Kopter. The ARF-MikroKopter comes with two different types of propellers: Propeller EPP1245 (for training flights) • Propeller CFK 12x3,8 (for flights with payload) • Both propeller types (EPP/CFK) are mounted in the same way. -
Page 20: Inserting The Battery
To keep the battery tight in the holder the hook and loop tape should be placed tightly against the lower hook and loop tape. To operate two 5000 LiPos together on the ARF-MikroKopter, those can be connected via the included Y-cable. In this case proceed as follows: If two of them been operated in parallel it is important to ensure that both batteries have the same charge. -
Page 21: Checking The Functions / First-Time Start
Checking the functions / First-time start Before the first flight the ARF-MikroKopter should be checked for its function. Here the functions of the individual channels, the motors and sensors can be checked using the MikroKopter-Tool. How to proceed you can read in „Settings“... -
Page 22: First Test Flight
This ensures that for the first test flight all auxiliary functions such as HoldAltitude, PositionHold and CareFree are off. Place the Mikrokopter on a sufficiently large and open flight field. The best way is on a model flight field so that no person, animals or property may be harmed. - Page 23 Starting / Stopping the motors: The ARF-MikroKopter software allows you to use a motor safety switch. This prevents that during the flight the motors could be switched off by mistake. To avoid an inadvertent maloperation this function is already set to the optional transmitters Graupner HoTT MC-32 / MX-20.
- Page 24 Settings Functions opt. Accessories Maintenance Troubleshooting Page 20 HiSystems GmbH...
-
Page 25: Settings
Settings for MikroKopter Tool and Transmitter If you make any changes to the following settings do not forget to write these changes into the ARF- info MikroKopter. This will be done with a „Click“ on the button (Write) which is located in the info bottom of the settings window. -
Page 26: Step 2: Connect Mk-Usb To The Arf-Mikrokopter
Step 2: Connect MK-USB to the ARF-MikroKopter After MK-USB been installed, ARF- MikroKopter can be connected. Please use the 10 pin ribbon cable to connect the MK-USB to the ARF-MikroKopter. Step 3: Download MikroKopter-Tool You can download the latest MikroKopterTool at the following internet address: http://mikrokopter.de/ucwiki/MikroKopterTool... -
Page 27: Step 5: Connect Battery With The Arf-Mikrokopter
Once the battery is connected to the ARF-Mikrokopter the initialisation begins. This initialization of the ARF-Mikrokopter consists of two parts: Each BL-Ctrl (Motor controller) on the ARF-MikroKopter checks its own connected motor. It turns each • connected motor a little bit and makes a tone sequence at the same time. -
Page 28: Step 6: Checking The Channel Assignment
Step 6: Checking the channel assignment Those, as well as all other settings, do not need to be changed in the first step. They are only there to verify. To verify the assignment / function of each channel, please open the settings dialog. This can be done by a „Click“... -
Page 29: Step 7: Testing The Camera Mount
MikroKopter are calibrated (Pg. 29). After the calibration of the Gyros the ARF-MikroKopter will „beep“ and the servos of the camera mount will adjust . Now the camera mount can be moved through Nick- and Roll direction via the two assigned potentiometer on the transmitter. -
Page 30: Step 8: Camera Trigger
After the calibration of the Gyros (Pg. 29) the functions on the servo outputs 3+4 can be used. If everything is checked and set you get back to the main window of the MikroKopter Tool by clicking the button „OK“ (down left). Page 26... -
Page 31: Step 9: Test Motors Individually
(Uncheck „Motortest active“ box) Step 10: Test Gyroscopes The ARF-MikroKopter is controlled by different sensors. You can check the function of the sensors „ACC“ and „Gyro“ in the KopterTool. Important: To be able to check the sensors you need to click on the button „->FlightCtrl“... -
Page 32: Calibration
On the other side the Gyros must be calibrated new after each switching ON (or battery change). If you don't do that you are not able to start the ARF-MikroKopter and a warning signal will sound while trying to start. -
Page 33: Gyroscopes (Gyros)
Gyroscopes (Gyros) For a proper flight function the gyroscopes need to be calibrated after connecting a LiPo. If you don't do that you are not able to start the Kopter and a warning tone will sound while trying to start the Kopter. On your transmitter you do as follows: Throttle-Stick up •... - Page 34 Align the Kopter with the front (rigger / Motor No.1) • towards south or north. Then turn the Kopter a few times over the • Nick-Axis until the buzzer stops „creaking“. Step 4 - Calibration of the Y-Axis (Roll-Axis) Method: •...
-
Page 35: Functions / Flight Modes
Functions / Flight modes The ARF-MikroKopter has 5 individual settings. All 5 parameters are already set at the factory and need not be changed. Which channel / switch is provided for the activation of the individual functions please get out of the chapter Channel assignment. -
Page 36: Gps-Functions
PositionHold: If the function PositionHold is activated the Kopter holds the actual position. Here, the ARF-MikroKopter can, depending on the received signal from the satellites and the accuracy of the GPS- System move around its position (1-3 m). If you move the sticks on the transmitter the Kopter will move in the appropriate direction. If you release the sticks on the transmitter the Kopter will hold the new position. -
Page 37: Teachable Carefree
Teachable CareFree Prolog: The function CareFree helps the pilot to control the ARF-MikroKopter in a contact flight. It also helps if the Kopter is far away and you cannot determine the front of the Kopter anymore. On the ARF-MikroKopter the different colored rigger No. 1 is the „front“. If you control now the MikroKopter via the transmitter the Kopter flies forwards if the „Nick“-Stick will be moved forwards. - Page 38 Function outside the 20-Meter radius around the starting point: If the ARF-MikroKopter is outside the 20-Meter radius around the starting point, and can't be easily seen, it doesn't matter here which direction the front (rigger No.1) of the Kopter points.
-
Page 39: Failsafe
During an interruption / disturbance of the radio link between the transmitter and receiver the function FailSafe will automatically be activated. The purpose of this function is to bring the ARF-MikroKopter, in case of a lost receiving signal, back into the range of the transmitter to restore the receiver signal. -
Page 40: Waypoint Flight
WayPoint Flight With the ARF-MikroKopter and the MikroKopter-Tool WayPoints can be set anywhere on the map and then flown automatically. Here now the Bluetooth-Set is used. The WayPoint program can be opened after a „Click“ on the button „OSD“ in the KopterTool. - Page 41 WayPoint the current alignment will be maintained. When the ARF-MikroKopter reaches the last WayPoint, the Kopter will stop there. To get the ARF-MikroKopter back to the starting point all functions like (Hold Height, CareFree, ComingHome) need to be deactivated to manually fly back the Kopter.
-
Page 42: Acoustic Signals - Led Displays
• gives a „tone interval“ and the appropriate motor moves for a short time. After that, a long „beep“ will sound from the buzzer of the ARF-MikroKopter, followed by 4 short beeps. • After a short break a last „beep“ will sound and the initialization is finished. -
Page 43: Installation Of The Optional Accessories
Installation of the optional accessories Optionally, various accessories can be purchased for the ARF-MikroKopter. This includes for example a transmitter with receiver, a camera mount, a mechanical cable release or a programmable remote with zoom function for different camera models, and more. -
Page 44: Transmitter Assignment: Graupner Mx-20
Transmitter assignment: Graupner MX-20 Assignment: Page 40 HiSystems GmbH... -
Page 45: Transmitter Assignment: Graupner Mc-20
Transmitter assignment: Graupner MC-20 Assignment: HiSystems GmbH Page 41... -
Page 46: Transmitter Assignment: Graupner Mc-32
Transmitter assignment: Graupner MC-32 Assignment: Page 42 HiSystems GmbH... -
Page 47: Mounting The Camera Mount
The camera mount SLR1 or SLR2 needs to be mounted to the four edge-screws of the battery holder. For the control of the two servos on the camera mount, located at the bottom of the ARF-Mikrokopter, there are two coupling, labeled with „R“ (Roll) and „N“ (Nick). -
Page 48: Camera Trigger - Shuttercable
Camera trigger - Shuttercable The Shuttercable can be ordered with a 2.5 mm jack or a N3 connector. Using the Shuttercable, an attached camera can be triggered manually by the transmitter or automatically via the FlightCtrl (e.g. during WayPoint flight). The Shuttercable is connected with the BEC-coupling to the prepared switch output „Out2“... -
Page 49: Camera Trigger - Ir-Ctrl / Lanc
Camera trigger – IR-Ctrl / LANC To trigger or control a camera / video camera with IR-receiver or LANC, the IR-Ctrl can be used. IR-Ctrl may either be purchased with an IR sensor or a LANC terminal. This allows to send a total of 4 control commands to the used camera / video camera. -
Page 50: Installation Of The Video Transmitter
Installation of the video transmitter On the ARF-MikroKopter the appropriate video transmitter „NANO Stinger“, can be attached directly to the camera mount SLR1/2. For this purpose a suitable clip for the video transmitter is included. Step 1: The cable for the video transmitter for strain relief is attached to the camera mount with a cable tie. -
Page 51: Connection Bluetooth-Set
Bluetooth- Module. Step 2 The Bluetooth-Module is connected with the 10-pin connection cable to the bottom of the ARF-MikroKopter and hooked up to the LiPo holder. Step 3 Connect the Blutooth-Module-USB to the PC / Laptop Now the module on the Windows PC should be automatically detected and the appropriate drivers should be found online and installed. -
Page 52: Maintenance
Maintenance You as the user / pilot of the ARF-MikroKopter must ensure a proper operation of this aircraft. To ensure a proper function of the ARF-MikroKopter a review and regular maintenance of the Kopter is absolutely necessary before every flight. -
Page 53: Technical Data
Brushless Motors (OktoXL = 8 Motors) ◦ Control: • Control via a suitable RC-transmitter and receiver with either PPM-Sum signal or S.BUS ◦ Weights: • ARF-MikroKopter (without battery/payload) = 2050g ◦ Battery 4S/5000 = 520g ◦ recommended max. payload = 2500g ◦... -
Page 54: Delivery
◦ License The ARF MikroKopter is already equipped with the required license for commercial use. A Micro SD-Card is already inserted into the NaviCtrl and contains your personal license file and the license number. With the license additional functions are usable with the Kopter: Greater range of 500mtr. - Page 55 When you apply for the permit you will typically need the proof of liability insurance, the technical data and the purpose of the ARF-MikroKopter as well as the name / address of the applicant and also the pilot. HiSystems GmbH...
-
Page 56: Troubleshooting
Troubleshooting Error: Source: Motors do not start. Compass is not calibrated. • The motor safety switch hasn't been pressed at the same time • with „Gas-Stick“ down + „Yaw-Stick“ to the right. Battery is not connected. • Transmitter is not switched ON. •... -
Page 57: Fehlermeldungen (Error Codes)
Fehlermeldungen (Error Codes) Sollte ein Fehler am ARF-Mikrokopter auftreten, wird dieser im Display des HoTT Senders oder über das KopterTool angezeigt. Error1 "FC not compatible " adjust new. Eventually change Gyro. Source: The FlightControl Software is not compatible to the Error11 "ERR: FC Roll Gyro"... - Page 58 Error17 "ERR: FC I2C" Source: The I2C-Bus to the Bl-Ctrls is disturbed. Error28 "ERR:Flying range!" Remedy: Check power supply of the Brushless-Controller. Source: On the Micro SD-Card is to the file "SETTINGS.INI" Check wirering of the I2C-Bus (C and D right the parameter "MAX_FLYING_RANGE"...
-
Page 59: Disposal
Disposal General A disposal of individual parts or the ARF-Kopter after end of its life must be done in accordance with applicable law. Batteries Disposing batteries in household waste is prohibited. Used or defective batteries can be given e.g. free of charge at your community or anywhere, where you can buy batteries / accumulators.
Need help?
Do you have a question about the ARF-MikroKopter OktoXL and is the answer not in the manual?
Questions and answers