Advertisement
Quick Links
Advertisement

Summary of Contents for Dyson Bike
- Page 1 User Guide - The Hard Tail 2014 Dyson Bikes page 1...
- Page 2 2014 Dyson Bikes page 2...
- Page 3 Contents Page Item ______________________________________________________________ Acknowledgements and Foreword Symbols and Users‟ information and Responsibility Components Description and Specification Assembly Instruments Mechanical Operation and Adjustment Electric Operation and Adjustment Safety Maintenance and Care Trouble shooting Warranty Maintenance Records 2014 Dyson Bikes page 3...
- Page 4 Dyson Bikes. Foreword Thank you for purchasing a Dyson e-bike, we are certain you will enjoy it for many years to come. Please take the time to read this instruction manual thoroughly before assembly (if required), and taking your first ride.
- Page 5 The e-bike is intended only for riding on paved roads and trails. Do not use it for off-road purposes. Do not use it in water, for jumping, stunting or in competitive sports events.
- Page 6 Learn how to operate all standard and accessory equipment on the e-bike. Ensure that anyone who uses the e-bike has been fully instructed in the operation of its mechanical and electrical functions. Your e-bike conforms to relevant Australian standards (AS NZS 1927-2010 Pedal bicycles - Safety requirements and European Committee for Standardization EN 15194:2009+A1:2011 Cycles –...
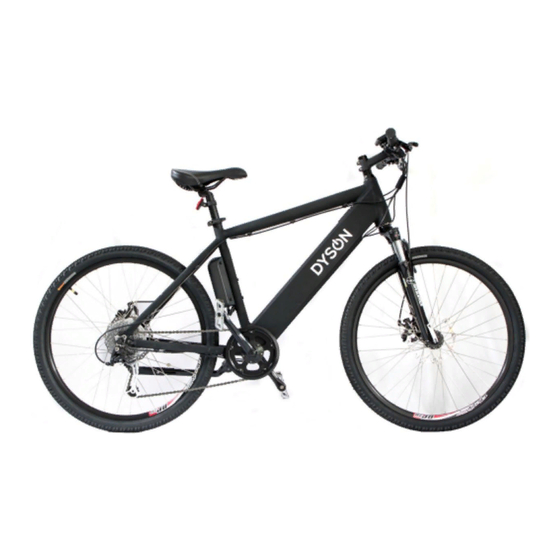
- Page 7 Section-1 Component Description and Specification An e-bike consists of various mechanical parts such as the frame, wheels, brake, handlebar, saddle etc. Please take the time to familiarise yourself with this terminology; it will make basic operation and maintenance instructions easier to follow.
- Page 8 General Wheel size 26 inches Dimension LxWxH 1660x235x850 mm 280 – 460 kPa Tyre Pressure range Valve type Schraeder Dimension (packing) LxWxH 1840x255x980 mm Net Weight (battery included) 22 kg Range on one full charge Approx. 60~70 km* Max. load of carrier (if fitted) 25 kg Permissible total weight 120 kg...
- Page 9 Section 2 - Assembly Instructions If you have purchased your new e-bike online and had it delivered, you will need to carry out some minor assembly before your e-bike can be ridden. If you have purchased an assembled e-bike please continue reading from Section 3 on page 12.
- Page 10 More information regarding handlebar adjustment can be found on page 14. Step 4. Locate pedals and use 15-mm spanner to attach to crank arms as shown in the image shown here. Note that the pedals are marked „L‟ for left and „R‟ for right. The Left pedal has a left hand thread and needs to be tightened in an anti-clockwise direction;...
- Page 11 Further notes on battery care can be found under Section 4.2 Battery and Charger. Step 6. Your e-bike is now assembled, but it is not quite ready for the first ride. Please continue to read through this manual paying particular attention to Section 3 ensuring that all bolts screws etc. are firmly tightened to the recommended specification.
- Page 12 To ride safely and comfortably your e-bike and its equipment must be matched properly to the size and skills of the rider. An e-bike that is too big or too small for the rider is hard to control and can be uncomfortable.
- Page 13 Keep the disc rotors and brake pads clean and free of lubricants, waxes or polishes. WARNING The e-bike is equipped with a front disc brake and it can achieve a very high braking force. In sharp turns, on sandy or slippery roads, wet asphalt and icy paths; apply the front brake carefully, so that the front wheel will not slip.
- Page 14 Note in the lower gears the crank will turn more in relation to the road speed, this will cause the e-bike controller to provide greater assistance. With experience you will learn the best gear to use in conjunction with the PAS level to maintain the desired road speed.
- Page 15 3.7 Tyres Ensure tyres are correctly inflated. Under inflated tyres can lead to punctures or damage to rims. In addition to standard manual air pumping, the tyres can be inflated with air compressor devices like those found at service stations. We recommend a tyre pressure for front and rear at 420 kPa, (equivalent to approximately 60 PSI or 4.1 Bar).
- Page 16 The forks can be set to the locked position by a level located on the top right hand leg. In the event that the front forks need to be replaced it is critical that they are replaced with a component of the same specification. Forks of a different size may cause your e-bike to become unsafe.
- Page 17 We recommend you disable the assistance in hard rain, in sandy terrain and in heavy traffic. If you have to wheel the e-bike, switch off the control panel in case the motor might suddenly start due to an unintended crank rotation.
- Page 18 NOTE Two keys are supplied with your e-bike; store one in a safe place in case the other is lost. To charge the battery plug the charger into a regular 240-Volt wall socket, the other small plug can then be inserted into the battery by lifting the small flap next to the battery power switch.
- Page 19 Before re-using the battery after long periods, charge the battery fully. Keep the battery as close to normal room temperature as possible by parking the bike out of the sun on hot days and not leaving in hot cars or sheds. If necessary remove the battery from the bike.
- Page 20 4.3 Control panel 4.3.1 Display indication The display indicates the key functions of the e-bike such as battery charge status and PAS level. The control panel is operated by the three buttons located on the small pad on the left hand side of the handlebars.
- Page 21 Parameter 1 - Wheel diameter. Press „UP‟ or „DOWN‟ buttons, and select „26 inch‟. Confirm the wheel size by pressing „MODE‟. Parameter 2 - Display background lighting level The second set parameter is the brightness of the display background lighting. ...
- Page 22 “DOWN” button for a few seconds and deactivate this mode by releasing the button. This will activate the motor without pedaling to maintain a walking speed. NOTE Riding the bike with the display off will not record mileage. 2014 Dyson Bikes...
- Page 23 The odometer measures total distance traveled, however please note distance traveled will not be recorded if the bike is ridden without assistance and the display off. To zero the „TRIP‟ meter during a ride: ...
- Page 24 To access this information: Press and hold „UP‟ button for 3 seconds until „AVG-SPEED‟ is displayed. Press and hold „UP‟ again until „MAX-SPEED‟ is displayed. Press and hold „UP‟ button again to go back to the normal indication. 4.4.9 Power Indicator The display shows the power consumption in Watts while riding.
- Page 25 The problem must be resolved before the e-bike can return to the normal state. Do not ride the e-bike with assistance active before the issue has been rectified. Riding as a regular bike with the main battery switch off is OK to complete your journey. 2014 Dyson Bikes page 25...
- Page 26 Check for cuts or cracks, replace damaged tyres before they puncture. □ Wheels: are they straight and true? Spin each wheel and check for brake clearance and side to side wobble. If a wheel wobbles it may be buckled. If buckled take to an experienced e-bike repairer to rectify.
- Page 27 5.2.5 Riding in the wet We highly recommend that you do NOT ride your e-bike in wet weather. Wet weather affects visibility for all road users. It is harder for any vehicle to stop in the wet. Allow more distance to stop while braking.
- Page 28 Wipe the e-bike with a damp micro-fiber cloth. Never hose or flush the e-bike, as this has a risk of damaging electrical parts and it can also wash the lubricants from the drivetrain.
- Page 29 Wheels Check rims for accuracy and spokes for evenness of tension. Replace any bent or broken spokes. Make sure that the wheel is mounted centrally in the frame. Brakes Check brake pad and brake lever mounting bolts. ...
- Page 30 The battery will heat up under heavy load. Pay attention to the room temperature before charging and place the battery where it‟s cool. Protection against moisture: Avoid riding the e-bike in standing water or in pouring rain, otherwise the electronic parts or connections could be damaged. ...
- Page 31 The maximum battery life can be achieved if you charge it at ambient temperature between +10℃ and +30℃. Avoid extended exposure to the sun or an environment of over 60℃ (for example in vehicles or sheds). Keep water or moisture out of the charging jack. ...
- Page 32 If all cables are correctly connected and the error code is still shown, contact an authorised repairer. Note: You may ride the e-bike trouble-free as an ordinary bike without assistance in this case! 2014 Dyson Bikes page 32...
- Page 33 If a Bike, Part or Accessory is defective (other than for the Warranty exclusions specified below) during that period, we will replace or repair it at our cost. To make a claim please return the complete Bike, defective Part or Accessory to the place of purchase.
- Page 34 Your e-bike is a mechanical product, which needs to be maintained regularly. We recommend the first service after approx. 100 km or 3-months. After that, we recommend servicing by a trained e-bike technician every 1,000 km or 12-months whichever is greater. Service 1: 100km / 3-months...
- Page 36 Dyson Bikes - 40 Catherine Road - Bentleigh East Vic 3165 w. dysonbikes.com.au – e. info@dysonbikes.com.au – p. 0497 357 117 ABN 211 656 485 00 – Printed May 2014...
Need help?
Do you have a question about the Bike and is the answer not in the manual?
Questions and answers