Advertisement
Advertisement

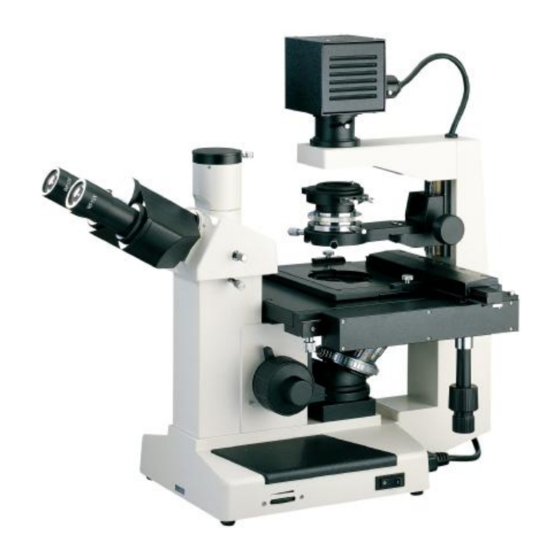
Summary of Contents for VistaVision 82026-630
- Page 1 Inverted Microscope Model 82026-630 Operating Manual...
- Page 2 Operating Manual of Inverted Microscope Congratulations ! Thank You for your purchase of a VWR VistaVision Microscope This unit is a precision optical instrument. Our product has been design to provide the highest level of safety. However, improper operation or negligence in following the instructions in this manual may cause personal injuries and property losses.
- Page 3 Operating Manual of Inverted Microscope Safety Precautions & Reminder 1. Be sure to turn off the power switch and remove the power cord plug before Warning! installing this unit, replacing the bulb / fuse or plugging and unplugging the power supply unit. This is to prevent electric shock or getting fingers burnt. 2.Check unit voltage is in compliance with your local power supply voltage, Warning! otherwise contact your supplier.
-
Page 4: Table Of Contents
Operating Manual of Inverted Microscope Table of Contents I. Characteristics and applications ....................- 1 - II. Structural features ..........................- 1 - III. Installation of this unit ........................- 2 - IV. Technical specifications ........................- 4 - V . Operation ............................... -
Page 5: Characteristics And Applications
Operating Manual of Inverted Microscope I. Characteristics and applications The inverted microscope adopts an inverted structure that focuses by lifting or lowering the objectives, and is provided with long working distance plan objectives and Wide-field plan eyepieces. The long working distance condenser system can be placed into or out of the light path, and is suitable for tissue observation in a high culture dish. - Page 6 Operating Manual of Inverted Microscope III. Installation Before installing, be sure every components is clean, no score any ! Caution parts or glass surface. Fig. 2 - 2 -...
- Page 7 Operating Manual of Inverted Microscope There are 2 styrofoam boxes within the carton box. a) The first box contains 6 objectives (3 pcs plan objectives 10X, 25X & 40X with single colored ring and 3 pcs plan phase contrast 10X, 25X & 40X with double colored rings and marked “PHP2”), 1 trinocular, 2 eyepieces, 1 centering telescope, 3 filters , 1 spare fuse and1 spare lamp.
-
Page 8: Technical Specifications
Operating Manual of Inverted Microscope IV. Technical specifications Total magnification 100X-400X (standard) Mechanical tube 160mm Main parameters length Conjugate distance 195mm of objective field of view WF 10X Eyepiece number Ф20mm Wide-field plan Parfocal distance Eyepiece interface eyepiece 10mm field of view Ф23.2mm WF 16X (optional) number Ф11mm... -
Page 9: Operation
Operating Manual of Inverted Microscope V. Operation ● Inverted Microscope Operation 1. Turning on the power switch and brightness adjustment ① ② Fig. 5 Turn on the toggle switch ① on the right of the body frame , so that the transmitted halogen bulb is illuminated. - Page 10 Operating Manual of Inverted Microscope 3. Adjustment of phase-contrast device Set the phase contrast puller ① to the central light hole, as shown in Fig.7. ① Fig. 7 4. Reset of diopter adjustment ring ring ① on the left eyepiece tube, so that the “0” d Turn the d position is iopter adjustment...
- Page 11 Operating Manual of Inverted Microscope ③ ② ④ ⑦ ⑤ ① ⑥ Fig.9 B. open the aperture diaphragm ④, and close the small field diaphragm ①, when a light spot as shown in Fig.11-a can be seen in the field of view. If the edge of the light spot is unclear, it can be made clear by adjusting the condenser height control knob ②.
- Page 12 Operating Manual of Inverted Microscope B. At this point, a bright light spot will be shown on the white paper, with a filament image inside. If the filament image is unclear, it can be made clear by adjusting the collector lens adjusting handle ④.
- Page 13 Operating Manual of Inverted Microscope (2) Adjust the stage moving device control knob ① and ② so that the observed area is right above the objective for easy observation and adjustment, as shown in Fig. 15. ① ② Fig.15 8. Coarse and fine focusing control knob operation (1) Focus with the 10X objective Turn the nosepiece ①...
- Page 14 Operating Manual of Inverted Microscope 9. Adjustment, assembly and removal of stage moving device (1) The longitudinal (Y) and transverse (X) movement of the stage moving device ① is realized by the longitudinal adjusting knob ② and the transverse adjusting knob ③ that are coaxial, as shown in Fig.
- Page 15 Operating Manual of Inverted Microscope The stage moving device is the key part for carrying the specimen and the culture dish. Do not lay it laterally or overhead after removal, otherwise it is likely to drop, Caution affecting its precision. It should be laid flatly on the worktable upside down. (3) Diopter adjustment Diopter can be adjusted by the diopter adjusting ring ①...
- Page 16 Operating Manual of Inverted Microscope 3. Centering of phase contrast device (1) Remove one eyepiece from the eyepiece tube, and insert the centering eyepiece ② into the eyepiece tube, as shown in Fig. 20-a. (2) A dark ring ④ and a bright ring ⑤ can be observed in the field of view of the centering eyepiece, as shown in Fig.
-
Page 17: Replacement Of Bulb And Fuse
Operating Manual of Inverted Microscope ● Operation of Trinocular Device This unit performs visual inspection and photographic observation through push-pull changeover. 1 Loosen the fastening screws ② of the photographic output tube, and remove the dust cap ① of the photographic output tube as shown on Fig 21 2 Mount the photographic device on the output tube, and then tighten the fastening screws. -
Page 18: Maintenance
Operating Manual of Inverted Microscope ● Replacement Of The Main Unit Fuse The fuse of the main unit is a circuit system used for halogen lamp, and is integrated into the power input socket ③ of the main unit. 1. Turn off the power switch ①, and unplug the power cord ②, as shown in Fig. 24. ②... -
Page 19: Troubleshooting
Operating Manual of Inverted Microscope 5. Keeping: When this unit is not to be used for a long time, turn off the power supply of this unit, allow the bulb to cool down sufficiently, put on the dust shield, store this unit at a dry, ventilated and clean place free from any acid, alkali or steam, otherwise mold may develop on the lens. - Page 20 Operating Manual of Inverted Microscope There is oil or any foreign object on the edge of the field of view Wipe the diaphragm edge. diaphragm. The objective is damaged. Repair the objective (by a professional). There is oil or dust on the surface of Wipe the objective or the eyepiece.
Need help?
Do you have a question about the 82026-630 and is the answer not in the manual?
Questions and answers