
Subscribe to Our Youtube Channel
Summary of Contents for HD DVB-S2
- Page 1 ======================= DVB-S2 High Definition Set Top Box =======================...
-
Page 2: Safety Precaution
SAFETY PRECAUTION CAUTION: The lightning flash with arrowhead Warning: The exclamation point within an symbol, within an equilateral triangle, To reduce the risk of electric shock, equilateral triangle is intended to is intended to alert the user to don't open the cabinet. Refer alert the user to important operating "dangerous voltage"... - Page 3 QPSK, 8PSK, 16APSK Transport Stream MPEG-2 ISO/IEC 13818 Transport Stream Specification MPEG Profile Level MPEG2 SD, MPEG2 HD, H.264/AVC SD, H.264/AVC HD LNB Power & Polarisation Vertical +13.5V, Horizontal 18V, Current: MAX 500ma, Multi Satellite receiving 22K switcher, DiSEqC1.0, DiSEqC1.1, Unicable , DiSEqC1.2, USAL Conditional Access system 1 Common Interface Slots ;...
-
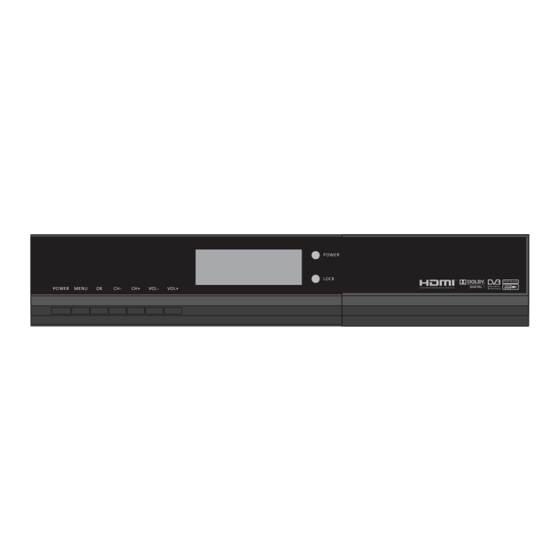
Page 4: Front Panel
Front Panel Bottom Name Function STAND BY Stand by Switch standby/play mode MENU Main Menu Enter into main menu confirm -VOL Volume - Volume down +VOL Volume + Volume up Channel - Channel down Channel + Channel up... -
Page 5: Rear Panel
Rear Panel Bottom Name Function POWER Power swicth On/off ETHERNET ETHERNET RJ-45(to ethernet) RS-232 RS-232 Connect to a PC fro SW upgrade HDMI HDMI port HDMI 1.3output USB port Connect to usb CVBS CVBS Connect TV through RCA AUDIOR/L AUDIOR/L Connect to audio R/L to TV/ Audio LNB IN LNB IN... -
Page 6: Table Of Contents
CONTENTS QuickStart ..........................................RemoteController ....................................BasicOperation ......................................1.Edit Channel ........................................................................1.1TV Channel List ................................... 1.2Radio Channel List ........................................1.3Favorite ......................................... 1.4Delete All 2.Installation ............................................................... 2.1Antenna Antenna&satellite Quick Setting ......................................2.2SatelliteList ..................................... 2.3Antenna Setup ..................................2.4Single Satellite Scan ................................... 2.5MultiSatellite Scan .................................... -
Page 7: Quickstart
Quick Start Turn on STB Connect the STB’s main power and turn on the power switch. When the first time turn on the STB there’s no channels in the system. So the STB will enter into mainmenu directly. 1. If user connect STB with TV by A/V cable the TV will show”no OSD, pls press V. Format” when the first time you turn on the STB. - Page 8 Record In recording mode, there will show a window on the screen. Like below pic. Shows. In recording mode, user can press RECORD again to set Duation. In playing mode, press RECORD can record the current playing show. After user press RECORD there will show a symbol on the right side of the screen, llike “REC”.
-
Page 9: Remotecontroller
RemoteController... - Page 10 Power Switch the STB between standby and play mode. AUDIO In full screen, press AUDIO there will show a window of “Audio”. User can press Left/Right/Up/Down to move hightlight to choose the letter and press OK to input the selected letter into the dialogue.
- Page 11 SATLIST RECALL In full screen, press SATLIST can open satellite list. User In full scree, press RECALL the STB will switch to the can find all the scaned satellite in the list. previous channel from the current one. INFO TEXT In full screen, press INFO there will show a window on the In full screen press TEXT can open teletext page on the bottom of the screen.
-
Page 12: Basicoperation S
Basic Operations When first time turn on the STB, the system will enter into the Main Menu, as following shows. 1.1.1 Favorite There are six symbols on the left side of Main Menu. Choose different symbol, user can enter into different menus, like Edit Channel, Installation, System Setting, Tool, Media and Network Setup. - Page 13 3 . Press EXIT to exit from the current mode. 1.1.5.Edit After exit from the window, the STB will ask user to Press Blue color key can enter into Edit mode. input password if he/she want to watch the locked channel. The default password is “0000”.
-
Page 14: Radio Channel List
Press OK on any of the Fav group can open a rename The above pic. is the “Rename window”. window, as below shows. Red color key can switch between capital letter and small letter. Green key can delete the char on the cursor. Yellow key can save the modification. -
Page 15: Installation
Q&A Q : If I incautiously delete all channels, what should I do? A : 1. User can go to Installation menu and scan the satellite once again. 2. If there’s channel in the STB since the first time user get it, then user can restore the channels by “Factory Setting”. -
Page 16: Antenna Setup
Red key to switch between capital/small letter Option: Disable/ Port 1/2/3/4 Green key to delete input character 6 . DiSEqC1.1: press Left/Right to choose Yellow key to save the edition and close the Option: Disable/ 1 Cascade M1 Port 1,2,3,4/ 1 window Cascade M2 Port 1,2,3,4/1 Cascade M3 Port 1,2,3,4/2 Blue key to cancel adition operation and exit from... -
Page 17: Single Satellite Scan
Limit setup search”) Press OK on “Limit seup” can enter into it’s setting 5 . Scan Mode: press Left/Right to choose “Blind scan” window as below. /”Preset Scan”. 6 . Search: press OK on “Search” the STB will start to scan the set satellite. -
Page 18: Lnb Powersetting
picture shows. In TP list menu, press Blue color key to open “TP In “TP Edit” user can edit the chose TP. Like the search” window. As the picture shows. Frequency, Symblo Rate and Polarity. After finished the setting pls press OK on “Save ” to save the settings.If user don’t want to save the setting, he/she can press OK on “Cancel”... -
Page 19: System Setting
to he/her needs. If the channel streams have the set language, 3 . System Setup then user can see the teletext in set language. If there’s no set language in the channel stream, then STB will not show the teletext in set language but in the default language of the channel. -
Page 20: Local Time Setting
3.4. Local Time Setting When enter into “Local Time Setting” menu, the system will show a menu as below. Once the Timer is ON, the timer will work not matter the STB is in standby mode or playing mode. 1 . Timer Mode: press Left/Right to choose Option: OFF/ Once/ Daily 1 . -
Page 21: Osd Setting
and press OK to open a new windon like Information, Factory Setting, Common Interface, CA Slot Setting, Upgrade By USB, Dump By USB, Remove USB device safely. 4.1. Information If the STB has been set a menu lock, there will show a dialogue asking user to input password before user enter into the Parental Lock menu. -
Page 22: Ca Slot Setting
When the STB don’t insert CI modual, the Common "Start"---press OK on "start" to the upgrading Interface menu will show “Slot 1: Not Available ” When the STB insert a CI modual, user can press OK on “slot 1: XXXX” to enter into the card information menu.In the card information menu, user can check the detail informations. -
Page 23: Remove Usb Device Safely
If user want to dump a Misc file, pls chooose the Dump In Media menu, user can press UP/DOWN to move Mode as "Misc Files". Then you'll see the below window. User highlight and press OK to open a new window like HDD can choose the files he/she want to dump by press green key, Information, PVR Setting or Media Player. - Page 24 Sort User can press UP/DOWN to movehighlight to choose Default/Name (A-Z)/ Name (Z-A)/ Image list/Music list the press OK on any of the choice to sort the list. User can see Music, Image, Video and Record and the top of the above window. press 1 to to switch media format Press EXIT to exit form the window.
-
Page 25: Networksetup
In Record menu, user can check all the available 5.3.3 Video record in HDD or U-disk.Red key to rename,Green key to lock, Yellow key to delete. Lock Press UP/DOWN to move highlight in the record list to choose the one user want to lock. When a record has been locked there will show a lock mark on the right side of the record. -
Page 26: Network Setup
In “Network Setup” menu,user can press UP/DOWN to move highlight and press OK to open a new window like Network local setting and Twin Protocal setting. 6.1. Network Set up When enter into “Network Local Setting” menu, the system will show a menu as below. In“Add update Files”... -
Page 27: Mgcamd Plug Setup
If STB cann’t read any MGcamdIf use don’t want to Red color key to switch capital/small letter load C-line, press Blue key/EXIT to cancel the operation/exit Green color key to delete the inputted char from the current window. Yellow color key to make confirm Q&A Blue color key to cancel the operation and exit. -
Page 28: Twin Protocol Setup
User can switch server setting ON/OFF by pressing 6.4. Twin Protocol Setup Left/Right when hight is on “Server Setting”. When highlight is When enter into “Twin Protocol Setup” menu, the on “TCP Port” or “Des Key” user can input informations by system will show a menu as below.
Need help?
Do you have a question about the DVB-S2 and is the answer not in the manual?
Questions and answers
Have a question on how to add apps