Table of Contents
Advertisement
Quick Links
Advertisement
Table of Contents

Related Manuals for SONIQ Qmedia DVP1000


Summary of Contents for SONIQ Qmedia DVP1000
-
Page 2: Notices And Safety Instructions
Notices and Safety Instructions - TO PREVENT FIRE OR SHOCK HAZARD, DO NOT USE THIS PLUG WITH AN EXTENSION CORD, RECEPTACLE OR OTHER OUTLET UNLESS THE BLADES CAN BE FULLY INSERTED TO PRESENT BLADE EXPOSURE. - TO PREVENT FIRE OR SHOCK HAZARD. DO NOT EXPOSE THIS APPLIANCE TO RAIN OR MOISTURE. - TO PREVENT ELECTRICAL SHOCK, MATCH WIDE BLADE PLUG TO WIDE SLOT FULLY INSERT. - Page 3 Notices and Safety Instructions To protect intellectual property, the involved organizations partition the world into six regions, each of which can only use the DVD player and DVD disc with the given regional code. The illustration on the right shows symbols of the six regions. One DVD player with a given regional code cannot play disc of another regional code.
-
Page 4: Important Safety Instructions
Important Safety Instructions Read Instructions- All the safety and operating instructions should be read before the appliance is operated. Retain Instructions- The safety and operating instructions should be retained for future Reference. Hewed Warnings- All warnings on the appliance and in the operating instructions should be adhered to. - Page 5 Important safety instructions Copy Protecion This product incorporates copyright protection technology that is protected by method claims of certain U.S. patents and other intellectual property rights owned by Macrovision Corporation and other rights owners. Use of this copyright technology must be authorised by Macrovision Corporation, and is intended for home and other limited viewing uses only, unless otherwise authorised by Macrovision Corporation.
-
Page 6: Table Of Contents
Table of Contents Notices and Safety Instructions Important safety instructions Setup Features Accessories Disc Type and Characteristics Description-Front Panel Tour of the Remote Control Using the Remote Control Unit Connections Connecting Headphones to the DVD Connecting to an External Component (Input Select) Connecting to a TV Connecting to a Stereo Component Connecting to TV Component... -
Page 7: Features
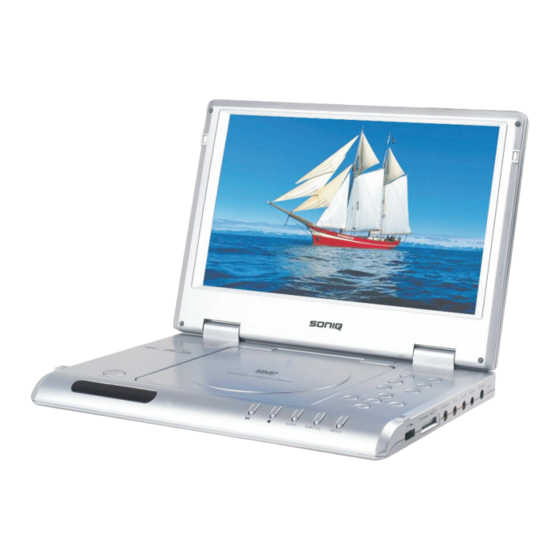
Features Plays DVD discs and audio CDs • CD-R/RW discs containing MP3/WMA files can be played. 20.32cm LCD display and built-in stereo speakers • With the built-in 20.32cm LCD display and stereo speakers, you can enjoy a DVD movie without requiring a separate TV. Convenient 2-Way power supply •... -
Page 8: Accessories
Accessories Remote control Lithium battery AC Adapter (For Remote Control) RETURN MUTE SEARCH SOURCE SUBTITLE AUDIO ANGLE CLEAR PROG VIDEO OUTPUT LCD SETUP TITLE ENTER MENU/PBC OSD ZOOM PLAY PAUSE/STEP STOP SLOW PREV NEXT REPEAT Battery pack Car Adapter Users Manual Headphone AV Cable YUV Cable... -
Page 9: Disc Type And Characteristics
Disc Type and Characteristics This unit can play the following discs. Maximum Disc Type Contents Disc size playback time Approx. 240minutes (Single sided disc) 12Cm Approx. 480minutes (Double sided disc) Digital Audio DVD videos with Approx. 80minutes appropriate region Digital Video (Single sided disc) number or ALL (MPEG2) -
Page 10: Description-Front Panel
1.Title button 2.Menu button 3.Source button 4.Power button 5.LCD button 6.Setup button Previous button )/Direction up FWD-SKIP( /Direction right 9.Enter button Next button )/Direction down REV-SKIP( ) /Direction left 12.Angle button 13.Subtitle button 14.Audio button 15.Stop button 16.Play/pause button 17.Remote control sensor 18.Open/close button 19.DVD door 20.Speakers... -
Page 11: Tour Of The Remote Control
Tour of the Remote Contol 1. Return button RETURN MUTE SEARCH SOURCE Return to the previous menu. 2. Mute button SUBTITLE 3. Number (0-9) buttons 4. Number (10+) button AUDIO 5. Video output button 6. LCD button ANGLE 7. Title button 8. -
Page 12: Using The Remote Control Unit
Using the Remote Control Unit Installing the Battery inside the Remote Control 1.Remove the battery compartment in the direction of the arrow. (Back of the remote control) 2.Place the battery inside the battery compartment and put the battery compartment cover back on the remote. -
Page 13: Connecting Headphones To The Dvd
Connecting Headphones to the DVD You can attach headphones with a stereo mini-jack plug to the PHONES jack for private listening. There are two jacks available. How to use headphones 1.Insert headphones into the 1 or 2 PHONES jack. This jack is a stereo mini-jack Important! •... -
Page 14: Connecting To An External Component (Input Select)
Connecting to an External Component (Input Select) You can enjoy video from your VCR or Camcorder on your DVD player. When connecting to an external component Important! • Always turn off the DVD Player and other components before you connect any cables. •... -
Page 15: Connecting To A Tv
Connecting to a TV You can enjoy high-resolution video using a VIDEO cable when connecting your DVD player to a TV equipped with a VIDEO input jack. • Always turn off the DVD Player and TV before you connect any cables. To view video with a TV 1.Turn on the TV. -
Page 16: Connecting To A Stereo Component
Connecting to a Stereo Component COMPONENT YUV Cable COMPONENT Jack/Plug Color: Y Jack: Green Cb Jack: Blue Cr Jack: Red 1. Connect the Mini-plug of the component video cable to the COMPONENT jack of the unit. 2. Connect the other three plugs to the corresponding component video or progressive scan video input jacks of the TV. - Page 17 Connecting to a Stereo Component When you connect the DVD player to an audio system, you can listen to higher quality sound. 2-CH Audio Playback Jack/plug color: Audio(Left): White Audio(Right):Red Video input: Yellow Connect the supplied audio cable to the AUDIO connecter located on the right side of the unit.
-
Page 18: Connecting To Tv Component
Connecting to TV Component After the completion of above connections; Digital connection to audio component without Dolby Digital decoder • DVD Disc When playing a Linear PCM Audio encoded disc, you must use the digital connection method shown above NOTE: •... -
Page 19: Digital Card Play Operation
Digital Card Play Operation Digital card (SD/MMC/MS) can memory Mp3 songs and digital pictures. How to select Digtal card to play 1. Turn on the power of this unit. 2. Insert SD/MMC/MS card and slide the card unit in clicks into place. 3. -
Page 20: Using The Ac Adapter
Using the AC adapter Important! • Always turn off the DVD player before connecting or disconnecting the AC cord. • Be sure to use the supplied AC adapter. Using a different type of adapter may cause malfunction or damage to the product. •... -
Page 21: Battery Level Display
Using the AC adapter Important! • Always turn off the DVD player when inserting or removing the AC adapter. Before storing the battery pack, make sure it is completely drained. • • Be sure to recharge the battery at least once every six months to ensure proper battery life. -
Page 22: Using The Battery Pack
Using the battery pack Important! • When inserting the battery pack, make sure that it is inserted correctly. Otherwise, your DVD player may malfunction. Charging the battery pack Use the AC adapter (included) to charge the battery pack. 1. Connect the DC cord to the DC IN jack on the side of the DVD player ( ). 2. -
Page 23: Playing A Disc
Playing a Disc Before Play Press the POWER button. When the slide AV IN/OUT switch to IN, the TFT display will be show “AV INPUT”. When to playing in main unit mode, must take out AV INPUT cable cord. Otherwise, you can hear there signal from external connect unit (when this unit is working). - Page 24 Playing a Disc 6.Step Motion Play Press the PAUSE ( )button on the remote during play. - Each time the button is pressed, a new frame will appear. - No sound is heard during STEP mode. - Press PLAY ( ) to resume normal play.
-
Page 25: Using The Search & Skip Functions
Using the Search & Skip Functions During play, you can search quickly through a chapter or track or use the skip function to jump to the next selection. Fast Forward or Fast Backward Press ( ) button on the remote control during playback, the disc will be played in a status of forward or reverse correspondingly. -
Page 26: Using The Function Menu
Using the Function Menu Using the SUBTITLE Button Press SUBTITLE button on remote control during playback. Subtitle: [1] will be displayed on LCD monitor that means a kind of language. Press once more. Subtitle: [2] appeared on LCD monitor means another kind of language and accordingly subtitles appear that represents how many kind of language being selected. - Page 27 Using the Function Menu Using the PROGRAM Button The program function can be used to play your selected tracks(CD/VCD/MP3)or chapter (DVD)in the order you desire. setp the disc and press the PORGRAMM button. The menu will be display on TV screen. Important: Input the title numbers first and then the chapter numbers.
- Page 28 Using the Function Menu Clearing a Bookmark 1. During play, press the SEARCH button twice on the remote. 2. Use the UP/DOWN buttons to select the bookmark number you want to delete. 3. Press the CLEAR button to delete a bookmark number. Press the SEARCH button to turn off display.
- Page 29 Using the Function Menu 2. CD,VCD,MP3 To Repeat a Track Use the skip button to commence playing the required track. Press the REPEAT button. ‘Repeat single’ will be briefly displayed on the LCD. The track will be repeated when the end of the track is reached.
- Page 30 Using the Function Menu Using the CLEAR Button Setting program or searching requires an input number. Press CLEAR button to clear the number when the input number is wrong. Using the Number(0~9,10+) Button By pressing the number(0~9) button, you can access directly to the desired track or chapters while a disc is played.
-
Page 31: Using The Setup Menu
MENU SUBMENU OPTIONS DESCRIPTION English English On Screen Display OSD Menu English English Subtitle Auto Automatically Display Subtitle Subtitle LANGUAGE Turn off the Subtitle Audio English English audio language English DVD menu DVD menu English English English MPEG4 subtitle Wester Europe External Subtitle Wester Europe MPEG4... -
Page 32: Setup The Language Menu
Using the Setup Menu General principles The fully expanded menu for each of the items that you can set are shown on the follow -ing pages. Navigate to the item of interest with reference to the menu structure shown opposite, and the appropriate menu in the following pages. - Page 33 Using the Setup Menu Subtitle This is the language to be used to display subtitles Language Video Audio Rating when they are turned on. The subtitle language setup is very similar to the OSD Menu English English English Auto Subtitle procedure just described for the OSD Menu.
-
Page 34: Setup The Video Menu
Using the Setup Menu Setup the Video menu The Video function allows you to set up the DVD according to the requirements and capabilities of Language Video Audio Rating your TV set. The default language is 16:9. TV shape 16:9 TV Shape TV System 16:9... - Page 35 Using the Setup Menu Note: If NTSC is selected with a non-compatible television you may experience interference or picture scrolling. View Mode Language Video Audio Rating This menu allows you to set the screen format of FILL TV shape 16:9 the view mode.
-
Page 36: Setup The Audio Menu
Using the Setup Menu Setup the Audio menu This menu allows you to set the format of the Digital Out signal. This is the signal from the black Language Video Audio Rating RCA connector on the rear panel of the DVD and labelled Coaxial. Digital out There are two output options, plus coaxial output off:... - Page 37 Using the Setup Menu Rating The Rating level can only be altered by entering a valid password as described above. The Rating function allows you to control the content that is played on the player. It is used to set a level above which DVDs with a higher rating will not play on this player. Example.
-
Page 38: Cautionary Notes
Cautionary Notes Cautions on Using the Player • Avoid magnetic environments. Using the player under strong fluorescent lighting, in a car, near a TV or magnetic object may deteriorate recorded images. • Be sure to remove the disc, turn off the player, and remove the battery pack after use. •... - Page 39 Cautionary Notes When Moving the Player • Be sure to remove the disc from the player before packing for moving. It is recommended that you also remove the disc from the player and turn off the power when not using the player. Saving Power •...
-
Page 40: Troubleshooting
Troubleshooting If your DVD player does not seem to be functioning properly, check the items below before you contact an authorized service center. Symptom Check • Make sure the AC power cord is securely plugged into an AC outlet. Power does not turn on or suddenly turn off. - Page 41 Troubleshooting Symptom Check • Check that the TV is set to VIDEO or AV. Video does not appear with an external component connected to the DVD player • Check that the video or audio cable is securely connected. • A hot battery pack may take longer to charge. Battery pack does not charge Wait until the battery pack is sufficiently cooled down.
Need help?
Do you have a question about the Qmedia DVP1000 and is the answer not in the manual?
Questions and answers