
Summary of Contents for Xsense Connectivity PalmRouter PR-100
-
Page 1: User Manual
N N e e t t w w o o r r k k i i n n g g t t h h e e F F u u t t u u r r e e PalmRouter PR-100 Internet Sharing Router with Four-Port Switch User Manual... - Page 3 Copyright Copyright © 2001 by Xsense Connectivity, Inc. All rights reserved. No part of this documentation may be reproduced in any form or by any means or used to make any directive work (such as translation or transformation) without permission from Xsense Connectivity, Inc. Xsense Connectivity, Inc. reserves the right to revise this documentation and to make changes in content without obligation among Xsense Connectivity, Inc.
-
Page 4: Table Of Contents
TABLE OF CONTENTS 1.0 INTRODUCTION..................1 1.1 Features ....................1 1.1.1 Sharing Internet Access..............1 1.1.2 Support Broadband Connection ............1 1.1.3 Built-in DHCP Server ..............1 1.1.4 Built-in 4-Port Switched Ethernet Hub ...........1 1.1.6 Easy Configuration ................2 1.1.7 Security ..................2 2.0 BEFORE YOU START ................3 2.1 Package Overview...................3 2.2 System and Other Requirements.............3 3.0 GETTING TO KNOW PALMROUTER ............4... -
Page 5: Introduction
1.0 INTRODUCTION Congratulations on your purchase of the Xsense PalmRouter, the Economical Internet Sharing Router with Four-Port Switch. Welcome to the Xsense Product Family. The PalmRouter provides home and small office PC users with an economical yet feature-rich way to share Internet access via their DSL/Cable broadband connection. -
Page 6: Easy Configuration
1.1.6 Easy Configuration The PalmRouter can be configured through a popular web browser, and it features web-based management for a simple, intuitive set up. It allows for remote administration for convenience and tech support. 1.1.7 Security The PalmRouter provides firewall-like security through NAT (Network Address Translation) to prevent unauthorized Internet users from accessing internal files. -
Page 7: Before You Start
2.0 BEFORE YOU START 2.1 Package Overview Prior to setting up your PalmRouter, make sure your PalmRouter package includes the following items: One PalmRouter unit (Model Number PR-100) One Power Adapter One User Manual and Registration Card One Category-5 UTP Ethernet cable with RJ-45 connectors 2.2 System and Other Requirements ISP account with DSL/Cable Modem Broadband Internet connection Desktop computer(s) with 10Mbps or 10/100Mbps Ethernet connection to... -
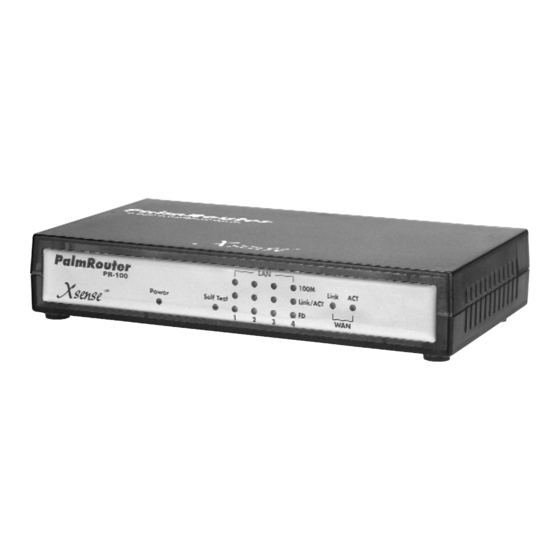
Page 8: Getting To Know Palmrouter
3.0 GETTING TO KNOW PALMROUTER This chapter first gives a description of the LED indicators and ports of the PalmRouter unit. Then it outlines the steps in installing and configuring the unit to work with your network environment. 3.1 Front Panel The Front Panel LED lights provide a status display indicating transmission and other activities. -
Page 9: Rear Panel
3.2 Rear Panel Figure 2 WAN Ethernet Port One Wide Area Network port for connecting the PalmRouter to the Internet via a DSL or Cable modem. Uplink Buton Used to determine the configuration of the PalmRouter’s LAN port No. 4. Choose either UP-position (straight-through) for connecting LAN computers to the PalmRouter or DOWN-position (uplink) for cascading a series of hubs or switches to the PalmRouter. -
Page 10: Installing Palmrouter
4.0 INSTALLING PALMROUTER Prior to connecting the PalmRouter to LAN, please be certain that your DSL or Cable service is active and operating correctly. If you are experiencing difficulties with the DSL or Cable service, please contact the service provider before continuing the installation process. -
Page 11: Connecting Computers To The Palmrouter
4.2 Connecting Computers to the PalmRouter When you finish connecting the PalmRouter to your DSL or Cable modem, you may now connect PC computers in your local area network to the PalmRouter. Two methods can be implemented for the connection: (1) plugging computers directly into the PalmRouter, and (2) connecting the PalmRouter to your LAN hub. - Page 12 Figure 5...
-
Page 13: Configuring Client Computers
5.0 CONFIGURING CLIENT COMPUTERS Congratulations on installing the PalmRouter’s hardware! Next we will show you how to enable communication between the PalmRouter and client computers. Part of the process of enabling communication involves setting the IP addresses for the computer. These computers must have their IP addresses configured such that they share the same subnet numbering scheme, as does the PalmRouter’s default IP address. - Page 14 choose Microsoft on the Manufacturers list, and select TCP/IP on the right side of the list. Figure 7 Follow the instructions on the screen to complete the installation process. It should prompt for a restart and then follow on with step 5, as you will now find a TCP/IP Protocol in your Network control panel.
-
Page 15: Assigning Tcp/Ip Values Manually
After specifying the settings of TCP/IP click OK and restart Windows to allow the settings to take effect. Repeat steps from 1 to 6 for each client PC on you Local Area Network. When all of your client PCs are configured, please go to Chapter 6 to set up your PalmRouter. - Page 16 Click the Gateway tab and enter the PalmRouter’s Private IP Address “192.168.1.1” in the Gateway IP address field and click Add. The Gateway IP address value must be the same as the PalmRouter's IP address to keep the proper IP numbering scheme. Figure 10 Click the DNS Configuration tab, choose Enable DNS and input a unique Host Name that simply is the computer’s name on the network.
-
Page 17: Basic Configuration
6.0 BASIC CONFIGURATION Now that you have completed the configuration of TCP/IP addresses on the client computer(s), you may begin configuring the PalmRouter’s Internet settings. This can be done through a standard Web browser (such as Netscape Navigator 4.7 or Microsoft Internet Explorer 5.0 and higher). -
Page 18: Access The Web-Based Config
6.2 Access the Web-Based Config Pages Launch your web browser. In the URL field, type the PalmRouter's default IP address (192.168.1.1) and hit Enter key on the keyboard. This is the area where you would normally enter a Web site address such as “www.xsense.com”. There must be no Proxy settings configured in your browser preferences. -
Page 19: One
6.3 One Page Setup The One Page Setup window now appears. Note that this page is divided into two basic sections: LAN IP Address and WAN IP Address. Figure 13 Host Name: This is an optional section. Some ISPs, such as The @Home Network and Cox Cable, require a host name for authentication purposes in order to be recognized by their systems. -
Page 20: Dynamic Configuration
Domain Name: A domain is a set of network resources (printers, databases, servers, etc.) for a group of users. Once the user has logged in and been authenticated by the domain, they have access to the resources. If your ISP doesn’t require a Domain Name, and most do not, then leave this field blank. -
Page 21: Static Configuration
6.3.2 Static Configuration To make changes to the WAN IP Address fields, connect to the One Page Setup and complete the following: Figure 14 Select Specify an IP Address. Enter the static IP address provided by your ISP in the field located immediately to the right of Specify an IP Address. - Page 22 Proceed with the following steps to configure the PalmRouter for a PPPoE connection. Figure 15 PPPoE Configuration Steps: Click PPPoE to enable this protocol for your connection. Enter the username assigned by your ISP. (i.e. ELN/username@earthlink.net) Enter the password assigned by your ISP. Enter the service name only if required.
-
Page 23: Status Monitor
6.4 Status Monitor The status monitor provides information on the working status of the PalmRouter. It contains the connection information for the WAN and LAN side of the router. The term WAN (Wide Area Network) refers to the connection going to the ISP. Figure 16 If you select the “Get an IP address automatically”... -
Page 24: Dhcp Settings
6.5 DHCP Settings The DHCP Server will automatically assign IP address information to computers configured to use the DHCP Server. There is no need to disable the DHCP Server, even if you have given your machines static IPs, unless you have another DHCP Server on the network. -
Page 25: Device Administration
6.6 Device Administration This page displays information on the firmware version of the PalmRouter. You can also change the password, reset the device and disable or enable external administrative access to the web-based configuration of the PalmRouter. If you enable both Block WAN port scanning and WAN ping responses the PalmRouter will run in Stealth Mode. -
Page 26: Dmz (Demilitarized Zone) Host
6.7 DMZ (Demilitarized Zone) Host This feature will open all in/out access for one LAN computer. This is useful for machines that host TCP/IP services and need to be fully exposed to the public network. For example, Internet Gaming, NetMeeting, Timbuktu, or other types of services may require this type of access. -
Page 27: Firmware Upgrade
7.0 FIRMWARE UPGRADE Xsense is continuously improving the firmware (software programmed on a PROM) in each of its products. The PalmRouter is shipped with the most up-to-date firmware available at the time of production. If a firmware upgrade becomes available, it will be posted in the Service and Support section on our Web site. -
Page 28: Troubleshooting
8.0 TROUBLESHOOTING This chapter provides solutions to problems that may occur during the installation and operation of the PalmRouter. Check the following symptoms and their possible causes before contacting Xsense Tech Support. 8.1 Common Problems and Solutions The Link LED is off. Verify that all RJ-45 connectors are plugged in firmly. - Page 29 should be in the range of 192.168.1.2 to 192.168.1.253. The Subnet Mask will be 255.255.255.0 and the Gateway Address is 192.168.1.1. Type “192.168.1.1” into the URL and hit enter. Clear the browser cache to remove old entries if needed. Try a second browser, preferably Netscape or Internet Explorer. When I attempt to connect to a URL through my browser I get a “Time Out Error”.
-
Page 30: Frequently Asked Questions
8.2 Frequently Asked Questions What is the purpose of Network Address Translation? NAT handles the conversion of the Public WAN IP to 253 Private LAN IPs as well as showing only the Public IP on the Internet, keeping the Private IP hidden. This helps ensure security since each outgoing or incoming request must go through a translation process that also offers the opportunity to qualify or authenticate the request or match it to a previous request. - Page 31 manual. With your web browser, type “192.168.1.1” only and hit the enter/return key. At this point, you should get the Username/Password window. Type “admin” as the password with no username needed and hit “OK”. You should reach the One Page Setup of the router. If problems persist, try a second computer with a new cable and a different web browser.
-
Page 32: Appendix
APPENDIX Specifications Network Protocol and Standards Compatibility IEEE 802.3 (10BASE-T), IEEE 802.3u (100BASE-TX), IEEE 802.3x (Full-duplex/Flow Control). Network Protocols supported TCP/IP, DHCP Server/Client, PPPoE, PAP/CHAP, DNS relay, NAT, HTTP, ICMP, PPTP pass thru, IPSec pass thru. Security Password protected access (Ethernet) Data Rate Up to 10/100Mbps auto-negotiation, full/half-duplex (Ethernet) LEDs... -
Page 33: Glossary
GLOSSARY Cable Modem A device that connects your PC to a local TV line and receives data at 1.5Mpbs. One of its connections is connected to your PC and the other one is to the cable wall outlet. It attaches a standard 10BASE-T Ethernet card to a computer and modulates between digital and analog signals. - Page 34 Gateway An entrance to a network. It associates with both router and switch whereas the router gives direction as data arrives at the gateway and the switch, on the other hand, furnishes its actual path in and out of the gateway. HTTP The Hypertext Transfer Protocol is an application protocol and a set of rules for file exchange on the World Wide Web.
- Page 35 LANs connected this way is called a wide-area network (WAN) MAC Address (Media Access Control Address) MAC Addresses- (Media Access Control) On a network, it is a unique 48-bit number used in Ethernet data packets to uniquely identify an Ethernet device, such as an Ethernet adapter.
- Page 36 TFTP TFTP stands for Trivial File Transfer Protocol. It is an Internet file transfer protocol that operates similar to FTP with few resources to run. It uses UDP and requires no login procedures. UDP stands for User Datagram Protocol. It's an user interface between applications and the IP in a network.
- Page 37 XSENSE STANDARD LIMITED WARRANTY Be sure to have your proof of purchase and a barcode from the products packaging on hand when calling. Return requests cannot be processed without proof of purchase. In no event shall Xsense’s liability exceed the price paid for the product from direct, indirect, special, incidental, or consequential damages resulting from the use of the product, its accompanying software, or its documentation.
- Page 38 180-00327-000...
Need help?
Do you have a question about the PalmRouter PR-100 and is the answer not in the manual?
Questions and answers