Table of Contents
Advertisement
Quick Links
Advertisement
Table of Contents

Summary of Contents for Kanvus KuPen Air
- Page 1 ® © Windows & Macintosh V1.00...
-
Page 2: Table Of Contents
Table of the Contents About This User’s Manual ......2 Introducing the Easy Note Taker ..31 Note Manager ........32 Notes for This Manual ....... 2 Folders ......... 32 Safety Information ........3 Toolbar ......... 33 Care and Cleaning ........3 Menu .......... -
Page 3: About This User's Manual
Specification Summary Provides you specifications summary of Kanvus KuPen Air. Troubleshooting Trouble shooting and FAQ for Kanvus KuPen Air, where you can find the answers to most common problems. Notes for This Manual A few notes and manuals are used throughout this guide, allowing you to complete certain tasks safely and effectively. -
Page 4: Safety Information
Safety Information Adhering to the following safety information will prolong the life of the device. DO NOT try to open the housing of the receiver unit and the digital pen. It will void your warranty. DO NOT expose to or use near liquids, rain, or moisture. DO NOT place or drop objects on top of the receiver unit. -
Page 5: Product Introduction
1. Product Introduction -Product Features -Package Contents -Receiver Unit -Digital Pen... -
Page 6: Product Features
Product Features Thanks for purchasing Kanvus product! With this Kanvus KuPen Air, you can capture any handwritten notes or drawings on a plain piece of paper and store them in its internal flash memory. Captured notes can be uploaded to a computer via its USB interface. This is an ideal and convenient pen tool when you are away from computer while being in a need to capture any thought or important point. -
Page 7: Package Contents
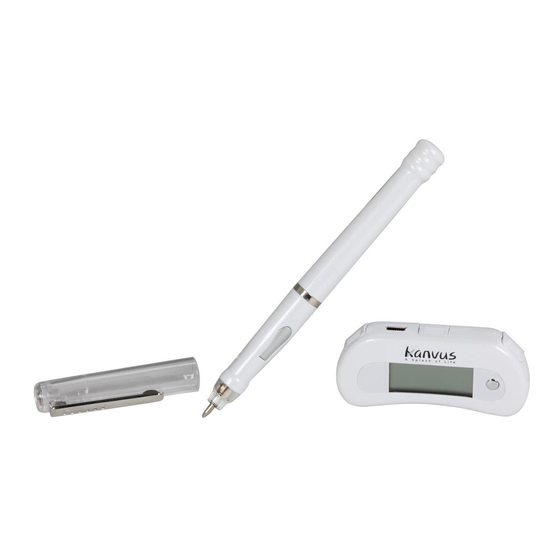
Package Contents Check your package for the following items. USB Cable Kanvus KuPen Air Digital Pen Ink Refills & Stylus & Batteries Carry Case Kanvus KuPen Air Receiver Unit Kanvus KuPen Air Installation CD ... -
Page 8: Receiver Unit
Receiver Unit Refer to the picture below. Descriptions ○ 1 — USB Port : Connects to a USB port on your computer via the USB cable provided in this product package when you need to upload your writing to your computer. ○... -
Page 9: Digital Pen
Digital Pen Refer to the pictures below. Descriptions ○ 1 — Pen Tip : Tapping the Pen Tip quickly acts as the Left-Click of the mouse, tapping it slightly longer to function as the Right-Click of the mouse. ○ 2 — Button : Functions as the Left-Click of the mouse in mouse mode when it is linked to a computer. -
Page 10: Changing The Battery
Changing the battery 1. Twist the battery lid and remove it. 2. Put in two SR41 batteries one at a time, with the positive poles facing up. 3. Cover the battery lid back by twisting it. Replacing the refill 1. Pull off the cap of the digital pen. 2. -
Page 11: Getting Started
2. Getting Started -Installation -Configuration... -
Page 12: Installation
Installation Windows Installing the Driver Software on Windows 1. Once you insert the installation CD into your CD ROM drive, the main installation window will appear immediately. If the main installation window does not appear automatically, please run the installation manually by clicking on【My Computer】 ►【CD/DVD ROM】, then start the “Autorun”... - Page 13 4. You will see the information about the destination folder. Click “Next” to install to the default destination folder, or click “Change” to install it in a different folder. 5. Click “Install” to begin the installation. 6. When the installation is completed, click “Finish”...
-
Page 14: Mac Os
Mac OS Installing the Driver Software on Mac OS 1. Please insert the installation CD into your CD ROM drive. The “Note Taker” main window will appear, and then click on “NoteTaker.pkg” to start the installation wizard. 2. When you see “Welcome to the Note Taker Installer”... - Page 15 “Install” 4. Click perform standard installation of the software on the volume you selected. If you want to install in a different destination, please click “Change Install Location” to go back to the previous step. 5. Remember that Mac computers require a set username password during...
-
Page 16: Connecting The Device
Connecting the Device Installing the Device on computer 1. After you have properly completed the driver and software installation, link the receiver unit to a computer via USB interface with the USB cable provided 2. Place your receiver unit on top of a paper, and the sensor coverage is about an area of an A4 size paper. -
Page 17: Configuration
Configuration Windows Once you installed “Easy Note Taker” and run the application program, you can see the following icon showing in the system tray. Unit Not Detected. Device is not connected to computer. Mouse Mode. It is the default setting when you have connected the device with computer. Initial Settings When you perform the application and plug in the device at the first time, you should be asked to complete some initial settings. - Page 18 2. Base Unit Orientation (Only supported in Windows XP) Set and place your receiver unit orientation the same way as your actual writing habit. The setting of your receiver unit orientation is the same no matter you work in Link Mode or Mobile Mode. Property Menu Move the cursor to the icon of Easy Note Taker in the system tray, and right-click.
- Page 19 1. Browse Notes Click on this option will launch Note Manager that enables you to view the writings you captured to the computer. You may also double-click on the icon in the system tray to open it directly. 2. Note Mode / Mouse Mode Click this option to switch the operation mode between Note Mode and Mouse Mode.
- Page 20 3. Detect Hardware Detect your device. If your device is not detected, the icon in the system tray will change to 4. My Sticky Notes If you have set a note to show as a sticky note and hide it, then you can view it with this option. 5.
-
Page 21: Mac Os
Mac OS Once you installed “Note Taker Preferences” into your Mac computer, it is high suggested that you complete the personal preference settings before you plug-in the device. 1. Click【Go】►【Application】 2. Click Note Taker Preferences to run the program. - Page 22 3. You will see the “Note Taker Preferences” setting dialog box. (1) Target path : Displays the destination location in your Mac’s hard drive where you would like to store the notes. Click to choose a different path. (2) Clear device’s memory : If you tick on this checkbox, the memory of the device will be erased after you upload the notes to the computer.
-
Page 23: Using The Device
3. Using the Device -Usage Overview -Place the Receiver Unit -Coverage Area -Holding the Digital Pen -LCD Indicator... -
Page 24: Usage Overview
Usage Overview The Kanvus KuPen Air enables you to work in two modes : Link Mode and Mobile Mode. Link Mode When you link the Kanvus KuPen Air to a computer, you are working on the operation mode which is referred as the Link Mode. - Page 25 Once you have completed one page, shortly press the front control button to save current page and start a new page. You can see the page number added by one on the unit screen. When you are using KuPen Air to capture your handwriting in Mobile Mode, please always press the Front Panel Button after changing the page to ensure your writing will be on the new page while avoiding overlapping.
-
Page 26: Place The Receiver Unit
Place the Receiver Unit The following images illustrate the ways you can place your receiver unit, according to the recommended positioning. Place your receiver unit at the top center of the paper for stronger sensor coverage. Place your receiver unit at the top left corner of the paper for right handed users. ... -
Page 27: Coverage Area
Coverage Area Coverage area is the area that the receiver unit can sense the movement of the digital pen. The sensor coverage is about an area of an A4 size paper and depends on the orientation you have set. The coverage area includes operation scope on the computer screen. -
Page 28: Holding The Digital Pen
Holding the Digital Pen Hold the digital pen as you would hold a pencil. When you are writing with the digital pen, make sure its inclination to the paper surface is between 45°and 90°. For better writing quality Hold the pen firmly and write normally. Do not block the receiver unit Do not place your hand Do not hold the pen like a... -
Page 29: Lcd Indicator
LCD Indicator Icon Name On When Off When Blinks When Unit is connected to Unit is not Data is uploaded to Connected connected to PC. Unit memory is 90% full. It is highly recommended to Less than 90% Memory Never upload your files to capacity used your PC and delete... -
Page 30: Using The Bundled Software
4. Using the Bundled Software -Minimum System Requirements -Introducing the Easy Note Taker -Note Manager -Note Taker -Edit Note... -
Page 31: Minimum System Requirements
Minimum System Requirements ® Operating System Microsoft Windows 2000 / Windows XP / Windows Vista (SP4) (SP2) 50MB available hard disk space 128MB 32-bit Color Quality 1024 X 768 pixels Screen Resolution... -
Page 32: Introducing The Easy Note Taker
Introducing the Easy Note Taker Once you completed the driver setup, the Easy Note Taker application program will be installed in your computer as well. The Easy Note Taker comes with operation windows including “Note Manager”, “Note Taker” and “Edit Note” for you to view, manage, organize and edit your notes. Activating the Easy Note Taker : 1. -
Page 33: Note Manager
Note Manager The Note Manager window will appear when you activate the Easy Note Taker application program. The Note Manager enables you to store, organize, view, copy, paste and export your notes. It is set up in Windows Explorer format, which allows you to navigate and organize your file folders at the left pane while viewing the note files at the right pane. -
Page 34: Toolbar
Folder Description Miscellaneous Stores every note you saved. Deleted Items It acts as a recycle bin that store files you deleted. Received Notes Save notes from network PC. Mobile Notes It is the default folder when you upload notes from the receiver unit. Contacts These two folders allow users to store customized types of notes. -
Page 35: Menu
Medium Displays note files in medium sized thumbnails on the Note Thumbnails Manager window. Large Displays note files in large thumbnails on the Note Manager Thumbnails window. Note Mode Click on this icon to switch to Note Mode. Mouse Mode Click on this icon to switch to Mouse Mode. - Page 36 2. Convert To Text ® Convert your note to text file by using MyScript Notes software. ® You must install MyScript Notes software first, in order to enable this function. 3. Move To… Move the note file you selected to another Note Manager folder.
- Page 37 through your default mailbox in your computer system, such as Microsoft Outlook. The recipients must have installed Easy Note Taker application program, in order to open the delivered note file. 5. Import You can import any *.pegvf data format file into the Note Manager database. 6.
- Page 38 8. Show As Sticky Note 9. Show As Paper Holder Make the selected note as a sticky note. Make the selected note as a paper holder. You can set the sticky note and paper holder by clicking on shortcut buttons in the toolbar. 10.
- Page 39 15. Print Setup… Set the print options, such as size and source of the paper and the print orientation. 16. Backup / Restore (1) Backup Database… : Backup your Note Manager database. (2) Restore Database… Restore your database from the folder which contains the backup file.
- Page 40 Edit 1. Edit Note Edit a note that you select. An extra “Edit Note” window will appear once you click on this function. You will be performing your editing work on this window. Please refer to “Edit Note” section for more details.
- Page 41 4. Paste 5. Delete Paste the note or folder from the clipboard Delete the selected note or folder. which was copied or cut previously. You can also use these functions, Cut, Copy, Paste, Delete and Edit Note, in the toolbar. 6.
- Page 42 8. Find Next Skip from current note and find the next note which matches the search criteria. 9. Select All Select all notes or folders in a specific folder. View 1. Sort (1) By Date : Sort your notes by created date. (2) By Name : Sort your notes by file name.
- Page 43 2. Small Thumbnails Display notes as small thumbnails in the Note Manager viewing pane. 3. Medium Thumbnails Display notes as medium sized thumbnails in the Note Manager viewing pane. 4. Large Thumbnails Display notes as large thumbnails in the Note Manager viewing pane. You can change the thumbnail’s size with the shortcut buttons in the toolbar directly.
- Page 44 Configuration 1. Detect Hardware Detect your device. You can also see if the device has been detected or not from the system tray icon. 2. Set Device Clock This operation will set your device clock to the Windows system time. It is in order to meet the timing when you upload notes from the receiver unit.
- Page 45 3. Preferences… (1) General : Configure preferences for the general settings (a) In the “Auto-Save note in” box, select the time interval (in minutes) after which the system automatically saves your note. This also activates an auto-recovery feature that recovers any unsaved information in case of system crash or power failure.
- Page 46 (2) Mobile : You can set rule for the receiver unit to upload new notes automatically or not, when it is connected to a computer. (3) Printing : The settings for page printing. (a) Tick the “Note per page” checkbox to specify that when you print notes, only one note is printed on one page.
- Page 47 (4) Paper Holder : Set the paper holder opacity. You can drag the slider to set the desired level of transparency. 4. Pen Styles You can change the pen stroke color and width. The default setting on pen stroke color is black, and width is 1.
- Page 48 7. Mouse Properties Set the mouse resolution. Help 1. Read User Manual Click to open the user manual, or you can click on【Start】►【Programs】►【Easy Note Taker】 ►【User Manual】to open it. The User Manual is in PDF files. You have to install “Adobe Acrobat Reader”...
- Page 49 2. About Easy Note Taker… It shows information of Application, Driver, Firmware versions and Product ID.
-
Page 50: Note Taker
Note Taker Tap your pen tip once on a paper to launch “Note Taker” when you run the Easy Note Taker application program in Note Mode. Your handwritings on the paper will be capture instantly and displayed on the screen. You can do some further editing for the handwritings. 【Note Taker window】... -
Page 51: Switching Modes
Switching Modes You have three choices for switching modes between Mouse Mode and Note Mode. 1. From System Tray Icon : Right-click on the icon and switch between modes. 2. From Note Manager Toolbar : Click on the shortcut button directly. 3. -
Page 52: Toolbar
Toolbar Edit Opens the Edit Note for editing the note. Clear Clears the entire notes on the screen. Undo Clears the previous stroke made by the digital Pen. Redo Resumes previously undone strokes. Pen Styles Changes the pen color and width. Copies the note into the clipboard for pasting onto other Copy applications. -
Page 53: Edit Note
Edit Note Once you select a note file for editing, the “Edit Note” window will appear. You can select an area or an object to edit on the note, you can delete it, change the color and/or width of the pen strokes, etc. -
Page 54: Toolbar
Toolbar Standard Toolbar Print Prints the selected note. Cuts Cuts the selected note and saves it into the clipboard. Copy Copies the selected note and saves it into the clipboard. Pastes the last item from the clipboard which was copied or cut Paste previously. - Page 55 Circle Inserts a circle image of any size. Rectangle Inserts a rectangle of any size. Text Inserts typewritten text. You can also select font and font size. Change Pen / Selects or changes the color of pen strokes, highlight strokes Highlight Color or text.
-
Page 56: Menu
Menu Note 1. Print… 2. Print Preview Prints the current edited note. Displays the current edited note as it will look when it is printed. 3. Print Setup… Set the print options, such as size and source of the paper and the print orientation. 4. - Page 57 Edit 1. Undo 2. Redo Clears the previous action. Resumes previously undone action. 3. Cut 4. Copy Cuts the selected items and saves into the Copies the selected item and saves it into the clipboard. clipboard. 5. Paste 6. Delete Pastes the last item from the clipboard which Deletes the selected item.
- Page 58 7. Clear Note 8. Select All Clears the entire notes on the screen. Selects all items in the note. 9. Properties Please keep in mind that this function is available when you select an area / object on the notes first. You can then change the color and width of the pen.
- Page 59 View 1. Zoom In 2. Zoom To Fit 3. Zoom out Enlarges the note viewing Resumes the note viewing to Reduces the note viewing size. its original size. size. 4. Tools Bars 5. Status Bar Selects which editing toolbars to show/hide Shows or hides the status bar at the bottom of (Standard, Tools, Manager).
- Page 60 Configuration 1. Pen / Highlight Properties Select the color and width of the pen and highlighter.
- Page 61 Tools 1. Selector Allows you to select any area / objects on the notes by clicking and dragging with your mouse. 2. Pen 3. Highlight Write / draw anything on the note file with your Make your handwriting / drawing in highlighter mouse.
- Page 62 6. Rectangle 7. Text Inserts a rectangle of any size. Inserts typewritten text. You can also select font and font size. 8. Color Select or changes the color of pen strokes, highlight strokes or text. 9. Line Width 1 / 2 / 4 / 8 Selects or changes the thickness of any stroke to width 1 / 2 / 4 / 8.
- Page 63 Help 1. Read User Manual Click to open the user manual, or you can click on【Start】►【Programs】►【Easy Note Taker】 ►【User Manual】to open it. The User Manual is in PDF files. You have to install “Adobe Acrobat Reader” first in order to open PDF files. 2.
-
Page 64: Specification Summary
5. Specification Summary -Receiver Unit -Digital Pen... -
Page 65: Receiver Unit
Receiver Unit Coverage Area A4 paper size Storage Capability 16Mbits (Store over 100 A4 pages) Built-in rechargeable lithium-ion battery Power Source Battery Recharging Time 3.5 hours 14 hours Battery Durability Resolution 100 DPI Interface USB 2.0 Mini B-Type Weight 26 g Dimensions (L X W X H) 64 X 24 X 12 mm Indicator... -
Page 66: Digital Pen
Digital Pen Technology Ultrasound and Infrared 67.2 X Φ2.33 mm Refill Standard Power Source SR41 Mercury battery X 2 Weight 16 g 139.7 X Φ12.7 mm Dimensions (L X W X H) Buttons Hovering in Mouse Mode 60 seconds without clicking... -
Page 67: Troubleshooting
6. Troubleshooting -Testing your device -FAQ -Service and Technical Support -Driver Download... -
Page 68: Testing Your Device
Testing your device Please do the following tests first to identify your problem. 1. Check the device connection : After you connect the device to your computer, the indicator of the receiver unit should be on instantly. If it is not on, please follow these steps : (1) Make sure the USB cable is properly connected to a USB port on the computer. - Page 69 check the latest FAQ on our web site for other information. (5) Install the latest version of the driver and restart your computer when the installation is completed (6) After you restart the computer, run the application program and then connect the device. (a) If you cannot launch the application program, it means the driver failed during start-up.
-
Page 70: Faq
Question : Why is there nothing on the LCD display when I power on the receiver unit ? Answer : This means that the built-in battery power is too low. Please recharge the battery by connecting the device to a USB port of the computer directly, or use a USB charger to charge it. Question : Why doesn’t the battery icon blink during charging ? Answer : If you have already confirmed that battery power was not full yet, then it may mean that the USB port has a bad connection and the power supply is not stable. - Page 71 re-plug the receiver unit and check the pen’s battery. Question : Why is the pen stroke unreadable or discontinued during writing ? Answer : Please refer to the following steps. 1. Try to write with more pressure on your pen. Or refer to “Holding the Digital Pen” section of chapter 3 for instruction on correct ways to hold the pen.
-
Page 72: Service And Technical Support
You can go to our web site to download the latest driver/software and check the updated FAQ. If your problem still remains unsolved, please contact our service and technical support staff. service@kanvus-global.com KWorld Computer Co., Ltd. Tel : +886 2 8228 6066 6/F, No. -
Page 73: Driver Download
Driver Download You can download the latest driver and e-documents from the following web sites. http://www.kanvus-global.com/... -
Page 74: Appendix
A p p e n d i x -Declarations and Safety Statements -Ordering Components and Accessories -Copyright Information -Limitation of Liability... -
Page 75: Declarations And Safety Statements
Plug the equipment and computer into an outlet that is on a different circuit form the television or radio. If necessary, consult with your dealer or an experienced radio/television technician for help. The Kanvus products have been tested and found to comply with the following harmonized European Norms : EN55024 (electromagnetic immunity) -
Page 76: Ordering Components And Accessories
Ordering Components and Accessories To purchase parts and accessories, please contact your local dealer or distributor. -
Page 77: Copyright Information
INCIDENTAL, OR CONSEQUENTIAL DAMAGES (INCLUDING DAMAGES FOR LOSS OF PROFIT, LOSS OF BUSINESS, LOSS OF DATA, INTERRUPTION OF BUSINESS AND THE LIKE), EVEN IF KANVUS HAS BEEN ADVISED OF THE POSSIBILITY OF SUCH DAMAGES ARISING FROM ANY DEFECT OR ERROR IN THIS MANUAL OR PRODUCT. -
Page 78: Limitation Of Liability
Kanvus. In each such instance, regardless of the basis on which you are entitled to claim damages from Kanvus , Kanvus is liable for no more than damages for bodily injury (including death), damage to real property and tangible personal property; or any other actual and direct damages resulted from omission or failure in performing legal duties under this warranty statement, up to the listed contract price of each product.
Need help?
Do you have a question about the KuPen Air and is the answer not in the manual?
Questions and answers