Advertisement
CP-1050
Direct Drive Turntable
Instruction Manual
Thank you for purchasing an Onkyo product.
Please read this manual thoroughly before making any
connections and plugging in your new Onkyo product.
Following the instructions in this manual will enable you to
obtain optimum performance and listening enjoyment from
your new product.
Please retain this manual for future reference.
Names and functions of parts ..... 6
Assembly and installation............ 7
Preparatory adjustments ............. 8
1. Horizontal balance............................ 8
2. Stylus pressure .................................9
3. Anti-skating.......................................9
Connections .............................. 10
Playing records ......................... 11
Troubleshooting ........................ 12
Advertisement
Table of Contents

Related Manuals for Onkyo CP-1050


Summary of Contents for Onkyo CP-1050
-
Page 1: Table Of Contents
Thank you for purchasing an Onkyo product. Troubleshooting ......12 Please read this manual thoroughly before making any connections and plugging in your new Onkyo product. Following the instructions in this manual will enable you to obtain optimum performance and listening enjoyment from your new product. -
Page 2: Important Safety Instructions
WARNING: WARNING AVIS TO REDUCE THE RISK OF FIRE OR ELECTRIC RISK OF ELECTRIC SHOCK RISQUE DE CHOC ELECTRIQUE SHOCK, DO NOT EXPOSE THIS APPARATUS TO DO NOT OPEN NE PAS OUVRIR RAIN OR MOISTURE. The lightning flash with arrowhead symbol, within an equilateral triangle, is intended to alert the user to the CAUTION: presence of uninsulated “dangerous voltage”... - Page 3 If water or any other liquid gets inside this unit, have it checked by your Onkyo dealer.
- Page 4 WEEE may cause harmful interference to radio communications. http://www.onkyo.com/manual/weee/weee.pdf However, there is no guarantee that interference will not occur in a particular installation. If this equipment does cause harmful interference to radio or television reception,...
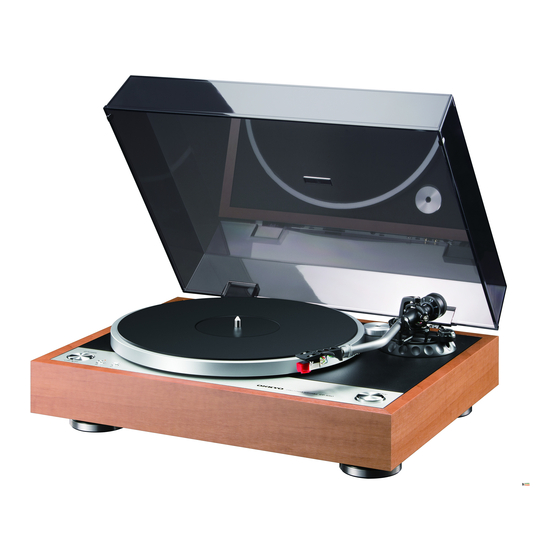
- Page 5 Features Supplied accessories Professional manual record player with a focus Before use, check whether the main unit and the accessories below are supplied. on sound quality This is a manual player with simple functions that is ∫ Turntable designed with the highest priority placed on the sound quality for playing analog records.
-
Page 6: Names And Functions Of Parts
Names and functions of parts POWER button ( OFF): Press this button START/STOP button: Rotates/stops the turntable. to turn the unit on or off. Locking nut: Use this to install the head shell. Speed selector button (33/45): Set this button Tone arm according to the record’s playing speed. -
Page 7: Assembly And Installation
Assembly and installation 3. Mounting the counterweight Assembly Mount the counterweight on the shaft at the back of the tone arm. 0 Do not rotate the counterweight to a position where the white center line on the shaft at the back of the tone 1. -
Page 8: Preparatory Adjustments
Preparatory adjustments 3. Release the arm clamp. Handling the stylus The tip of the stylus is extremely delicate. Be careful not to break or bend the stylus when removing the stylus cover. If the stylus tip is damaged, promptly replace it with a new stylus. If a damaged stylus is used, it will result in damage to the record. -
Page 9: Stylus Pressure
Preparatory adjustments 2. Turn the counterweight in the direction of the arrow so that the white center line on the shaft at the back of the 2. Stylus pressure tone arm is at “3.5”. 0 When the counterweight is turned, the stylus pressure adjustment ring also turns. -
Page 10: Connections
Connections Amplifier to an AC outlet 1. Connection with the amplifier 3. Mounting the dust cover Connect the supplied pin cables with attached grounding 1. Insert the two supplied dust cover hinges fully into the to the PHONO OUTPUT terminals on the rear panel of holder on the rear panel of the unit. -
Page 11: Playing Records
Playing records 5. Raise the lifter lever, hold the head shell’s finger hook, and move the tone arm to the desired position over the Before playing the music 0 Release the arm clamp. record. 0 Turn on the power supply of the connected amplifier and switch the input so that the sound of Lifter lever this unit comes out. -
Page 12: Troubleshooting
Troubleshooting No sound comes out after replacing the stylus Before starting the procedure with a special replacement stylus (DN-105ST). Problems may be solved by simply turning the power 0 Fit the stylus properly until a clicking sound is heard. on/off or disconnecting/connecting the power cord, which is easier than working on the connection, setting and operating procedure. - Page 13 Promptly replace the stylus in this case. Use a special replacement stylus (DN-105ST) to replace the stylus for the CP-1050. See the manual supplied with the replacement stylus for the replacement method.
-
Page 14: Specifications
Specifications ∫ Turntable section Drive method Direct drive Turning speed: 33 1/3 rpm, 45 rpm Wow and flutter: 0.15 % or less Signal to noise ratio: 60 dB or above Turntable: Aluminum die-cast Diameter 305 mm Motor: Brushless DC motor Starting torque: 1.0 kgf-cm or above ∫... - Page 16 Tel: 86-21-52131366 Fax: 86-21-52130396 http://www.cn.onkyo.com/ Asia, Oceania, Middle East, Africa Please contact an Onkyo distributor referring to Onkyo SUPPORT site. http://www.intl.onkyo.com/support/ The above-mentioned information is subject to change without prior notice. Visit the Onkyo web site for the latest update.
Need help?
Do you have a question about the CP-1050 and is the answer not in the manual?
Questions and answers