Table of Contents
Advertisement
Advertisement
Table of Contents

Summary of Contents for Motiv STANDARD
- Page 1 Owner’s Manual...
- Page 2 Must Read...
- Page 3 Bicycle Owner’s Manual CONGRATULATIONS! You’ve just bought one of the finest electric bicycles in the world; a Motiv! We developed and refined the quality that an electric bicycle should be and presented it to you. We work with top name suppliers to IMPORTANT: identify the best new materials and latest developments in our technology.
-
Page 4: Table Of Contents
Table of Contents GENERAL WARNING: Chapter 1: Before You Ride H. Charger..............28 Charging the Battery ...........28 A. Bike Fit..............9 J. Motor...............29 B. Safety First..............9 Like any sport, bicycling involves risk of injury and damage. By choosing to ride an electric bicycle, you assume the respon- C. -
Page 5: Chapter 1: Before You Ride
Chapter 1: Before You Ride STANDARD NOTE: We strongly urge you to read this Manual in its entirety before your first ride. At the very least, read and make sure that you understand each point in this section, and refer to the cited sections on any issue which you don’t completely understand. Please note that not all bicycles have all of the features described in this Manual. -
Page 6: Mechanical And Electric Safety Check
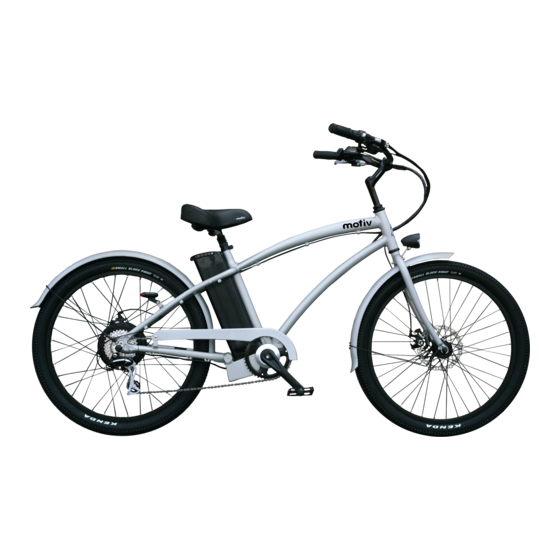
Battery Check: The battery is located behind the seat tube and underneath the seat. Make sure the battery turns on. Turn the key C. Mechanical and Electric Safety Check counter-clock wise until you hear a click and the key stops turning. Check throttle lights to see if they are lit. If they are not, press the red button beneath the lights to activate the system. -
Page 7: First Ride
D. First Ride 2. Always do the Mechanical Safety Check (Section 1.C) before you get on a bike. 3. Be thoroughly familiar with the controls of your bicycle: brakes (Section 3.A.); pedals (Section 3.E.); shifting (Section 3.D.); throttle When you buckle on your helmet and go for your first familiarization ride on your new electric bicycle, be sure to pick a controlled envi- (Section 3.G) ronment, away from cars, other cyclists, obstacles or other hazards. -
Page 8: Off Road Safety
Motiv does not recommend off road use but here are some tips to follow if you chose to do so. 7. Use approved hand signals for turning and stopping. -
Page 9: Wet Weather Riding
6. Be prepared. If something goes wrong while you’re riding off-road, help may not be close. CAUTION: Check reflectors and their mounting brackets regularly to make sure that they are clean, straight, unbroken and securely mounted. Have your dealer replace damaged reflectors and straighten or tighten any that are bent or lose 7. -
Page 10: Changing Components Or Adding Accessories
F. Changing Components or Adding Accessories There are many components and accessories available to enhance the comfort, performance and appearance of your electric bicycle. However, if you change components or add accessories, you do so at your own risk. The bicycle’s manufacturer may not have tested that component or accessory for compatibility, reliability or safety on your bicycle. -
Page 11: Removing The Rear Disc Brake
force, you should have to wrap your fingers around the fork blade for leverage, and the lever should leave a clear imprint in the palm of 4. Installing a rear disc brake your hand. CAUTION: be careful not to damage the disk, caliper or brake pads when reinserting the disk into the caliper. Never activate a disk NOTE: If, on a traditional cam action system, the lever cannot be pushed all the way to a position parallel to the fork blade, return the lever brake’s control lever unless the disk is correctly inserted in the caliper to the OPEN position. -
Page 12: Brakes
3. Before you ride the bike, first check that the seat post is securely clamped. 6. See the brake manufacturer’s instructions for operation and care of your brakes, and for when brake pads must be replaced. If you do not have the manufacturer’s instructions, see your dealer or contact the brake manufacturer. Adjusting the seat post cam action mechanism The action of the cam squeezes the seat collar around the seat post to hold the seat post securely in place. -
Page 13: Shifting Gears
D. Shifting Gears E. Pedals 1. Toe Overlap is when your toe can touch the front wheel when you turn the handlebars to steer while a pedal is in the forward most Your electric bicycle has a derailleur drivetrain position. This is common on small-framed bicycles, and is avoided by keeping the inside pedal up and the outside pedal down when 1. -
Page 14: Battery
The battery’s range depends on several factors, mainly, weight, terrain, and weather and to some extent, temperature. We fitting appropriate to the valve stems on your bicycle. Our bikes come standard with a Schraeder Valve, but a Presta Valve can be used, but calculated that the range is roughly 2 miles per amp hour (ah). -
Page 15: Charger
H. Charger J. Motor 1. The battery can be charged on or off the bike, and can easily be removed by removing the saddle and turning the key to The motor is a rear wheel 500 watt geared brushless motor available in a 36v or 48v system. We use a geared motor because it allows 80% more efficiency and running distance to the battery, the unlocked position and pulling up on the battery. -
Page 16: Service Intervals
bike, just to make sure that you did everything correctly. Since that will require the time of a mechanic, there may be a modest charge for • Squeeze each adjoining pair of spokes on either side of each wheel between your thumb and index finger. Do they all feel about the same? this service. -
Page 17: Nothing Lasts Forever
Use in competitive events, trick riding, ramp riding, jumping, aggressive riding, riding on severe terrain, riding in severe climates, riding with heavy loads, commercial activities and other types of non-standard use can dramatically shorten the life of the frame Properties of Metals and components. -
Page 18: Things To Look For
Things to look for: down tube buckled. Hit harder and the top tube may be broken, the down tube buckled and broken, leaving the head tube and fork separated from the main triangle. When a metal bike crashes, you will usually see some evidence of this ductility in bent, buckled or folded metal It is now common for the main frame to be made of metal and the fork of carbon fiber. -
Page 19: Warranty Registration Card
When your car tires wear down to the point that the tread bars are contacting the road, those tires are not defective. Those tires are This WARRANTY REGISTRATION CARD must be filled out immediately and returned to Motiv worn out and the tread bar says “time for replacement.” When a metal part shows a fatigue crack, it is worn out. The crack says “time for replacement.”... - Page 21 www.motivelectricbikes.com...
Need help?
Do you have a question about the STANDARD and is the answer not in the manual?
Questions and answers