Table of Contents
Advertisement
Advertisement
Table of Contents

Related Manuals for Thornycroft 90

Summary of Contents for Thornycroft 90
-
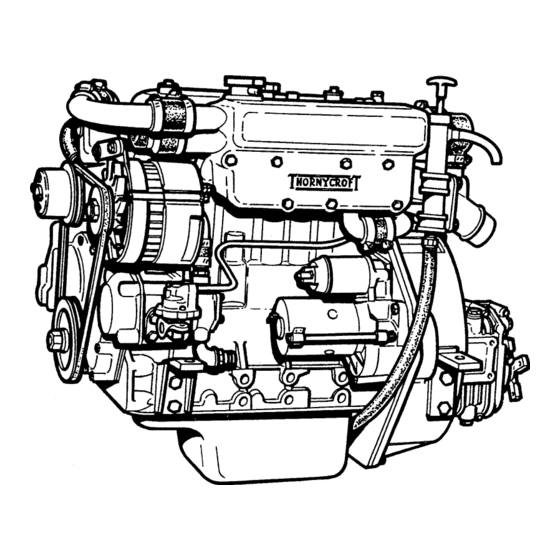
Page 2: Marine Engines
Minimum full load speed = 1500rpm ENGINE RATINGS The type 90 Engine may be set to develop continuous outputs from 13.5 to 30 BHP according to requirements The type 108 Engine may be set to develop continuous outputs from 21 to 38 BHP according to requirements. - Page 3 Lubricant specification for engine and gearbox. Filling gearbox. Coolant/Corrosion inhibitor specification. Filling cooling system. Priming the engine oil system. Bleeding the fuel system type 90 engines. Bleeding the fuel system type 108 engines. Initial start. Normal start. Running in. Operating guidelines.
- Page 4 The maximum installed angle of the engine is 15°, engine types 90/2, 108 and 108/2 (10° for engine type 90). This allows for a further rise of 4° when the craft is moving. Check the angle of installation using the centreline of the mounting feet bolts as a datum.
- Page 6 THORNYCRO LUBRICANT ENGINE AND GEARBOX `Page 2 ENGINE OIL RUNNING IN OILS Do NOT use special running-in lubricating oils for new or rebuilt engines. Use the lubricating oils specified for normal engine operation. ENGINE OIL VISCOSITY RECOMMENDATIONS The use of a multi- graded lubric ating oil h as been fou nd to impro ve oil consumption and improve engine cranking in cold temperatures while maintaining lubrication at high operating temperatures.
- Page 7 Fig. 5.
- Page 8 NOTE: Corrosion inhibitor is NOT an anti-freeze. COOLANT QUANTITIES Complete system including engine (IFWC) types 90 and 108 engines. 5.1 Litres For external fresh water cooled engines (EFWC) See Page 23. FILLING THE COOLING SYSTEM Remove the filler cap from the heat exchanger Fig.
- Page 9 405i Fig. 9...
- Page 10 PRIMING THE ENGINE OIL SYSTEM Page 4 PRIMING THE ENGINE OIL SYSTEM (TYPE 90/2R ENGINES ONLY) As only a residual amount of oil is present in the oil pump, filter and oil galleries of the engine, it is therefore necessary to prime the system before the engine is run.
- Page 11 THORNYCROFT BLEEDING THE FUEL SYSTEM TYPE 90 ENGINES Page 5 BLEEDING THE FUEL SYSTEM Slacken the bleed valve on the injection pump Fig. 8. Operate the lift pump Fig. 9 and when the fuel coming from the valve is free of air bubbles, tighten the valve.
- Page 12 Fig. 10...
- Page 13 THORN BLEEDING THE FUEL SYSTEM TYPE 108 ENGINES BLEEDING THE FUEL SYSTEM YCROF Fig. 11 Fig. 12 Note: After renewing fuel filter element it will only be necessary to bleed the fuel filter as described in 1 and 2, provided that the engine has not been cranked while the filter is dismantled.
- Page 14 THORNYCROFT INITIAL START, NORMAL START, RUNNING IN Page 7 INITIAL START With all systems filled, primed and checked the engine may be started. Run it for 2 to 3 minutes then stop it. Top up engine, gearbox oil and water levels to the high mark.
- Page 15 OPERATING GUIDELINES THORNYCROFT Page 8 COMPLIANCE WITH THE FOLLOWING RECOMMENDATIONS CAN RESULT IN LONGER LIFE, BETTER PERFORMANCE AND MORE ECONOMICAL OPERATION OF YOUR ENGINE. Routinely perform all of the specified maintenance, including the "First Start of the Day" checks. Use anti-freeze during all seasons to protect the cooling system from corrosion as well as freeze damage.
- Page 16 THORNYCROFT OPERATING GUIDELINES Page 9 DO NOT OPERATE THE ENGINE WITH LOW OIL PRESSURE When the engine is at normal operating temperature, the minimum oil pressures required are: Idle (570 RPM) ......1 bar (15 psi) Full Speed and Load ....2.3 bar (35 psi) DO NOT OPERATE THE ENGINE WITH FAILED PARTS Practically all failures give some warning before the parts fail.
- Page 17 Check water hose connections. Check all electrical equipment. Change fuel filter element. Check and service injectors as necessary. Check and adjust engine idling speed as necessary (Use a Thornycroft dealer) Check fuel system for leaks. ENGINES IN REGULAR USE EVERY 50 HOURS Check electrolyte level in batteries.
- Page 18 THORNYCROFT ENGINE OIL CHANGE TYPE 90 ENGINES Page 11 CHANGE ENGINE OIL Run the engine until it reaches normal operating temperature, stop the engine, then using the hand pump Fig. 14 drain the oil into a suitable container. Fig. 14 CHANGE ENGINE OIL FILTER Slacken the centre fixing bolt '1' Fig.
- Page 19 sealing ring '4'. Replace with element sealing ring, ensuring that ring correctly seated i n t he filt er head ' 5' and tig hte n t he centre bolt. Fill the engine with the specified amount of oil and prime the oil system as described on Page 4.
- Page 20 THORNYCRO ENGINE OIL CHANGE TYPE 108 ENGINES Page 12 CHANGE ENGINE OIL Run t he engine u ntil reaches nor mal operating temperature, stop engine, then using the hand pump Fig. 16 drain the oil into a suitable container. Fig. 17 Unscrew the oil filter cartridge Fig.
- Page 21 pressure register on the gauge. Stop the engine and allow a few minutes for Oil to settle, Check oil level and top op if necessary...
- Page 22 THORNYCROFT FUEL FILTER CHANGE Page 13 RENE W FUE L FILTER ELE MENT Turn off the fuel supply tap then support the filter base '1' Fig. 1 9 and unscrew the centre bolt '2'. Detach the base and twist the element '3' to separate it from the filter head '4'.
- Page 23 Fig. 19...
- Page 24 THORWC"T CLEANING FUEL LIFT PUMP Page 14 FUEL LIFT PUMP FILTER Turn off the fuel supply tap then remove the cap screw '1', Fig. 20. Lift off the cap '2', gasket '3' and filter gauze '4'. Clean the gauze in a suitable solvent usin g a sti ff brush.
- Page 25 Fig. 20...
- Page 26 THORNYCROFT GEARBOX OIL CHANGE Page 1 5 CHANGING THE GEARBOX OIL T he gearbo x o il must be changed when the gearbox has reached operating temperature. (After about 1/2 hour driving the craft). To help the oil drain easily from the gearbox first remove the oil filler dipstick plug from the top of the gearbox.
- Page 27 Illustration shows PRM 160 gearbox Fig. 27...
- Page 28 THORNYC CLEANING AIR FILTER ROFT Page 16 CLEANING AIR FILTER Slacken the clip on the breather pipe and pull the pipe off the air cleaner then, slacken the screw Fig. 22 this allows removal of the outer casing and the air filter gauze. Submerge the casing and gauze in a bath of clean paraffin or diesel fuel, agitate them vigorously to remove dirt particles.
- Page 29 THORNYCROFT DRIVE BELT ADJUSTMENT AND REPLACEMENT ALTERNATOR AND RAW WATER PUMP Page 17 SAFETY: BEFORE ATTEMPTING THESE OPERATIONS DISCONNECT THE STARTER BATTERIES Adjusting Alternator Drive Belt Type alternator shown illustration Fig. 23 but procedure for adjusting alternator drive belt the same for type 108 engines.
- Page 30 No. 2. valve fully open Rec hec k the clearance wit h the loc knu ts tightened and readjust if necessary. Fig. 25 Valve Clearance - Type 90 engines Inlet Valve 0.381mm (0.015in) Exhaust Valve 0.381mm (0.015in) Valve Clearance - Type 108 engines Up to Thornycroft Engine No.
- Page 31 THORNYCROFT PROCEDURE FOR RETORQUING CYLINDER HEAD NUTS Page 19 PROCEDURE FOR NEW ENGINES WHICH HAVE RUN FOR 25 HOURS Run engine and stop when normal operating temperature is reached. B Slacken the cylinder head nuts by approximately 1/6" of a turn (one flat of the nut) following the sequence shown using service tool 18G 1457 to reach the nuts in the centre row.
- Page 32 Tighten the nuts to 10.4 kgf m (75 lb ft) type 108 engines, 9.8 kgf m engines (.71 lb ft) type 90 in the sequence shown in procedure Using service tool 18G1457 to reach centre row. Fig. 27.
- Page 33 THORNY REMOVAL AND REFITTING FUEL INJECTORS CROFT Page 20 REMOVING FUEL INJECTORS Injector cleaning and spray testing can only be carried out with specialised equipment, therefore this must be done by a Distributor or Dealer. Fig. 28. Disconnect the feed pipe '1' and spill rail '2'. Note the sealing washers '3' on each side of the spill rail banjo union.
- Page 34 battery. Fig.29A...
- Page 35 CHANGING COOLANT Page 21 CHANGING COOLANT Remove filler cap from heat exchanger, place a suitable container beneath the drain plug Fig. 30. Remove plug and allow to drain. Place suitable container beneath drain tap in cylinder block Fig. 31. Remove tap and allow to drain.
- Page 36 to be encountered. See Page. 3. Fig. 30...
- Page 37 Fig. 31...
- Page 38 DRAINING RAW WATER SYSTEM Page 22 DRAIN THE RAW WATER SYSTEM Slacken the six screws Fig.32 on the raw water pump. Remove end covers from heat exchanger and drain tubes either by removing the tube stack or by blowing out with compressed air.
- Page 39 ROUTINE MAINTENANCE OF RAW WATER SYSTEM IFWC THESE NOTES DO NOT APPLY TO EXTERNAL FRESH WATER COOLED ENGINES Examine and clean the sea inlet strainer at regular intervals. Do Not remove the strainer when the engine is running as foreign matter can be drawn into the system and cause irreparable damage to the pump.
- Page 40 EXTERNAL FRESH WATER COOLED ENGINES ONLY (EFWC) THORNYCROFT Page 2 3 This consists of a closed circ uit fresh water system with a fre sh water circulator, combined header tank and exhaust manifold, dry exhaust outlet and water/coolant tanks normally fitted to the skin of the craft. It is therefore...
- Page 41 Page 24 Electrical System An insulated return system employed on the type 90 and 108 engines. The 12 volt alternator has a built-in voltage regulator which automatically adjusts the charging rate to provide sufficient electric current to keep the battery fully charged under normal operating conditions.
- Page 42 THORNYCROFT FAULT FINDING Page 25 FAULT FINDING ENGINE WILL NOT START Starter does not ELECTRICAL FAULT crank engine Battery run down Lead disconnected Faulty starter switch Faulty starter motor Starter cranks ELECTRICAL FAULT engine slowly Battery partly run down Terminal(s) loose...
Need help?
Do you have a question about the 90 and is the answer not in the manual?
Questions and answers