
Summary of Contents for King Kutter S-ATV-180-U
- Page 1 PO Box 1200 305 Commerce Drive Winfield, Alabama 35594 S-ATV-180-U OPERATION AND PARTS MANUAL www.kingkutter.com...
- Page 3 TO THE PURCHASER This manual contains valuable information about your new King Kutter ATV Spreader. It has been carefully pre- pared to give you helpful suggestions for operating, adjust- ing, servicing and ordering repair parts. Keep this manual in a convenient place for quick and easy reference.
- Page 4 Return the equipment or parts to the authorized King Kutter dealer, from where it was purchased, for ser- vice or replacement of defective parts that are covered by warranty. (The King Kutter Factory may inspect equipment or parts before warranty claims are hon- ored.)
-
Page 5: Table Of Contents
General Information ... 6 Technical Data ... 8 Safety Information... 9 Operating Instructions... 13 Safety Decal's And Locations ... 14 Spreader Use & Adjustments ... 15 Hopper Loading ... 18 General Maintenance ... 20 Lubrication ... 21 Replacement Parts ... 22... -
Page 6: Information On The Machine
These machines are usually used in daylight. If you need to use the spreader at night or poor visibility, you must use the lighting system of your trac- tor or some other source to operate safely. - Page 7 The fertilizer delivery is controled by properly opening the shutters in the hopper bottom, through locking devices operated by levers. The fertilzer spreader and the agitator are connected through a gearbox with the wheels, so the speed of the disc is proportionate to the speed of the machine.
-
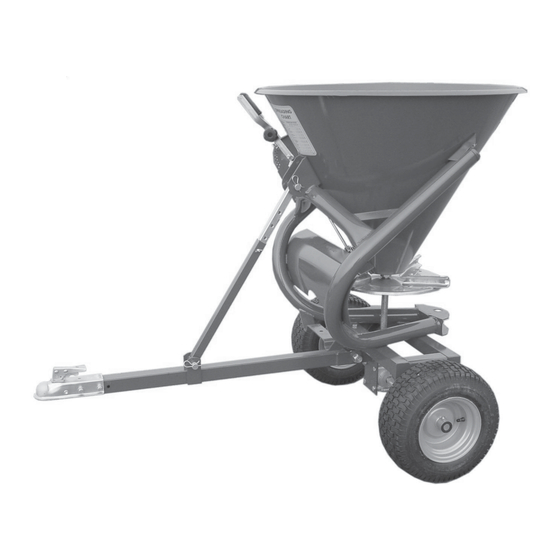
Page 8: Technical Data
(type/bar) Spreading Width (meters/feet) Ground Cover Per hour A. REGULATING LEVER B. HOPPER C. DISTRIBUTOR VANES D. SPREADER DISC E. STEEL FRAME F. TIRES G. ROD FOR TONGUE ADJUSTMENT H. TONGUE I. 1-7/8” BALL HITCH 165 / 43,6 80 / 175 1,05 / 41”... -
Page 9: Signal Words
If you have any questions not answered in this manual or require additional copies or the manual is damaged, please contact your dealer or King Kutter, Inc. P.O. Box 1200 Winfield, AL 35594 (205) 487-3202 or www.kingkutter.com... -
Page 10: Equipment Safety Guidelines
Refer also to safety messages and operation instruction in each of the appropriate sections of the tractor and seeder/ spreader manuals. Pay close attention to the safety signs affixed to the tractor and the seeder. -
Page 11: Safety Information
All below instructions must be integrated by a common sense, experience worker to prevent accidents. The spreader must be used by a single operator. The use of the spreader is forbidden to youngsters. All the listed instructions must be carefully respected. Changes to the spreader are not authorized by the manufacturer and exclude his responsibility. - Page 12 Generally the fertilizers are rather corrosive. For this reason, it is important that no particle of fertilizer stay in the spreader for a long period of time. Clean the hopper and distributor after each use.
-
Page 13: Operation Of The Machine
OPERATION OF THE MACHINE Make a check of the spreader before switching it on. Start to work only if spreader is in perfect condition. Before using the spreader please be sure that all safety devices are correctly in place and in good working condition; in case of breakdowns or damages to the guards, please replace them immediately. -
Page 14: Safety Decal's And Locations
The safety signs on the machine supply the most improtant indications: their ob- servance helps your safeness. 1. ATTENTION! Before doing any work or repair on the spreader, stop the engine of the pulling vehicle, remove the key, put on the parking brake and read the operator’s manual carefully. -
Page 15: Spreader Use & Adjustments
Connections The pull type spreader can be hitched to every type of tractor or atv with 1-7/8” ball hitch providing it has the horsepower to pull it . To make the connection, it is neces- sary to put the ball hitch in the coupler on the pull type spreader, locking it pushing the lock handle towards the bottom. - Page 16 How To Adjust The Spreader Vanes In order to assure an even distribution on both sides of the spreader, depending on the different specific weight of the material used, the vanes on the disc can be set to different positions.When all the vanes are put in hole 1 (Shown in picture), the distri-...
- Page 17 HOW TO ADJUST THE SPREADING The material spreading is regulated through the regulation lever that moves the opening section on the bottom of the hopper. In order to carry out the regulation, after having consulted the spreading table, acording to the type of material to spread and to the speed of pulling vehicle, it is necessary to move the lever “A”...
-
Page 18: Hopper Loading
If it is neces- sary operator must wear headset, mask and glasses. After having hitched spreader to pulling vehicle and carried out necessary precau- tions it is now possible to begin work. ATTENTION! - Page 19 Various ways exist to spread the material in the field. One of the simplest methods is, as follows: Position spreader at the beginng of the field you intend to fertilize or seed, to a distance (D/2) that is the half of the working width that is used (point 1);...
-
Page 20: Spreading Mistakes
In case of unusual vibrations, check the wear of the vanes and spreading disc, the tightness of all nuts and bolts and lubrication of gearbox. The excessive vibration of the spreader, besides being annoying is dangerous and damaging for the entire structure, subjecting the mechanical parts to more and more stress. -
Page 21: Lubrication
- look over the spreader thoroughly and check for structural damages, looking for deep abrasions in the paint; - verify that the safety signs are on the spreader and readable, In case they are torn and unreadable, replace with new ones. -
Page 22: Replacement Parts
Ref. Spreader Disc with Blades Right Hand Shutter Lever - Long Left Hand Shutter Lever - Long Right Hand Lever Tie Rod Left Hand Lever Tie Rod Shutters- (1) Left & (1) Right S-ATV-180 PARTS Part Name Hopper Lower Agitator Kit... - Page 23 Ref. Output Shaft with Bushing Tow Bar for 1-7/8” Hitch S-ATV-180 PARTS Part Name Gear Box Tire 16 x 6.50-8 Left Axle Right Axle 1-7/8” Ball Hitch Tongue Rod Part Number 900125 900126 900127 900128 195169 900129 900118 900119...
-
Page 24: Warranty
All warranty service will be performed at service cen- ters designated by King Kutter. If King Kutter is unable to repair the product to conform to the warranty after a reasonable number of attempts, King Kutter will provide, at its option, one of the following: (a) a replace- ment for the product or, (b) a full refund of the purchase price.
Need help?
Do you have a question about the S-ATV-180-U and is the answer not in the manual?
Questions and answers