Table of Contents
Advertisement
Advertisement
Table of Contents

Related Manuals for lifeSMART LS-8PAC

Summary of Contents for lifeSMART LS-8PAC
-
Page 2: Table Of Contents
Introduction This Instruction Manual is universal for portable air conditioners manufactured by lifesmart.The appearance of your unit might be slightly different than the one described in this manual. Operation and usage of your air conditioner should not vary. In order to ensure your safety, Please carefully read the sections that correspond with your unit. -
Page 3: Introduction
INTRODUCTION PORTABLE AIR CONDITIONER This Portable Air Conditioner is a small size appliance that has multiple functions. Some functions of this unit are that it can adjust the temperature and humidity in a room, cool, dehumidify, and fan. The unit was designed to be used in home and office environments with a compact design compared to others. -
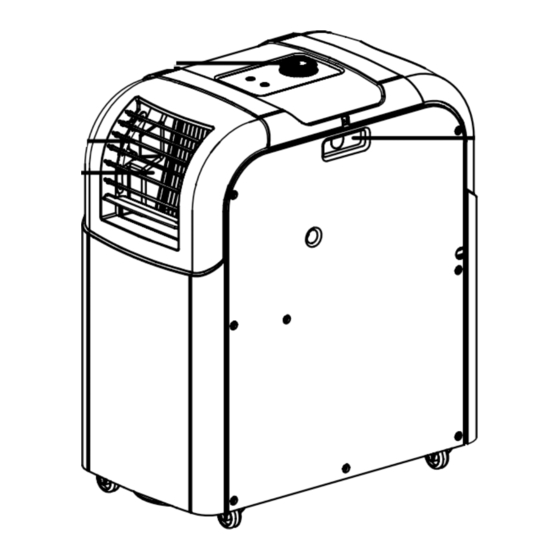
Page 4: Parts
PARTS FRONT Control knob Handle Adjustable air fins Cold air outlet BACK Note:Features and appearance may vary depending on your air conditioner model. -
Page 5: Control Panel
CONTROL PANEL CONTROL PANEL 1 Before you insert the plug,please make sure the knob is turned to the "OFF" position. OFF:When the knob is turned to "OFF",the air conditioner will stop operation. LO FAN: When the knob is turned to "LO FAN",the air conditioner will be in low fan operation mode to delivery weak airflow. -
Page 6: Timer Button
CONTROL PANEL CONTROL PANEL 2 Note:Features and appearance may vary depending on your air conditioner model. REMOTE CONTROLLER SIGNAL RECEIVER DIGITAL DISPLAYER FAN Mode: Indicates room temperature. COOL or DRY Mode: Indicates setting the temperature. TIMER Operation: When pressing the TIMER button, this indicates timer time. If the time has not been adjusted, after 5 seconds the temperature will appear. - Page 7 1. Set temperature indicator 2. Fan speed indicator 3. Lock/Hold key indicator 4. Present time indicator 5. +/- button Increase or decrease the room tem- perature or set the timer duration a er pressing the timer button. 6. On/o button Turn the unit on or stop operation and turn the unit o .
-
Page 8: Remote Control
REMOTE CONTROL PRESENT TIME SETTING PROCEDURE When cells are inserted,under the timer operation has not been set,do it as following procedure, EX:set to AM:10:30. Continually press the HOUR button about 2 seconds. The time indicator is flickering and can set the HOUR time. Press the HOUR button. -
Page 9: Water Drainage
WATER DRAINAGE Water Drainage: The air conditioner evaporates condensed water and discharges the moisture through the hot air outlet. In some cases it is possible that all water did not evaporate and the internal water tank can be full. If this is the case, the WATER FULL light will illuminate and the unit will stop running. Follow the steps to drain the water. -
Page 10: Maintenance/Service
MAINTENANCE/SERVICE Continuous Drainage In a high humidity environment, if possible the user can have a continuous drainage. This can reduce the number of times you have to pour out water. Condensation is discharged by gravity through a hose (not provided). Of course, this method will reduce the efficiency of the unit. - Page 11 MAINTENANCE/SERVICE *Pull the plug out of the socket before cleaning. WARNING *To prevent accidents caused by electrical shock, make sure there is no power to the unit before beginning maintenance or repair. CLEANING OF AIR FILTER If the air filter is blocked,the air flow volume will reduce.Clean the filter once every two weeks.
-
Page 12: Safety
*When unplugging the unit,hold the power plug securely and pull it out carefully. * Do not use extension cord. * Do not toggle over or incline,If the unit does toggle please call lifesmart technical support at 1-866-484-2066. * Do not spray with insecticide or other chemicals as the plastic case may get damaged... -
Page 13: Troubleshooting
* The base tank is nearly full? DIscharge the condens- Condensed water ed water from the base spills out when water outlet moving the unit For further support or questions please call lifesmart technical support at 1-866-484-2066 (USA) or 214-614-2509 (Canada). -
Page 14: Installation
INSTALLATION Installation location Put the portable air conditioner in a flat location where the air outlets cannot be obstructed. Make sure the unit has 3 ft around it for airflow. Installation and Uninstallation of the Air Exhaust Hose See the figure below,First the user must take out the the hose. - Page 15 INSTALLATION Installation and Uninstallation of the Air Exhaust Hose Installation: See the figure below. Attach the air exhaust adapter into the air exhaust hose (Use the arrows for direction). Then attach the air exhaust hose into the air conditioner. Uninstallation: See the figure below. detach the air exhaust adapter into the air exhaust hose (Use the arrows for direction).
- Page 16 INSTALLATION Window Kit Installation Your window kit has been designed to fit most standard "vertical" and "horizontal" window applications.However,it may be necessary for you to improvise/modify some aspects of the installation procedures for certain types of windows. See the figure below, Horizontal window Window slider kit Minimum:27-1/2"(70cm)
- Page 17 INSTALLATION Air Exhaust Hose Mounting Method The air exhaust hose is 20 cm - 160 cm in length.It is suggested that the hose be as short as possible to achieve maximum efficiency. If you need to extend the hose, please use the previous mounting method instructions: 1.Try to avoid bending the hose.
Need help?
Do you have a question about the LS-8PAC and is the answer not in the manual?
Questions and answers
Where can I order a replacement parts?