Table of Contents
Advertisement
Advertisement
Table of Contents

Subscribe to Our Youtube Channel
Related Manuals for Quantaray 5.6” Digital Photo Frame

Summary of Contents for Quantaray 5.6” Digital Photo Frame
- Page 1 Quantaray by Sunpak 5.6” Digital Photo Frame Stock no. 81-166-0497...
- Page 2 Opening Screen Screen 2...
- Page 3 LOCATION OF FRAME CONTROLS...
-
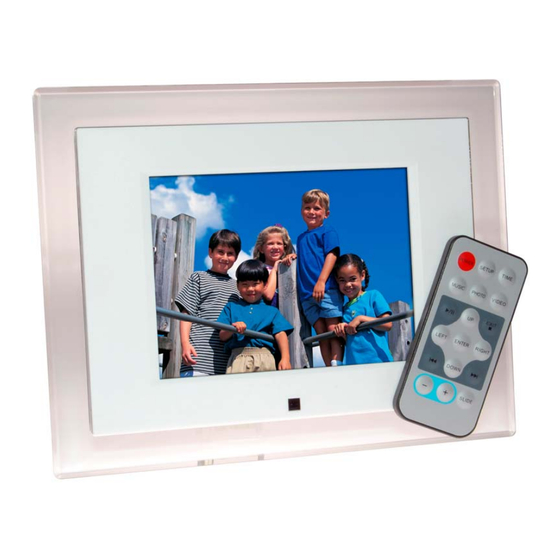
Page 4: Remote Control
REMOTE CONTROL Remote Control Buttons 1. POWER: Turns digital photo frame on and off 2. SETUP: Activates on screen display settings 3. TIME: Displays calendar and time 4. MUSIC: Play music with a single press 5. PHOTO: Display thumbnails 6. VIDEO: Display video files /II : Play/Pause 8. -
Page 5: Displaying Images
TURNING ON 1. Plug the AC-DC adapter into the port marked DC 12V located on the back frame. 2. Press the power switch to the ON position. The unit will display the opening screen. DISPLAYING IMAGES 1. Insert a memory card or USB driver that contains JPG image files into the SD/MMC/MS card slot or USB port. -
Page 6: Music Playback
FAVORITE IMAGES Display two different pictures without a memory card or USB drive. 1. When a photo is displayed in full screen mode from a memory card or USB drive, press the PHOTO button. Along with the photo a message will appear on the bottom left side of the screen stating: DON’T POWER OFF. -
Page 7: Video Playback
VIDEO PLAYBACK 1. Insert memory card or USB driver that contains video files into the card slot or USB port respectively. 2. Turn the digital photo frame ON. Operate by using the remote control At the opening screen select CARD or USB you had inserted, Press the ENTER button, select the VIDEO icon or press the VIDEO key, then a list of available file names will display on the right side of the screen;... -
Page 8: System Setup
SYSTEM SETUP On Screen Display Languages: English, German, French, Portuguese. To select use the RIGHT and LEFT buttons on the remote control. DEFAULT: RESTORE – Restore factory settings FIRMWARE VERSION: Noted on screen and cannot be changed by user... -
Page 9: Photo Setup
PHOTO SETUP EFFECT: OFF, WIPE BOTTOM, WIPE LEFT, WIPE LEFT, WIP RIGHT, LEFT TOP, RIGHT TOP, LEFT BOTTOM, RIGHT BOTTOM, EXTEND FROM H, EXTEND FROM V, COMPRESS TO H, COMPRESS TO V, WINDOW H, WINDOW V, WIPE TO CENTER, RANDOM, and WIPE TOP. FREQUENCY: Time between photos 5 SECONDS, 10 SECONDS, 30 SECONDS, 1 MINUTE or 30 MINUTES... - Page 10 Music: Display music information: file name, size, and resolution. ON/OFF JPEG INFO: Displays photo information: file name, size, and resolution. ON/OFF PLAY MODE: Cycles through photos in sequence or in a completely random manner. NORMAL/RANDOM...
-
Page 11: Picture Setup (Factory Settings In Brackets)
PICTURE SETUP (factory settings in brackets) BRIGHTNESS: 12 levels (6) CONTRAST: 12 levels (6) HUE: 12 levels, -6 to +6 (0) SATURATION: 12 levels (0) SHARPNESS: 8 levels (0) CLOCK SETUP DATE SETUP: Sets date (Year, Day and Month) 2000/01/08 TIME SETUP: Sets time (Military 24 hours) 13:28 ALARM SETUP: (option for selected models only) -
Page 12: Auto Power On/Off
AUTO POWER ON/OFF To activate this function the time must be set to turn the unit ON or OFF. Enter POWER OFF sub-menu by going to the main screen and select SETUP and ENTER. On the SYSTEM SETUP screen use the DOWN button and select CLOCK SETUP. - Page 13 TECHNICAL SPECIFICATIONS Memory Stick®(MS), Support Cards/USB MultiMediaCard™(MMC), Secure Digital™ (SD), USB Flash Drives JPEG, BMP, MP3 and MP4 Supported file formats 5.6” LCD Display 320 x 240 Resolution Full frame 4:3 Standard Aspect Ratio, Slide Viewing Modes Show, Thumbnail Note: when displays 16:9 photos with top and bottom of screen darkened Flip, Rotate, Zoom Image Effects...
- Page 14 continuously for a long time. But it is recommended not to show the same picture continuously for more than 1 month. 3) Q: What is the best picture resolution displayed on the screen? A: The frame’s best resolution is 320x240. 47) Q: Does it play every type of AVI and or MPEG4 videos? A: No.
- Page 15 Cleaning the LCD screen • Treat the screen with care. The screen a liquid crystal and can be easily scratched, broken or damaged. • For fingerprints or dust we recommend using a soft, non-abrasive cloth such as a camera lens cloth to clean the LCD screen.
- Page 16 Regulatory Compliance CE Declaration of Conformity Attestation RSH05080201-1, RSH06080201-2 We declare under our responsibility that the product is in conformity with the following standards EN55022:1998 (Radio Disturbance requirement of Information Technology Equipment) EN55024:1998 (Immunity requirement of Information Technology Equipment) EN61000-3-2:2000 (Limits for Harmonic Current Emission) As assessed by the following applications standards: 89/336/EEC Electromagnetic Compatibility This Product is produced by a manufacturing organization on...
- Page 17 • Reorient or relocate the receiving antenna. • Increase the separation between the equipment and receiver. • Connect the equipment into an outlet on a circuit different from that to which the receiver is connected. • Consult the dealer or an experienced radio/TV technician for help. Changes or modifications not expressly approved by the party responsible for compliance could void the user's authority to operate the equipment.
- Page 18 For additional information on recycling in the U.S.A, contact www.eiae.org (Consumer Education Initiative) Please find out about the local regulations on how to dispose of your old unit from your local municipality. Quantaray by Sunpak Tocad America Inc. 53 Green Pond Road Rockaway, NJ 07866, USA...
Need help?
Do you have a question about the 5.6” Digital Photo Frame and is the answer not in the manual?
Questions and answers
The light on the back of my digital frame is blinking red and it won’t turn on.