Audio Technica System 10 PRO Installation And Operation Manual
Digital wireless system atw-1301 unipak transmitter system atw-1301/l lavalier microphone system atw-1302 handheld microphone system atw-1311 dual unipak® transmitter system atw-1311/l dual lavalier microphone system atw-1312 unipak®/handheld
Advertisement
Quick Links
System 10 PRO
Digital Wireless System
Installation and Operation
UniPak
Transmitter System
®
ATW-1301/L
Lavalier Microphone System
Handheld Microphone System
Dual UniPak
Transmitter System
®
ATW-1311/L
Dual Lavalier Microphone System
UniPak
/Handheld Combo System
®
ATW-1312/L
Lavalier/Handheld Combo System
Dual Handheld Microphone System
ATW-1301
ATW-1302
ATW-1311
ATW-1312
ATW-1322
Advertisement

Summary of Contents for Audio Technica System 10 PRO
- Page 1 System 10 PRO Digital Wireless System Installation and Operation ATW-1301 UniPak Transmitter System ® ATW-1301/L Lavalier Microphone System ATW-1302 Handheld Microphone System ATW-1311 Dual UniPak Transmitter System ® ATW-1311/L Dual Lavalier Microphone System ATW-1312 UniPak /Handheld Combo System ® ATW-1312/L...
- Page 2 Under Industry Canada regulations, this radio transmitter may only operate using an antenna of Thank you for choosing an Audio-Technica System 10 PRO Rack-Mount a type and maximum (or lesser) gain approved for the transmitter by Industry Canada. To reduce digital wireless system.
-
Page 3: Installation
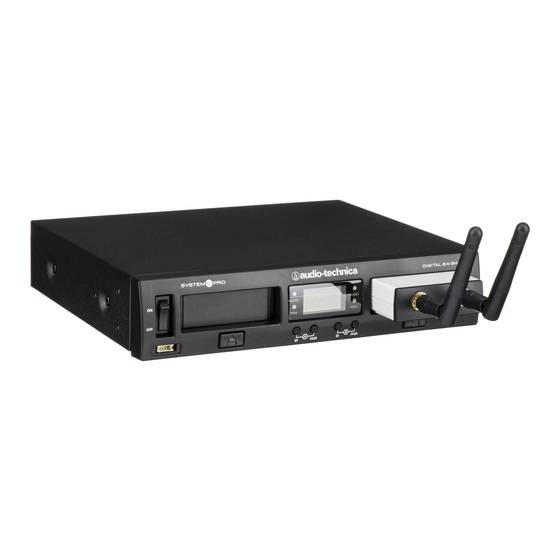
System 10 PRO Installation and Operation Installation the cord hook on the chassis to keep the plug from being accidentally dislodged. Plug the adapter into a standard 120 Volt 60 Hz AC power Receiver Unit Location outlet. The receiver chassis is equipped with a power On/Off switch. - Page 4 System 10 PRO Installation and Operation Figure B, C & D — Rear Panel Controls and Functions 1. RJ45 Connector: Use Ethernet cable (not included) to mount 6. Receiver Chassis Link IN/OUT Connector: Use included RJ12 cable receiver remotely up to 328' (100 m) from chassis.
- Page 5 System 10 PRO Installation and Operation ATW-RU13 Receiver Unit Controls and Functions Figure E — ATW-RU13 Functions 4. RJ45 Connector: Run Ethernet cable to chassis to mount receiver 1. Antenna: Attach antennas and angle them away from each other so remotely (cable not included).
- Page 6 System 10 PRO Installation and Operation ATW-T1002 Transmitter Setup Controls and Functions Battery Selection and Installation Two alkaline AA batteries are recommended. When inserting the batteries, observe correct polarity as marked inside the battery compartment. Power / Battery / Mute...
- Page 7 System 10 PRO Installation and Operation Microphone / Instrument Level Control Pairing Switch Screwdriver System ID Display Battery Compartment Figure H — ATW-T1001 UniPak Transmitter ® UniPak ® Transmitter Battery Installation 1. Slide off the battery cover. 2. Carefully insert two fresh AA alkaline batteries, observing polarity markings.
-
Page 8: System Operation
System 10 PRO Installation and Operation System Operation CAUTION! The small trimmer controls are delicate; use only the supplied screwdriver. Do not force the trimmers beyond their normal 190° range of rotation. Turn down the volume control for both receivers and the mixer/amplifier level before starting up the wireless system. -
Page 9: System Frequencies
System 10 PRO Installation and Operation Clearing Individual ID Pairings 4. While System 10 PRO has been designed to mount in a rack for convenient multi-system operation, please keep other wireless 1. Press the receiver’s System ID button to select the ID number you devices (including wireless systems and routers) away from System wish to clear. -
Page 10: Specifications
System 10 PRO Installation and Operation Specifications OvERALL SySTEM UNIPAk TRANSMITTER ® Operating Frequencies 2.4 GHz ISM band RF Output Power 10 mW Dynamic Range >109 dB (A-weighted), typical Spurious Emissions Following federal and national regulations Total Harmonic Distortion <0.05% typical... - Page 11 System 10 PRO Installation and Operation This page intentionally left blank.
- Page 12 System 10 PRO Installation and Operation Audio-Technica Corporation audio-technica.com ©2014 Audio-Technica P52551...
Need help?
Do you have a question about the System 10 PRO and is the answer not in the manual?
Questions and answers