Table of Contents
Advertisement
Advertisement
Table of Contents

Related Manuals for Genua genucard

Summary of Contents for Genua genucard
- Page 1 Quickstart Guide...
- Page 3 This Quickstart Guide provides an overview of the genucard Mobile Security Device's functionality, and how to use it. Copyright © 2013 genua mbh. All rights reserved Version 3.0 genua mbh Domagkstrasse 7 85551 Kirchheim/Munich Germany www.genua.de...
-
Page 4: Table Of Contents
Content What is the genucard?..........6 Scope of delivery............7 Ports................8 Installing the driver............. 10 Installing genucard............. 11 Web GUI..............12 Internet Connection............ 14 VPN Connection............16 Power Supply............. 18 Power Supply............. 18 LAN and DSL/PPPoE..........19 Internet Profile LAN............ 20... - Page 5 Internet Profile DSL/PPPoE........21 Using WiFi..............22 Internet Profile WiFi............ 23 Using USB Devices............ 24 Internet Profile 3G/USB Modem.........25 Using Bluetooth (Mobile Phone).........26 Internet Profile Bluetooth (Mobile Phone)....27 USB Update..............28 Using Smartcard............29 Technical Specifications..........31 LED Signals..............33...
-
Page 6: What Is The Genucard
The genucard Mobile Security Device enables secure, fast, and easy connections from your laptop/PC via the Internet to your company network. genucard is equipped with a firewall to handle all connections, as well as a VPN gateway to strongly encrypt data communication. -
Page 7: Scope Of Delivery
Scope of delivery 1x genucard 2 x USB cable (Micro USB to Type A) -
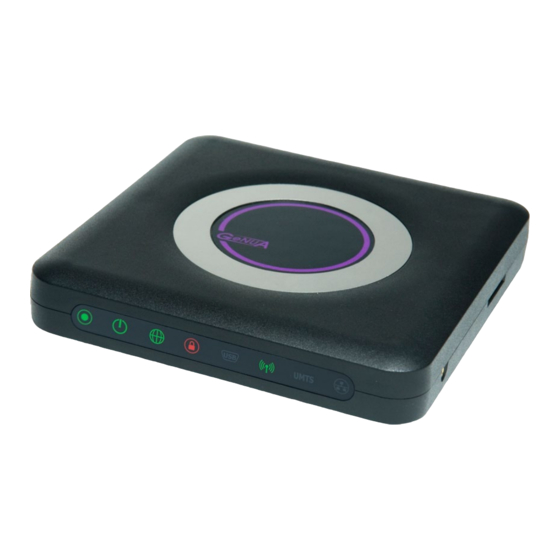
Page 8: Ports
Ports... - Page 9 Reset button USB port (modems, Bluetooth sticks, software update and installation) Network interface Micro USB data connection to the laptop Micro USB power socket 3G SIM card port Smartcard port Attachment for external 3G antenna Attachment for external WiFi antenna...
-
Page 10: Installing The Driver
Installing the driver Windows Vista und Windows 7: The driver already is included in the operating system. genucard is detected as an RNDIS Internet Sharing Device. Windows XP: Windows XP also provides RNDIS drivers. However, a current version of ActiveSync needs to be installed. -
Page 11: Installing Genucard
Installing genucard 1. Insert the USB stick with the installation file in USB port on the genucard. (This step is not needed if the system administrator already has performed the installation.) 2. Connect the genucard USB interface to the laptop with the included USB cable. -
Page 12: Web Gui
Web GUI 1. To use genucard, log in to the Web GUI by entering the following URL in your Web browser: http://my.genucard... - Page 13 2. Enter your username and password, and click on "Login". The genucard GUI will now let you establish Internet and VPN connections.
-
Page 14: Internet Connection
Internet Connection 1. To establish an Internet connection via genucard, first choose the correct Internet profile in the dropdown menu "Internet","Select Internet connection". - Page 15 2. Click on the button "Connect". A green check mark will be displayed in the status field once the Internet connection has been established. 3. Click on the button "Disconnect" to terminate the connection.
-
Page 16: Vpn Connection
VPN Connection 1. First check if there is an established Internet connection via the genucard. 2. To establish a VPN connection via genucard, choose the correct VPN from the dropdown menu "VPN","Select VPN connection". - Page 17 3. Click on the button "Connect". A green check mark will be displayed in the status field once the VPN connection has been established. 4. Click on the button "Disconnect" to terminate the VPN connection.
-
Page 18: Power Supply
Power Supply Important: Be sure to have adequate power before using WiFi or 3G. To do so, attach the Data and Power connections to your laptop. Alternatively, the optional power supply can be plugged into the power connection. See page 33/34 for LED signals. -
Page 19: Lan And Dsl/Pppoe
LAN and DSL/PPPoE 1. The genucard already is attached to your laptop. 2. Insert the LAN cable into the genucard port. -
Page 20: Internet Profile Lan
Internet Profile LAN To set up a LAN Internet profile, the following information is necessary (unless DHCP is used): -- genucard IP address and prefix (e.g. 192.168.0.101/24) -- Optionally: Default IPv4 gateway DNS server -- If specified by the system administrator:... -
Page 21: Internet Profile Dsl/Pppoe
Internet Profile DSL/PPPoE To set up a DSL/PPPoE Internet profile, the following information is necessary: -- If required by your Internet provider: Username Password -- If specified by the system administrator: MTU (Maximum Transmission Unit) -
Page 22: Using Wifi
Using WiFi To use WiFi, the genucard must be attached to your laptop with both Micro USB cables (Power and Data). -
Page 23: Internet Profile Wifi
Internet Profile WiFi To set up a WiFi Internet profile, the following information is necessary: -- If you intend to use encrypted WiFi: Password -- If the WiFi network cannot not be automatically detected: SSID -- If specified by the system administrator: MTU (Maximum Transmission Unit) -- If an additional login (WISPr) for a WiFi Hotspot is required, you will be prompted for the username and... -
Page 24: Using Usb Devices
Bluetooth stick. 1. Attach the genucard Data and Power interfaces to your laptop using the provided Micro USB cables. 2. Insert the USB device in the genucard USB port... -
Page 25: Internet Profile 3G/Usb Modem
Internet Profile 3G/USB Modem To set up a USB Internet profile, the following information is necessary: -- If the mobile phone is attached via USB: no further information needed -- To use the builtin 3G module: Username Password Phone Number -- 3G (integrated modem): SIM PIN Access Point Name... -
Page 26: Using Bluetooth (Mobile Phone)
Using Bluetooth (Mobile Phone) 1. The genucard is attached to your laptop via both Micro USB cables. 2. Insert the Bluetooth stick in the genucard USB port. 3. Activate Bluetooth on your mobile phone. Provided that genucard supports your mobile phone, the devices will be linked after setting up the Bluetooth profile. -
Page 27: Internet Profile Bluetooth (Mobile Phone)
Internet Profile Bluetooth (Mobile Phone) To set up a Bluetooth Internet profile, the following information is necessary: -- Whether your phone uses the connection type DUN or -- If required by your Internet provider: Username Password Phone Number Dialin String -- If specified by the system administrator: MTU (Maximum Transmission Unit) -
Page 28: Usb Update
USB Update 1. The genucard is connected to your laptop and booted. 2. Insert the USB stick with the update configuration file in the genucard. 3. The update will start automatically. During update, the System LED will blink red and green. -
Page 29: Using Smartcard
Using Smartcard genucard can be used with a Smartcard to securely store private keys. 1. Remove the small chip card (ID-000 format) from the large chip card (ID-1 format) and insert it in the genucard Smartcard slot:... - Page 30 GUI. 3. Successively entering an incorrect PIN three times will lock the genucard! You will need the PUK to unlock it again. 4. The Web GUI will display an error message if an incorrect PIN is entered.
-
Page 31: Technical Specifications
Technical Specifications CPU: PowerPC: Freescale MPC5121e Memory: 256MB SDRAM + 128MB NAND Flash Netzwerk: 1x 10/100 MBit (RJ45) USB Host: 1x Typ A (Flash firmware, ext. Modem) SIM Slot: SIM card adapter ID-000 format USB Power: 1x Micro B USB Data: 1x Micro B Smartcard Slot: SmartCard (SIM format, key storage) - Page 32 Ext. antenna attachments: 1x 3G, 1x WiFi Case measurements: 11 x 11 x 2 cm Protection rating: IP 20 Temperature range: 0-50 (during operation) -20-70 (during storage) Humidity: 20-80% (during operation) 10-80% (during storage) Altitude above sea level: max. 2000m (during operation) max.
-
Page 33: Led Signals
Bootloader being loaded green (slow) blinking: Configuration being loaded red/green blinking: Configuration/update being applied. Do not remove genucard from laptop while updating! Internet LED green blinking: Network connection being established orange blinking: WISPr authentication... - Page 34 VPN LED green blinking: Connection being established green steady: VPN connection established USB LED green steady: USB connected WLAN, 3G, LAN green steady: Interface is active green blinking: Data is being exchanged All LEDs red blinking: genucard is not configured...
- Page 36 www.genua.de...
Need help?
Do you have a question about the genucard and is the answer not in the manual?
Questions and answers