Table of Contents
Advertisement
Advertisement
Table of Contents

Summary of Contents for IqON IOS 100HD
- Page 1 User’s Manual IOS 100HD IOS 200HD IOS 300HD...
-
Page 2: Table Of Contents
------------------------------------------------------------------------------------------------------------ 23 5. Parental Control -------------------------------------------------------------------------------------------------------- 23 6. Network ------------------------------------------------------------------------------------------------------------------- 24 IV. Basic Operation -------------------------------------------------------------------------------------------- 25 1. Turning your IQON on and off ---------------------------------------------------------------------------- - 25 2. Service selection ------------------------------------------------------------------------------------------------------- 25 3. Switching Channel ----------------------------------------------------------------------------------------------------- 25 4. Controlling the volume ------------------------------------------------------------------------------------------------ 26 5. - Page 3 IqON User’s Manual 12. Electronic Program Guide - EPG ------------------------------------------------------------------------------------ 33 13. Time Shift --------------------------------------------------------------------------------------------------------------- 34 14. Recording -------------------------------------------------------------------------------------------------------------- 35 15. Playing back a recording --------------------------------------------------------------------------------------------- 38 16. Managing Recording File -------------------------------------------------------------------------------------------- 39 17. Media Player ------------------------------------------------------------------------------------------------------------ 39 18. Plug-ins ------------------------------------------------------------------------------------------------------------------- 40 19.
- Page 4 IqON User’s Manual 2-5. Factory Reset ----------------------------------------------------------------------------------------------------- 62 2-6. Software Management ----------------------------------------------------------------------------------------- 62 3. System Information ---------------------------------------------------------------------------------------------------- 63 4. Update the software --------------------------------------------------------------------------------------------------- 64 4-1.USB Update -------------------------------------------------------------------------------------------------------- 65 4-2.Internet Update ---------------------------------------------------------------------------------------------------- 65 VI. Troubleshooting ------------------------------------------------------------------------------------------- 66 Specifications VII. -------------------------------------------------------------------------------------------- 67...
-
Page 5: Before Initial Operation Of The Receiver
1. Safety instructions Please read the safety instructions completely and carefully, before using the IqON. The Manufacturer takes no responsibility for damages as a result of incorrect handling of the IqON. 1.1 Connecting Power • This product operates only in the range of AC 100V~240V and 50Hz/60Hz. Please check first your power supply to see if it fits this range. - Page 6 IqON User’s Manual 1.7 Location • Place the product indoor. • Do not expose the product to rain, sun or lightening. • Do not place the product near any heat appliances as a radiator. • Ensure that there is more than 10 cm distance from any electrical devices & wall.
-
Page 7: Main Features
IqON User’s Manual 2. Main Features 2.1 IQON • HD DVB-S/DVB-S2 Satellite Twin Tuner. • Supporting MPEG-4, H.264 & MPEG-2 Compliant. • 405MHz Dual Core Broadcom MIPS Processor. • 2Gbit NAND Flash & 3Gbit DDR RAM. • Advanced Linux Operating System. -
Page 8: Ios 200Hd
IqON User’s Manual 2.2 IOS 200HD • HD DVB-S/DVB-S2 Satellite Twin Tuner. • Supporting MPEG-4, H.264 & MPEG-2 Compliant. • 405MHz Dual Core Broadcom MIPS Processor. • 2Gbit NAND Flash & 3Gbit DDR RAM. • Advanced Linux Operating System. • Full HD 1080p via HDMI. -
Page 9: Ios 300Hd
IqON User’s Manual 2.3 IOS 300HD • HD DVB-S/DVB-S2 Satellite Tuner. • Supporting MPEG-4, H.264 & MPEG-2 Compliant. • 405MHz Dual Core Broadcom MIPS Processor. • 2Gbit NAND Flash & 3Gbit DDR RAM. • Advanced Linux Operating System. • Full HD 1080p via HDMI. -
Page 10: Packaging Contents
IqON User’s Manual 3. Packaging Contents Please ensure that the following items are included with the receiver in our packing. • User Manual • Power cord (IOS 200HD : Apaptor) • SATA Cable (IOS 200HD) • Remote Control • AAA X 2 batteries... -
Page 11: Product Descriptions
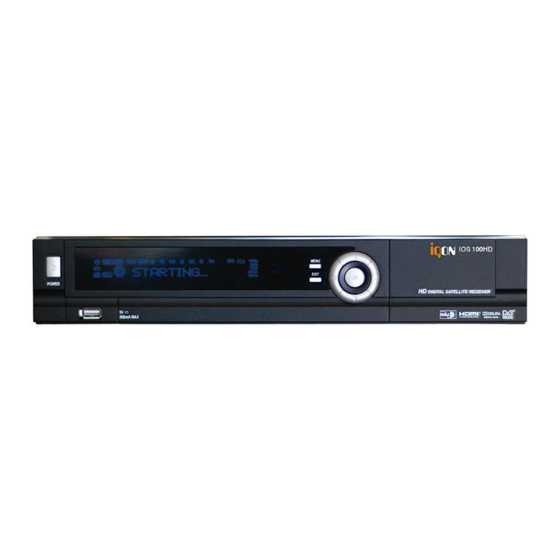
IqON User’s Manual 4. Product Descriptions 4-1. IQON ◆ Front Panel 1. Power : Switch between operation and standby modes. 2. USB 2.0 Port : Connect to the External HDD or USB storage with USB cable. (Max. 500mA) 3. Display (VFD) : Display current menu information and channel name etc. -
Page 12: Rear Panel
7. Ethernet : Communication port via HTTP, FTP, NFS, Telnet and Samba to access your Hard Drive or to upload channel lists. This is also used to update IQON's software. 8. 2x USB 2.0 Port : Connect to the External HDD or USB storage with USB cable (Max. 500mA). -
Page 13: Ios 200Hd
IqON User’s Manual 4-2. IOS 200HD ◆ Front Panel 1. Power : Switch between operation and standby modes. 2. Display (VFD) : Display current menu information and channel name etc. 3. Channel Up/Down Button : Navigates through the scanned channel list. - Page 14 IqON User’s Manual ◆ Rear Panel 1. LNB 1 IN : 1st satellite tuner input from the LNB on a dish antenna. Turn the receiver OFF first before connecting. 2. LNB 2 IN : 2nd satellite tuner input from the LNB on a dish antenna. Turn the receiver OFF first before connecting.
-
Page 15: Ios 300Hd
IqON User’s Manual 4-3. IOS 300HD ◆ Front Panel 1. Power : Switch between operation and standby modes. 2. Up/Down Button : To move cursor up/down in menu mode or to call up channel list in live mode. 3. Left/Right Button : To move cursor left/right in menu mode. - Page 16 IqON User’s Manual ◆ Rear Panel 1. LNB INPUT : Satellite tuner input from the LNB on a dish antenna. Turn the receiver OFF first before connecting. 2. S/PDIF : Connect with an appropriate optical cable to your HiFi-Amplifier or DSP. The AC3 signal is also available at this port in case the selected channel transmits Dolby Digital signals.
-
Page 17: Remote Control Unit (Rcu)
1. MUTE : Mutes or unmutes the audio temporarily. 2. POWER : Switches between operation and standby. 3. HELP : Displays major important operation methods of IqON. This provides users with a quick guide of using IqON. 4. HOME : Instantly moves to the top of the menu list. - Page 18 IqON User’s Manual 21. INFO : Displays the Electronic Program Guide (EPG) information if provided. 22. NUMERIC KEY (0~9) : Control the numerical operation and change the Channel/Service number directly. 23. PREV (<) : Return to the previous channel/service or move to the end of the Service List or the Play List.
-
Page 19: Installation
IqON User’s Manual II. Installation This chapter will guide you through the whole installation process. Please read each section carefully to make sure the system run properly. 1. Connecting TV, Audio, and Antenna 2. Connecting your TV to the receiver ●... -
Page 20: Connecting Your Hi-Fi Audio To The Receiver (Optional)
RCA audio port on your IQON. ● If you have digital audio equipment, you can connect it to Receiver using S/PDIF. - Plug in the appropriate cable to the S/PDIF port on your IQON, and then connect the other end to your digital audio equipment. -
Page 21: Start Wizard
You will be shown different video output modes for roughly 10 seconds, after you have connected and switched on your IQON. Once you see a clear picture on your TV screen press the OK button to select it. If you prefer a different output than the selected one you can use the Navigations buttons up/down and the OK button to select it. -
Page 22: Configuring Satellite Connection
The start wizard takes you through the basic setup of your IQON. Press the OK button on your remote control to get to the next step. You will be asked if you want to set the basic settings for your IQON now or if you want to quit the start wizard. -
Page 23: Service Scan
IqON User’s Manual • Toneburst A/B This option is used if you want to receive two satellites using a Toneburst switch. • DiSEqC A/B This option allows you to configure two satellites in Port A and Port B. • DiSEqC A/B/C/D This option allows you to configure four satellites in Port A, Port B, Port C and Port D. -
Page 24: Basic Operation
Use the power button to turn your IQON on and off. To put your IQON into standby mode either press the power button on your remote control or directly on your IQON. The current time will be shown in the IQON’s VFD display(on IOS 100/200HD only). -
Page 25: Service Selection
•Deep Standby: Puts your IQON into deep standby mode. 2. Service selection Pressing the CH up/down buttons on your IQON remote control will take you to the previous or next service. Pressing the 0 will enable you to skip back and forth between the two most recently watched services. -
Page 26: Tv/Radio Switching
IqON User’s Manual Pressing the MUTE button mutes the volume. A crossed speaker symbol will appear on the screen. 5. TV/Radio switching Pressing the TV/RADIO button activates the TV/RADIO Mode. 6. Program Information (Infobar) The Infobar appears and disappears by pressing the OK button once, if no OSD menu is shown on your screen or when you change channels. -
Page 27: Changing The Audio Track
IqON User’s Manual 7. Changing the audio track Press the AUDIO button and Up/Down, Left/Right keys on the remote control to select the audio track and audio mode (mono right/left, stereo). 8. Subtitles You can view the subtitle of the current program if the program provides the subtitle. - Page 28 IqON User’s Manual • VOLUME + If you want to enlarge the page, press VOLUME + button. • VOLUME - If you want to reduce the page size, press VOLUME – button. Teletext configuration menu: If the Teletext page 100 is shown you can press the MENU button to enter the Teletext configuration menu.
-
Page 29: Channel List
IqON User’s Manual • Transparency: Here you can adjust the transparency value of your Teletext. Press the Navigation buttons left or right to adjust the alpha value. • National characterset: automatic recognition = on/off The national code page detection is used to display the teletext pages with the right letterset for your location. - Page 30 IqON User’s Manual • Use the Navigation buttons up/down to select the desired service and press the Menu button to open the “Channel list menu”. • Navigate to the option “show transponder info“ and press the OK button.. 11.2 Add to parental protection •...
- Page 31 IqON User’s Manual you will get a list of your bouquets afterwards. • You can choose to which bouquet you want to add the currently selected service. • If you are using only one bouquet which is the factory default, the service will be added to you favorites list.
-
Page 32: Electronic Program Guide - Epg
IqON User’s Manual • Navigate to the option “remove entry”. • The selected service will be deleted from your favorites list. 11.8 Moving a service to favorite • Pressing the Up/Down buttons on your remote control activates the service list. - Page 33 IqON User’s Manual 12-1. Multi-EPG EPG Table displays the program information of each channel based on the date and time. You can look up the programs and make reservations. • Press the EPG or INFO button to display EPG table.
-
Page 34: Time Shift
IqON User’s Manual 12-2. Single In this view you are supplied with detailed information about the currently selected channel’s programming. • Pressing the Blue buttons on your remote control activates the blue panel. • Navigate to the option "Cool Single Guide". -
Page 35: Recording
The Timeshift mode can be end by pressing the Stop button. 14. Recording IQON is a Personal Video Recorder with two integrated DVB-S2 tuners. You can record multiple programs at the same time. There are two ways to operate and manage recording. - Page 36 IqON User’s Manual Switch to the service which recording you want to stop. Press the Record button, select the "Stop recording" option and press the OK button to select. If you only have one active recording it will be stopped immediately.
-
Page 37: Playing Back A Recording
IqON User’s Manual NOTE : Your IQON will be turned on 5 minutes before the recording if a recording is supposed to start while the IQON is in Deep-Standby mode. Manual programming Press the Green options button to add a new timer. -
Page 38: Managing Recording File
IqON User’s Manual 15-1. Playback of a recorded program Press the List button to get to the selection of recordings. Use the Navigation buttons up and down to select a recording. Press the OK button to start playing it. During replay you can see the control symbols in the Inforbar. -
Page 39: Media Player
- Settings 17. Media Player IQON is truly a multimedia receiver capable of playing media contents. Using Media Player, you can enjoy Music, Photo and Video contents stored on the internal HDD and/or a USB memory stick plugged into IQON. -
Page 40: Sleep Timer
IqON User’s Manual 19. Sleep Timer Using the sleep timer you can put your IQON into standby or turn it off after a predetermined amount of time. Press the Main menu -> Standby/ Restart and select the option “Sleep Timer”. -
Page 41: Setup
6. Software management 2-1. Service Searching : Here you set up the tuners of your IQON and run channel scanning automatically or manually. 2-1-1. Tuner configuration : If you run the First Time Installation process (refer to the page 22~23), the Tuner A and B are already configured. -
Page 42: Automatic Scan
IqON User’s Manual If default service lists are not available, you can run the service scan automatically or manually to add TV and radio channels to the channel list of your IQON. 2-1-3. Automatic Scan : The easiest way to scan services is to use Automatic Scan. In the Automatic Scan menu, there are two options to choose from as below. -
Page 43: System Configuration
Here you have two options for YES and NO. NO is used to scan the transponder (TP) based on the data that your IQON currently has. YES is used to scan the TP not just based on the existing TP data but also using new TP data, if there is TP data newly transported from the TP. - Page 44 IqON User’s Manual - HDMI : If you have connected your TV to the HDMI output of your IQON set the “Output type” option to HDMI. - YPbPr : If you have connected your TV to the YPbPr output (component cable) of your IQON set the “Output type”...
-
Page 45: Video Enhancement Settings
IqON User’s Manual - Letterbox : 16:9 programs will be displayed on 4:3 TV’s with black beams at top and bottom. - Pan&Scan : 16:9 programs will be zoomed to full hight on 4:3 TV’s, parts of the picture on the left and right side will cut off. - Page 46 IqON User’s Manual can see a flashing symbol of a satellite dish on your screen if you set this option to “yes”. • Enable multiple bouquets : Services may be grouped in bouquets. If this option enabled, you can use more then one bouquet.
-
Page 47: Record
: Allows AIT data to be included in http streams. • Include ECM in http streams : This allows the ECM data to be included in the stream. This enables a client IQON to decode it. 2-2-4. Record In this menu you will find various record options. -
Page 48: Audio Language Selection
IqON User’s Manual : Allows you to use the original position of the teletext subtitle. • Rewrap teletext subtitles : Allows you to activate rewrapping of the teletext subtitle. • Custom test position : Allows you to set the position of the teletext subtitle.. -
Page 49: Rf Output
IqON User’s Manual : If set to "yes" the STB will use the audio stream that has been used earlier. • Allow subtitle equals Audio mask : Allows displaying subtitle that equals the chosen audio. • Allow hearing impaired subtitles : Allows displaying the special hearing impaired subtitles. -
Page 50: Network
The features you can stop/start are: FTP, NFS, VPN, Samba and etc.. IQON is integrated with standard 10/100Mbps Ethernet with RJ 45 connector standard. You are recommended to use this network capability of IQON to fully enjoy the system. • Adapter settings - Use interface : "YES"... - Page 51 DNS is used to translate a Domain name to an IP address. Normally, if the Type is set to LAN, there is no need for a DNS entry. If the IQON is connected to the Internet over a router, enter the router’s IP address here.
- Page 52 – 4D. 9. Press OK. • Network Browser IQON can find other devices on the network, enter them and view multimedia content sharing. 1. Select Network Browser and press OK. 2. Your IQON will scan your Local Area Network and discover any PC or IQON available.
-
Page 53: Input Devices
(repeat and delay settings). 2-2-11. Display Setup There is a 12 character VFD display on the front panel of IQON. This display shows various information like the current menu, channel, HD icon, and so on. You can adjust the brightness of this display using this menu. -
Page 54: Keyboard
IqON User’s Manual display using Left/Right key when the set is in standby mode. 2-2-12. Keyboard Map On this screen you can define what type of keyboard you are using. 2-2-13. Recording Paths Configure your recording paths. By using "only" one Storage device, no changes is needed. -
Page 55: Language
You can set your time zone in this menu. Using Left/ Right key, you can find a time zone that you want to use for your IQON. After selecting a time zone, press Green to confirm and save the changed setting. -
Page 56: Timeshift Settings
IqON User’s Manual 1. Open the CrossEPG menu. 2. Select configure and press OK. 3. Make sure you have a USB stick or HDD attached for EPG data storage. Using left & right buttons set the storage device to HDD or USB. Other settings in this screen can remain as default for the purpose of this guide. - Page 57 (or instant timer record) is. This saves resources because not run two shots at once (timeshift and timer), and is particularly interesting for IQON boxes that are so overwhelmed sometimes turn 2 HD footage simultaneously and the recording is broken.
-
Page 58: Skin
2-3. Common Interface (in available model only) To be able to watch CAS channels, you need to have a proper CAM and a Smartcard. If you have CAM modules, keep them inserted in your IQON, it will reduce the trouble of changing CAM. 2-4. Parental Control... - Page 59 IqON User’s Manual If you want to prevent certain channels from being accessed by others, you can do so using this menu. Set the “Enable parental control” option to yes. Under the “Parental control type” option you can choose between a blacklist and a whitelist.
-
Page 60: Factory Reset
If you want to erase all installed service list as well as all configurations, run the Factory Reset process. Upon the completion of factory reset process, your IQON will reboot automatically and start the First Time Installation process. NOTE : If you do this factory reset, all of your configuration data including bouquets, service lists, satellite parameters, and so on will be erased. - Page 61 IqON User’s Manual A. Press OK button to make a image backup and you will prompted with a confirmation box. B. Press "Yes" and the backup process will start. C. This will take a few minutes to process and once done you will see the finished screen.
-
Page 62: System Information
: Edit the upgrade source address. 3. System Information If you want to check the H/W or S/W system of your IQON, this is the menu that you need to use. Also, here you can check very detailed information of a specific service. -
Page 63: 4-2.Internet Update
4.1.2. Unzip the upgrade files( \update\ folder) into memory stick 4.1.3. Insert memory stick into front USB slot on the IQON. 4.1.5. AC power off and on IQON and follow the on screen instructions. - If you press OK(or channel Up) button on front panel, it will start updating. - Page 64 IqON User’s Manual 4.3.3 If you press OK on the update file, it will download the file on the \tmp folder. 4.3.4 Press “Yes” on the update start. 4.3.5 After completion of update, STB will reboot automatically.
-
Page 65: Troubleshooting
• Check if there is a conflict between recording timer. 7. Noise • IQON has an integrated FAN. This may create a noise but is inevitable to make sure the safety of the product. • Also, when HDD is running, you may hear a noise. -
Page 66: Specifications
IqON User’s Manual VII. Specifications... - Page 67 IqON User’s Manual == Thank you==...
Need help?
Do you have a question about the IOS 100HD and is the answer not in the manual?
Questions and answers